When I used to work at a coffee shop I was always very appreciative of people who brought their own reusable mugs or cup sleeves. We went through a mind-boggling amount of those every day and it was so nice to see people care about reducing waste.
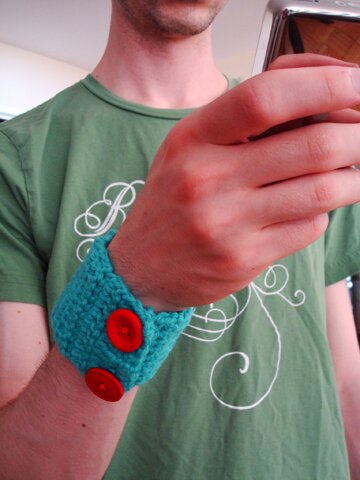
And Mike likes to wear wrist cuffs — he claims that it keeps him warm in his freezing office. But it probably didn’t keep him warm enough because he needed to periodically head downstairs for cups of hot tea at the coffee shop.
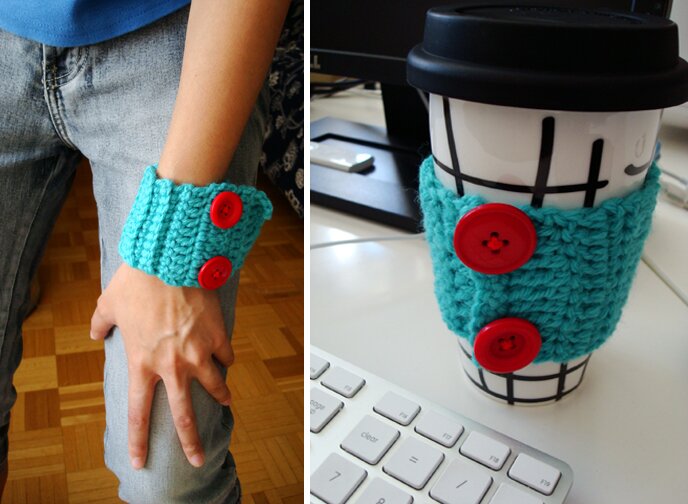
The problem of over air-conditioning aside, I thought it would be fun to combine wrist cuff and cup sleeves! I also conveniently made this up for a beginner’s crochet workshop, so I tried to be as simple and straightforward as possible. There’s no buttonhole or anything complicated. But if you’re up for more challenge, I saw this reeeeeally nice beer bracelet pattern on Crochet by Faye — I’d like to try that out myself one day!
I find this website helpful when learning with videos of crochet stitches.
Here’s what I did:
Materials /Â tools:
Small amount of worsted weight yarn
2 large buttons (mine were about 1″ in diameter)
Needle and thread
5mm hook
A coffee cup for size-testing
Row 1: I made 9 chains (ch). You can make more or fewer ch if you want your cuff to be wider or narrower.
Row 2: ch 2, single crochet stitch (sc) in the 3rd stitch from hook, sc in each ch across.
Row 3: ch 3, turn (see instruction for turning chain). Skip first sc, double crochet stitch (dc) in each sc across. Place last dc in ch 2 from row below (the ch 2 counts as an sc stitch).
Row 4 and on: Continue to make rows of sc or dc or both until cuff is long enough to wrap around wrist.
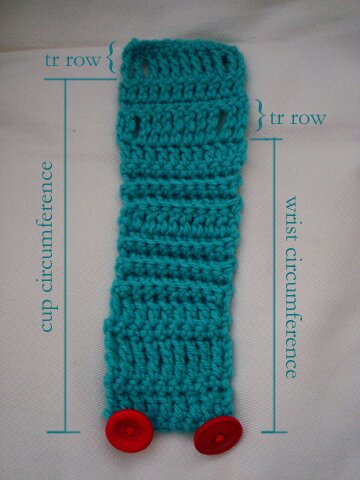
When cuff is long enough to wrap around wrist: ch 4, turn. Skip first stitch, triple crochet stitches (tr) across. This row serves as button holes for wrist cuff.
Continue to make a couple more rows of sc and dc until the cuff is long enough to wrap around the cup.
When cuff is long enough to wrap around cup: ch 4, turn. Skip first stitch, tr across. This row serves as button holes for cup sleeve.
Next row: ch 1, turn. Skip first tr, sc in each tr across. Fasten off.
Note: it’s better to make it a bit too short than a bit too long, it will stretch over time.
The diagram below may give you an idea of the construction…
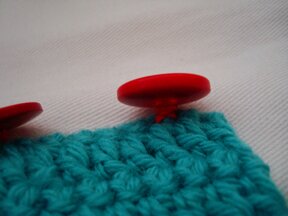
Finally, sew buttons on the first sc row. When sewing button on thick fabric (such as something crocheted), I find this instruction from Wiki How useful:
For buttons that get heavy use, try wrapping the long thread of the needle tail around the threads that hold the button, at least 4 or 5 times, tightly, then force the needle and thread through the tight bunch of threads that you have created. Try pushing the needle parallel to the the button’s holes, to avoid resistance. Use a thimble for pushing the needle. (The reason for this is simple: thread wear will cause the button to fall off sooner, unless you wrap the exposed threads with a protective wrap.) Once you have forced the needle through, push it back into the cloth, and tie it off with the long tail that you left at the starting knot.
This is how the sewn buttons would look:
Depending on who you’re making this cuff for, the tr row for the wrist may not be necessary. You see, apparently Mike’s wrist is the same size as the coffee cup…
I happen to have ridiculously small wrists due to Asian genes, so I needed the cuff to be adjustable. Anyway. I hope this is not too confusing. If you have any question, feedback or comment please feel free to drop me a note! And I hope you enjoy the cooler evening and hot drinks as our hemisphere welcomes the arrival of fall!


I totally had this idea when I was walking to get a chai the other afternoon. So glad you had it too, so I don’t have to figure out for myself how to implement it! :) Thanks for the tutorial! I’m about halfway through making one. I’m even using the same colors, because they are my absolute favorite right now!
ooh, great minds! :D glad you like the pattern!
You want to see what the completed cuff looks like? http://emilyflippinmaruna.wordpress.com/2012/01/03/a‑not-too-tough-cuff/
On the wrapping of the button thread — my sewing teacher actually taught us to do this with buttons way back in 1986:) I have always done it this way and it reinforces the buttons beautifully:)
I’m making one of these in grey right now. I think I shall make a few — I love pretty and short (and useful!) projects:)
Ya know, I don’t think I will need to put two sections for the buttons as I have a fat wrist so I can probably make it work for a cup and myself as a cuff without needing an extra button setting LOL:)
thank you for trying this out! actually many people have commented that they only need one button section for both the cuff and the cup sleeve :)
Here’s the finished one! (and another in the background)
http://www.ravelry.com/projects/Taxandria/cuff—sleeve
It’s not quite as nice as yours but I’m just proud of myself because I only learned how to crochet 2 weeks ago:)