Update Nov. 30/2020: I’ve received quite a few comments and questions regarding this pattern since it’s been published. It is not a beginner’s pattern. A few folks are fine with the written pattern and few photos, and some folks requested more clarifications. I apologize that I’m not a professional pattern designer, my patterns have not been tested by others (though this one was repeatedly tested by me), I don’t have the time or know-how to make videos, I write pattern and instruction to the best of my ability in the clearest way in my understanding and offer them for free. I do acknowledge that the photos in this particular pattern is admittedly lacking. I’m sorry about this, and if I do make another hat this winter, I will retake/replace the photos. Working and studying full-time currently means that at this point I don’t have the time nor capacity to respond extensively to inquiries about how to make this hat. And a lot of times I cannot decipher what is going wrong in the ways that people describe them without seeing the pieces and showing people what to do in person. So it means that at times it is simply impossible for me to help people out. Going forward I will support and clarify to the best of my ability, but my responses may be delayed. I contemplated taking this pattern down altogether because it sounds like it’s been causing a lot of frustration for people. But I thought I’d still leave it up for folks who find it useful. Thank you for visiting. Â
I’ve made quite a few of these hats with crochet slip stitch. I like that they’re made slowly.Â
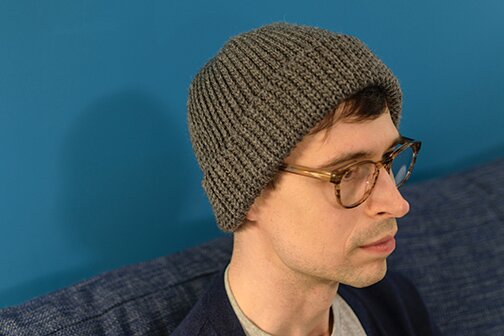
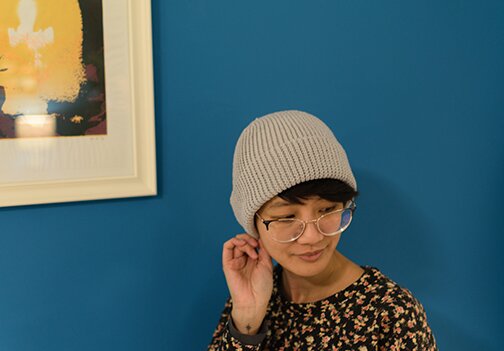
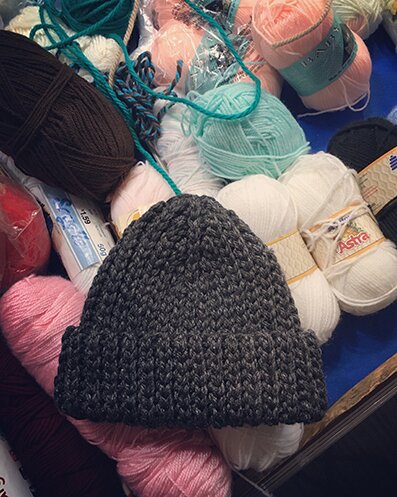
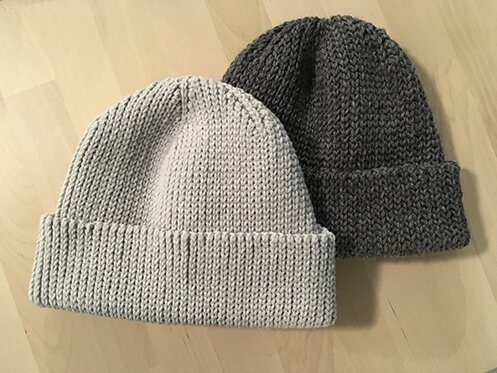
I’m going to attempt to write the pattern for 3 different yarn weights, so it’s versatile for whatever yarn you have on hand. They all make a hat that is 19″ around and 11″ in length (with brim unfolded). The stitch is quit stretchy so it will fit most I think. Here’s the worsted weight version on me.

And the worsted weight version on Mike (I have a smaller head than he does).
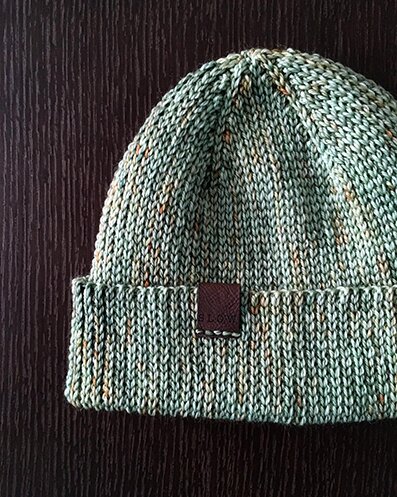
This is the sport weight version.
After testing the sport weight version with a leftover skein of acrylic yarn, I treated myself to a skein of merino hand-dyed by Toronto Yarn Hop co-organizer Emily Gillies. She has a range of beautiful colours, and one skein of merino sport is perfect for making one hat.Â
I made the hat in blue spruce (pictured here, in first photo, and in process photos below). The wonderful custom vegan tag is by Millie Marty Co. in Belleville, ON.
The hat can also be made more quickly in bulky yarn. I tested it while attending the Warming Toronto event (an afternoon of hanging out with great folks at a local pub while making hats, scarfs and mittens for distribution at emergency shelters in the winter). And this hat took about 3.5 hours to make.
Dimension of all three versions (sport, worsted, bulky): 19″ around, 11″ in length with brim unfolded.Â
Suggested yarn:
Sport — Merino Sport by Emily Gillies, 1 skein, 282 yards
Worsted — Patons Classic Wool Worsted, 2 skeins, 210 yards each
Bulky — Patons Shetland Chunky, 2 skeins, 148 yards each
Pattern:
Instructions are for sport weight (worsted and bulky in parenthesis).
The turning ch does not count as a stitch.
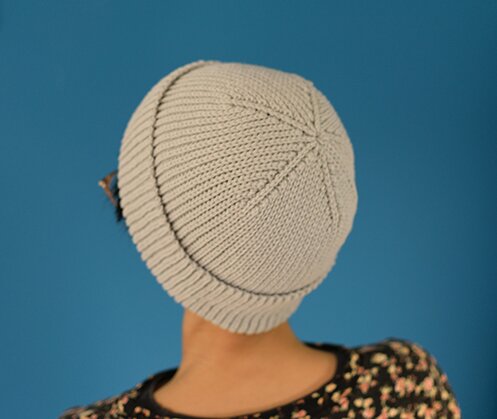
The hats are made with slip stitch in black loop only (BLO), made sideways with short rows for crown shaping, then seamed at the back with slip stitch (or sewing).
Crochet loosely, otherwise it can be difficult to get the hook into the slip stitches.
The hat can be made wider with one or two additional short rows, and longer with additional stitches in the beginning chain (makes for a wider brim).
Hooks:Â
Sport — 5.5 mm
Worsted — 6.5 mm
Bulky — 10 mm
Row 1 (setup row): ch 55 (40, 33), sl st in second ch from hook, sl st in each ch to end.
First set of short rows:
Row 2: ch 1, sl st in each st until there is one st left, skip remaining st, turn.
Row 3: ch 1, skip first st, sl st in each st to end.Â
Repeat rows 2 and 3 six (four, three) more times.
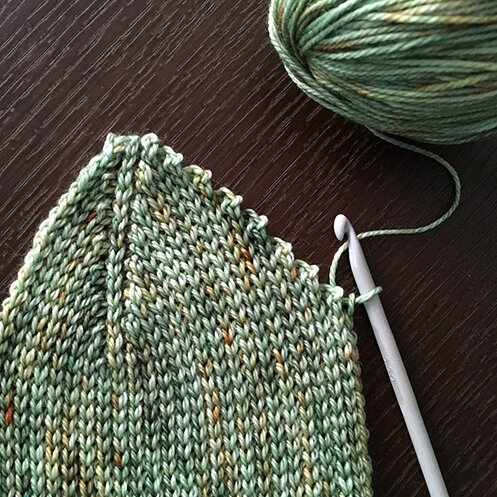
Next row: ch 1, sl st in each st. At this point the piece will look like this.
Continue on and sl st into each end of the short row and the space in between each row — 14 (10, 8) stitches across the short rows, then sl st in the remaining last stitch from row 2. The piece will now look like this.

Next row*: ch 1, sl st in each st to end.
Second set of short rows:
Row 1: ch 1, sl st in each st until there are 14 (10, 8) stitches left in the row, turn.
Row 2: ch 1, sl st in every st to end.
Row 3: ch 1, sl st in every st, then sl st in the next two st in the row marked with * (the row made before row 1 of the second set of short rows), turn.
Repeat rows 2 and 3 six (four, three) more times.
Next row: ch 1, sl st in every st to end.
Repeat first and second sets of short rows four more times. Don’t fasten off.
Crochet seam together right side out. Turn inside out. Weave yarn through each stitch in crown opening, cinch and tied off. Weave in ends. Turn right side out. Fold up brim. Â
Happy crocheting!
Â
Note: No incentive or commission was received for this post. Simply thought it was neat that I could find local artisans for both the yarn and custom tags, and want to support indie businesses :)
Â
Â
The blue wall makes such a good posing background :D
yes it does!
It looks so beautiful, thank you for sharing! Could you please explain what the ‘ back loop’ is or maybe add a photo to show where we need to insert the hook? I think I’m working in the back loop (the loop of the v that is not close to me) but the fabric created doesn’t look like yours. Then I tried to work in the extra loop behind the v but that’s only possible in the first row, after the second row that loop is gone. I can’t figure out how to create the ‘knitted’ look of your hat. :-)
Thanks so much Kim for giving the pattern a try! This is the video tutorial I used for the back loop slip stitch: https://newstitchaday.com/crochet-back-loop-slip-stitch/
Hope this helps, happy crocheting!
Thank you for your quick reaction, I’m gonna try again!
I have been on a quest for the last 5 years to find a hat my husband,5 sons and grandson will wear. This is it! Thank you
thanks so much Judith, I’m glad you like the hat!
I don’t understand when to start the short rows. Do you get the hat to a certain height or width then start row 2? Thanks
hi Deb, thank you for giving the pattern a try. You would start the short rows right at the beginning at row two. The picture actually shows the first pattern repeat of short rows already made, sorry that it’s not made more clear in the post. Happy crocheting!
They look fabulous!
thank you Tanya!
is it possible for you to do a video tutorial on how to make this hat? I am having trouble with the short rows …thank you
Thank you so much for your interest in this pattern. Unfortunately I don’t have the equipment, experience or time to make a video. If you can let me know what you’re stuck on or if there’s anything I can clarify about the pattern I can try my best to help. thank you!
Thanks for pattern. After 5 attempts, I finally made it. But I don’t understand how to crochet it together so seem wouldn’t be too visible,
Thank you for giving the pattern a try. The seam will be visible with crochet or sewing, but with sewing it may be less visible.
Gorgeous decrease! Can’t wait to tr this.
thank you Tina!
Hi, do you possibly have a video for this pattern? I’ve been looking for a hat pattern like this but I’m so much better with being shown instead of reading the pattern I don’t know all the abbreviations. Thanks
Hi Toni, thanks so much for your interest in the hat pattern. Unfortunately I don’t have the skills or the capacity right now to make a video. There is a video of the slip stitch that I use for the hat: https://www.youtube.com/watch?v=bNhgRu3XRGI
Hope this helps a bit. Happy crocheting!
Hi, thanks for letting me know, and thanks I will check that out! Have a good day.
When I get to the end of the short rows and turn do I crochet in the back loop of the last stitch and turn or crochet in both loops? it leaves a big lump if I crochet in just the back loop,and doesn’t look like your photo. looks much smoother on the reverse side. Nice pattern. I have a husband,4 grown sons and a grandson ‚and I’ve been looking for a long time for a crochet hat they like.this is it,if I can figure it out! Beautiful!
thanks so much for giving the pattern a try. yes, every stitch in the pattern is made in the back loop only. If you’re working on the first set of short rows, after turning you would ch 1, and skip the first st, then sl st in every st for the rest of the row (row 3 in the first set of short row). If you’re working on the second set of short rows, after turning you would ch 1, and sl st in every st. So be sure to ch 1 at the beginning of every row, which does not count as a stitch. I also crocheted quite loosely to accommodate the sl st, so maybe that helps with smoothing the stitches out. Hope this helps, happy crocheting!
Thank you,I’ll keep working on it!
Hi, love this pattern but I don’t quite understand where to go after the row running up and over the first set of short stitches.
Hi Louise, thank you for giving the pattern a try. Sounds like you’ve completed the first set of short rows. The next row after that is:
Next row*: ch 1, sl st in each st to end.
Then you would start the second set of short rows:
Row 1: ch 1, sl st in each st until there are 14 (10, 8) stitches left in the row, turn.
Row 2: ch 1, sl st in every st to end.
Row 3: ch 1, st st in every st, then sl st in the next two st in the row marked with * (the row made before row 1 of the second set of short rows), turn.
Repeat rows 2 and 3 six (four, three) more times.
Hope this helps, happy crocheting!
Hello am from India. And I need this pattern for my 2.5 year old girl. Can you please tell me what all are the changes I have to made. Thank u in advance…
Hello, sorry about the delay in reply. I can’t provide the exact modification for the size you’re looking for, but you can try using sock weight yarn with a 4.5mm hook and follow the pattern, which will make a smaller hat than pictured. Hope this helps, happy crocheting!
I don’t understand this pattern, I did all of the instructions up to the first picture and all I got was half a triangle, definitely not what was shown as what we are supposed to have. There are so many missing steps and I am so confused on how to complete this project
Thank you for your message Emma, I’m sorry that you didn’t have a good experience with the pattern. All the steps/rows involved in the pattern are written in the post, but the photos don’t show each step, I’m sorry about that. The first photo actually shows one set of short rows already made, so from what you’re describing I believe you’re on track. I’m sorry that the photos aren’t accurate.
I love Johnny at New Stitch A Day — but maybe there are some who learn better by checking out other videos/teachers:
Give this one a shot: https://www.youtube.com/watch?v=R6ZRatKQZ0Y
I am finishing up a Seafarer’s Cap and that is the first time I did so much slip stitch — for the brim! Probably why the instructions from GenuineMudpie make sense to me. The seam is a bit of a problem so will wait until brain is relaxed to proceed — again. In case someone here would like to look at this one: https://www.ravelry.com/patterns/library/crochet-seafarers-cap
One of the best techniques I’ve learned is the frog stitch (rippit, rippit, rippit) — and when I finally *get it* I speed right through … like a miracle.
I’m definitely going to try Trisha’s pattern and method.
I’ve made the seafarers cap many many times. You tube can help with how to slip stitch for an invisible seam. A great pattern. I’ve made slow: hat once. It turned ok ok,but not great in the short row seams. It does not look anything close to your hat.…maybe I should keep trying,but a lot of work to not turn out very well. Yours looks great
Ive waisted so much yarn trying to do this. It would not come out as in the pics. There should be some steps missing. Plus it says to repeat steps 2 and 3 six more times after the first one, but in the picture there is 8 repetitions. That makes no sense! So i tried it like that too, and failed again. Im getting frustrated here.
I’m sorry that this pattern is frustrating for you. I’m not sure how to help without being able to look at your project. Others have mentioned that the Seafarer hat pattern is a lot more user-friendly, it has a similar look, perhaps it would provide a better crocheting experience: https://www.ravelry.com/patterns/library/crochet-seafarers-cap
Hello! I love this pattern, what are your thoughts on making and selling these hats? Most people just want a reference back to them for where the pattern came from. I would like to make and sell these hats in my neighborhood.
Hi Sarah, thank you for your interest in the pattern. Yes you can sell the finished products as long as you link back to this pattern page on my blog to credit the design. Thanks so much for checking. Happy crocheting!
Hi there!
So I just finished the first stockinette stitch on the first set of “short stitchesâ€. I am here…
Next row*: ch 1, sl st in each st to end.
Second set of short rows:
My question is, is the next row supposed to be slip stitches in the very first row of chains or… are we supposed to ch1, turn, slip stitch in each stitch to end?? I am a bit confused! HAA but love the pattern so far!
Hi Kay, thank you for giving the pattern a try. In the row you copied in your message, simply slip stitch in every stitch you see in the row until the reach the bottom edge of the hat. You would have turned at the end of your last row. I hope this helps. Happy crocheting!
Hermoso gorro! Lo voy a intentar!
Hello there seems to be some steps missing. My project is not looking like the photos. I really want to make this version of the hat. Is it possible to fill in the missing steps please. Or is there a way I can share my photo with you so you can advise what’s missing. The steps are definitely missing in the beginning.
Hi Keisha, thank you for giving the pattern a try. Sorry about the photos, the are in fact a few steps ahead of the written instructions, but there are no steps missing in the written instructions. Feel free to email me at genuinemudpie[at]gmail[dot]com with a photo of what you have and I can try to help. Thanks.
Hello! What do you mean by “st st� I haven’t been able to find any meanings for there being two! I thought it may be a typo, but after reading comments I think I’m just out of the loop on what it means! Thanks!
Hi there, wherever it said “st st”, it should be “sl st” through out, abbreviation for slip stitch. I’ve corrected the typos. Sorry about that. Thanks for catching.
Hi Trish, thank you for the pattern, the hat looks lovely! Could you give an example of how many stitches we are supposed to have per row especially after each of the short rows? I’m still quite a beginner and it’s my first time attempting a hat and short rows, and I’m not sure if I’m doing this right.
Row 1 (setup row): ch 55 (40, 33), sl st in second ch from hook, sl st in each ch to end. (So there are now 54 stitches?)
First set of short rows:
Row 2: ch 1, sl st in each st until there is one st left, skip remaining st, turn. (So there should be 53 stitches in this row?)
Row 3: ch 1, skip first st, sl st in each st to end. (Are there still 53 stitches or 52 now? When you say skip first st, you don’t count the ch 1 correct?)
Thanks in advance for your clarification!
Hi Jane, thanks so much for giving the pattern a try. Yes, everything you said is correct about the short rows. Happy crocheting!
Thanks for the clarification Trish! Sorry I have another question: what is the space in between each row in the instructions below, is it made from the space of the Ch 1 and skip 1 Ch in row 3 of the first set of short rows?
Continue on and sl st into each end of the short row and the space in between each row — 14 (10, 8) stitches across the short rows, then sl st in the remaining last stitch from row 2. The piece will now look like this.
I’ve made this,instructions seem fine.
Hi Jane, yes, the space would be made either by the turning ch or skipped ch in between each row. But that can be hard to tell with slip stitches. Ultimately if you can evenly sl st 14 (or 10 or 8, depending on yarn you’re using) across the short rows you’ve created, it would be fine. Hope this helps!
Hi Trish, thank you for the guidance so far, I’ve managed to finish most of the hat :) my final question is, how do I seam it without creating a bump? So far I’ve tried to slip stitch the ends together by lining up the edges with wrong side facing each other, but it leaves an unsightly bump. Is there a way to crochet seam it flat, such that the finish really looks seamless? Thank you!
Hi Jane, glad the hat is working out. I crocheted mine together with a visible seam, as I didn’t mind it. You can maybe try this method for invisible seams for granny squares: https://www.bhookedcrochet.com/2017/03/13/join-granny-squares-invisible-seam/
It’s not exactly the same kind of stitch but the finishing edges are similar. Hope this helps, happy crocheting!
I’m so sorry, I’m still having a hard time following the instructions. Is there a video tutorial for this? Or a name for the crown-shaping type of hat? I’ve tried reading the instructions about a half a dozen times, and I’m still getting a clunky look.
I am new to crochet. Love this hat for my husband. Reading comments have been most helpful, but because I’m a visual person, I need a step by step photo. I have the stitch itself down pat and have learned what not to do on the straight edge (brim), am I understanding this correctly? The 1st set of established rows is the center of each of the 5 sections. As I move to the short rows, I am decreasing to angle the top on the right top sde of the 1st section and evenly at the bottom of the brim? Because I dont understand where to go from there (worsted 40 down to I believe about 32 stitches), am I increasing to start the left half of the next section? Am I connecting the two at this time? Or after I finish all sections? Also, what are the 10 stitch spacing? Are those the stitches connected the sections as seen in the 1st photo? If I am way off I’ll continue the ftog rippet stitch and keep reading until I get it. I am a determined newbie.
Hi Ella, I’m very sorry for the delay in reply. I don’t have a video tutorial for this. There’s crochet hat pattern that looks similar, is very popular and has good reviews, which you might want to try out instead: https://www.ravelry.com/patterns/library/crochet-seafarers-cap
I’m sorry for the frustration that this pattern has caused. Hope you find a pattern that brings you relaxation and joy.
Hi Linda, sounds like you’re getting it correctly. You’re decreasing/increasing to angle the top and the brim edge stays straight. You’re connecting the two sections as you crochet the rows. I’m not sure where you’re referring to as the 10 stitch spacing — can you copy/paste that section in the comment so I know which part of the pattern you’re looking at? Thank you for giving the pattern a try.
Your conversation with Jane on 10/30–11/1. Thank you for stating “loosely” as well. That helps. I’ll keep checking back in case you do post more photos. Again, thanks for this pattern. I’ve looked for an easier pattern, but this is the look I’m “hooked” on. Thanks for your reply and good luck on your studies
This is the best, minimalist and “knit-like” crochet pattern I have found anywhere! (and I’ve been hunting for a while). What makes it even better is it is local to where I am, which made me very excited when I found it through Pinterest.
Like many of the comments, I found it a little hard to follow at first, but Trish has done a great job if you really read each line-by-line. We are all guilty of quickly skimming patterns, when we know better and that we shouldn’t. I do it all the time! This pattern if you read it all and do a few quick number calculations on your own your hat will come out beautiful.
I agree
Hi,
I’m having trouble with the pattern because for each repeat my number of stitches is increasing and I don’t know how to sew this in the end or if it’s even right.
“Row 3: ch 1, sl st in every st, then sl st in the NEXT TWO st in the row marked with * (the row made before row 1 of the second set of short rows), turn.” So because of working 14(10,8) out of 7(5,4) stitches before, the number of stitches is increasing at this point each time. Or is it meant to crochet the two sl st TOGETHER, so at the end of doing this it’s 7(5,4) again?
Trish
I really like this pattern for its clever shaping and excellent fit.
Thank you so much for sharing.