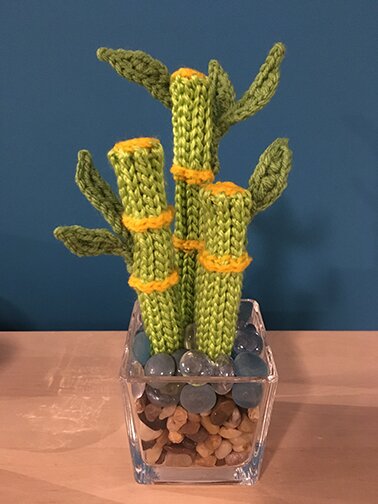
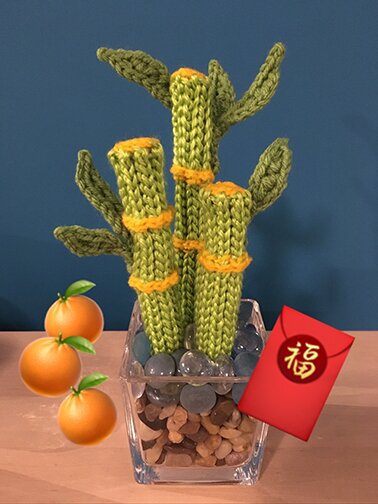
Today is the first day of Chinese new year. I made this bamboo as a gift. Pretty happy with how it turned out.
I thought bamboo generally symbolizes good luck because it’s sold in every Chinese shop that sells plants. But with a quick search on the internet I learned that it also represents renewal (because of how quickly it grows), flexibility/strength, and longevity — so, resilience, tenaciousness.
“Tenacious” is a word that I’d like to be described by. I don’t give up, or perhaps more truthfully I find it hard giving up on things or people. Some would say that I’m not very good at letting go. Other have said I’m stubborn. I’d like to think that I’m tenacious. But I guess a way forward would be to cultivate flexibility, to renew or reorient my approach to how I’m tenaciously connecting to some things.
Anyway, I’d also say that the crochet slip stitch is a very bamboo-like stitch, because it makes a firm fabric and therefore tenacious, it is however also very flexible and stretchable, almost like a knitted rib.
Here I’d like to share a loosely formed recipe for making the bamboo. It’s kind of like free-formed crocheting, and how tall the plant is depends on the vase you’re using, but there are some basics to it, in case anyone would like to give it a try.
I used:
Caron Simply Soft for the bamboo stalk because of its sheen
Patons Astra for the yellow rings and caps
Bernat Super Value for the leaves
5.5 mm hook for the stalk
3.5 mm hook for the rings and caps
Tapestry needle
Popsicle sticks
Vase with pebbles
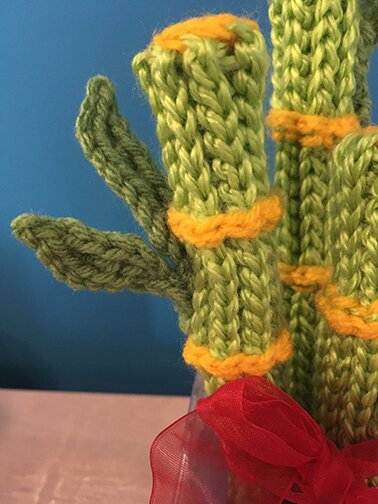
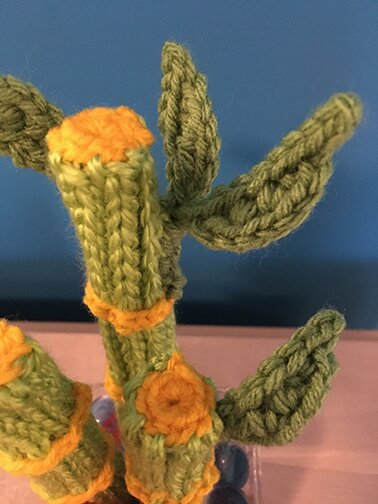
Stalks are made with back loop slip stitch (tutorial).
With larger hook and lighter green, make a chain of desired length. I started with 25 ch for the tallest, and 21 and 15 for the other two. Then sl st BLO until piece is about 1.5″ wide. Without fastening off, sl st to join the seams together lengthwise, making a long tube (the sl st seam will be on the outside; the piece won’t be turned inside out after seaming). Fasten off.
Rings are made around the stalks with surface slip stitch (tutorial).
With smaller hook and yellow, attach yarn where you want the ring to be at the back seam of the stalk. sl st in every stitch in the rows crosswise (not just the stitch that appears as a “v”, but also the stitch in between the “v“s, so that the rings would protrude a bit). Fasten off after every ring made and pull the tails inside the stalk.
Caps are made with magic ring (tutorial) with 8 sc inside the ring, sl st to join with first sc, then fasten off and leave a long tail for sewing. Attach ring to the top of the stalk.
Leaves may be a little tricky to explain… I regret not taking progress photos, very sorry. It took quite a bit of experimentation but I settled on this method and I think the results are quite lively looking. I hope this makes sense.
With smaller hook and darker green, ch 5 to 7 (this is the stem you’re sewing to the stalk, so its length depends on how you want to position the sprig of leaves on the bamboo), dc in second ch from hook, *[ch 1, dc in ch just made] two or three times (depending on how long you want the leaf to be), ch 2, sl st in 2nd ch from hook, sl st evenly into the dc’s made earlier (roughly 2 sl st per dc), sl st into the last ch of the stem*. At this point you can sl st down every ch of the stem then fasten off with tail for sewing, or you can make another leave by sl st down just a couple of ch on the stem, then repeat * to *, and sl st down every ch of the stem, fasten off and leave a tail for sewing.
Sew the leaves to the stalks as desired.
Assembly:
The bamboo stalks are supported by popsicle sticks on the inside. I used popsicle sticks because it’s the only thing I can find to use at home. The width of it and the thickness of the crochet fabric takes up the interior of the stalks so they don’t need more stuffing. I’ve had to connect a couple of popsicle sticks together for the taller two stalks by simply overlapping the ends of the sticks and gluing them together with white glue (hot glue would be a better choice).
To determine the lengths of popsicle sticks you need, measure how deeply you want the sticks to extend toward the base of the vase. I would want the sticks to actually touch the base of the vase to make sure the sticks don’t wobble too easily. Determine the length of stick that is sticking out of the end of the stalk. It would be the same for all the stalks. Then measure how tall each stick will need to be according to the length of the stalk.
Pour a layer of pebbles into the vase. I think smaller stone chips at least for the bottom layer are better for stability. Insert the stalks and arrange as desired, then pour on more pebbles. I used different glass ones on top for interest.
I later added a red ribbon around the stalk for gift-giving that is not pictured because it blocked the bamboo too much. But that also helps with the stability.
I didn’t have any other new year decorations but thankfully there are emojis 😊🎋
Wishing everyone good health and happiness in the year of the 🐀