Archive for the 'paper' Category

party flowers

The hallways in our apartment buildings are pretty dark and grim. There was a new neighbour who moved into the apartment across the hall and she hung a small flower wreath on her door, and it made such a difference! So, inspired by my neighbour, I decided to make a small flower wreath for our door too! I took the idea from the floral party hats on Oh Happy Day.

Ta-da! 


A close up of the tissue paper flowers. If you look carefully you’ll see the half-ripped neighbourhood watch sticker I was attempting to cover with the flowers.


And I actually did make floral party hats. We were going to a wedding shower for a friend this week – so exciting! I love weddings. 


The one with the bit of tulle is for the bride-to-be – here she is! :D


And us party-goers :D


Cakes at the party! They were as pretty as they were delicious.


And when we got home I continued partying with a friend who came over to make a collage thank-you card for a prof (art-making parties are the best kind of parties!), and she so kindly brought over some macarons!


Feeling totally spoiled!  And the card we made was so totally awesome!

Wishing you a wonderful Tuesday! 


龍年快樂!

Happy Year of the dragon! :D


I made this dragon dance craft with a group of kids in the summer – waited five months for Chinese new year to post it here! :D

Wishing you a year of good health and many blessings.


recycling bin kaleidoscope!

A while ago I showed you a project I did in school, the altered book project, where I turned a botanical foreign book into a kaleidoscope. I thought I would share the process here, but with a challenge for myself – everything I use must come from the recycling bin!

It even has turnable, interchangeable lenses, like my altered book project :D


I’ve made kaleidoscopes with groups of kids in the past (6-12 years old), and they seemed to have lots of fun and quite proud of what they made. For the younger kids I cut some of the parts for them ahead of time, like the clear plastic, and the hole in the middle of the eye piece (because it’s easiest to cut with a utility knife). For the older kids I just made copies of templates and had them cut out the shapes themselves (except the hole in the eye piece – I still cut that ahead of time).

Older kids (8+ years old) can probably handle a lot of the steps themselves, but help from an adult would be necessary for this project, especially for stuff involving the utility knife and hot glue gun.

There are lots of instructions for homemade kaleidoscope, like this one. But I’ll show all the steps here, makes it easier if anyone’s going to try this.

So! From the recycling bin, I pulled:

- Two cardboard tubes. One is slightly larger than the other in diameter, i.e. a loo roll (aka TP tube) is usually larger in diameter than paper towel tube.

- Flyers with pictures of flowers, i.e. the gardening section.

- Bit of cardboard from a granola bar box.

- A stiff sheet of clear plastic from the packaging of a swiss roll. A sheet of clear plastic that’s large enough for this project may be hard to come across, so if you can’t find any, overhead transparencies or project covers work perfectly.

Then I used these tools:

- Clear packing tape

- Hot glue

- White glue

- Utility knife

- Scissors

- Ruler

- A bowl

To make the kaleidoscope:

First, make the prism by cutting out three pieces of clear plastic. It needs to fit snugly inside the smaller paper towel tube. To determine the length of the short side of each piece, I Googled “parameter of a triangle inscribed inside a circle“. I found this formula that someone really smart came up with and followed it.

The formula is: 3 x square root of 3 x radius.

The radius of the smaller paper towel tube is 2 cm. So following the formula I got 3.46.

I measured 3.4 cm on for each short side. It doesn’t really matter how long the long side is, as long as the three pieces are identical in measurement. I just harvested as much plastic from the packaging as possible.

Then I taped them together along the long sides with some packing tape, forming a prism.

Now for the kaleidoscope tube, I took the smaller cardboard tube and cut it to the same length as the prism.

To make the eye piece (i.e. the end where one looks in), I traced the end of the smaller cardboard tube on a piece of cardboard, print side up. I then drew a larger circle around it and cut it out. Then I cut out small triangles all around, and folded the notches up. Finally, I cut a small circle in the center with a utility knife.

This piece is then taped to one of the ends of the smaller cardboard tube with packing tape, like so (probably looks nicer if you glue the notches down with some white glue, but tape is quicker).

One could probably wrap/decorate the tube with some nice papers at this point, but I didn’t have anything in the recycling bin that I liked, and plus I like how it has the “recycling bin look” with the bare cardboard, so I just left it.

Then I took the prism and put some white glue all along the edge of one end…

Then I slid the prism inside the tube with the eye piece, with the glue side going in first.

I let it stood, eye piece down, to dry for a while…

Which made it a good time to make the interchangeable lenses, from these flyers!

I put a short length of packing tape on a picture of the flowers.

Then I scraped it with my thumbnail to get rid of any air bubbles, so the tape is in complete contact with the paper.

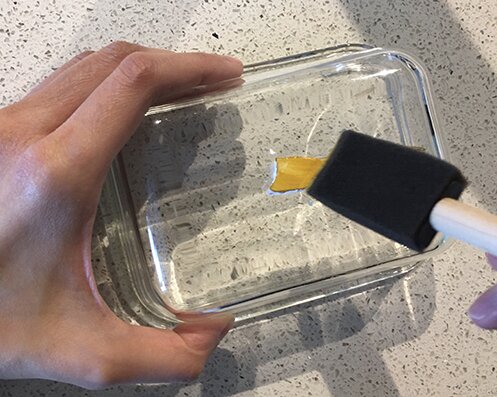
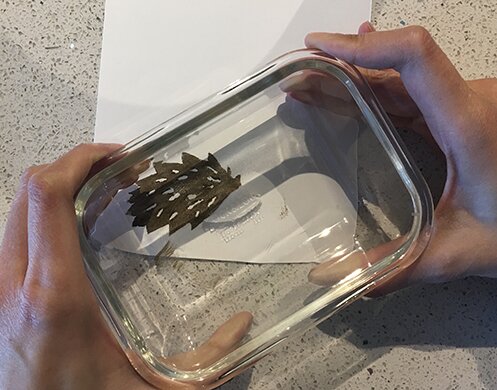
I cut out the taped areas of the pictures and immersed them in a bowl of water, letting them soak for a few minutes.

Then I took it out and started rubbing off the paper fiber on the back of the image (the side that’s not taped).

Remove as much fiber as possible, and you’ll get a transparent image! Pretty neat, huh?

While I let these dry completely, I took the larger cardboard tube and cut them into rings that are about 1 inch tall.

To attach the ring to the image, I put hot glue all around one end of the ring, and placed it on top of the image, tape side down (this is a bit tricky, an adult should do it). After the glue cooled down I trimmed the image around the ring.

While I was at it, I tried making lenses with a pressed flower by taping it on a piece of clear plastic. (the flowers didn’t come from the recycling bin… but I just wanted to see how it looks in the kaleidoscope :D)

And some some tissue paper dots made with a hole punch, also sandwiched between clear plastic and packing tape.

I attached both to cardboard rings the way I did with the flyer images.

So it’s done! Let’s put the lenses on the tube and test it out…

Mike found that the flyer image of the tulip worked the best, and I agreed with him.

The one with purple flower is also pretty.

The pressed flower was too centered to make any interesting illusions, I think.

And the tissue paper dots looked alright, but the shapes weren’t as interesting as the tulips.

I think pressed flowers would make cool illusions, just need to perhaps use more flowers so they cover the whole lens. I’ll be on the lookout for flowers to press this summer! :D

Kind of an odd project, but I’d love to see it if you do give this a go!

Have a great start to the week!

a quick cup of tea


Today I present to you – a teacup bookmark, with a hanging tea tag! :D Possibly a father’s day gift for a tea-drinking, book-loving dad?

Or for anyone who enjoys a good cup of tea. And a good book. At the same time.

So! Instead of favourite things Friday this week I’m going to share how I made this teacup bookmark, because one can only do so much in a week, and I’ve had this idea in my head for a while now. It was something that Mike has seen somewhere and told me about it, and I was inspired by the Victorian Tea we had at the Tollhouse.

It may look like there are lots of steps, but it’s actually a pretty quick project. It probably took me under an hour to make all three, and that’s with my picture-taking.

So! It’s time to get out the glue and scissors!

… and a bunch of other stuff… here are all the materials and tools I used.

  • Used gift bags (one could use other kinds of paper as well, but I thought gift bags would be a good idea because it’s coated, so it’s slightly heavier and more durable than, say, construction paper, and they have nice patterns. And because I save them when people give me gifts and I have tons on hand)
  • Cotton thread (I used crochet thread because that’s what I have, but thin yarn or kitchen twine should work too).
  • A glue stick
  • A marker (or pen)
  • Scissors
  • A thick tapestry needle
  • A utility knife
  • White glue
  • A ruler (if you want to be precise)
  • A cutting mat (or something to cut on, like old magazines)
  • Teacup templates

I made up this project partly to learn how to use Illustrator, particularly drawing simple shapes and curves. So I made this set of templates with different teacups and a tea mug. Just click on either the image or the link above it and it will bring up a PDF file. Print it at 100% and you’ll get the same size teacups as the ones I made (each is 3 inches wide).

First, I cut out a template. It might be easier to cut out the part inside the teacup ear with a utility knife. (Or teacup handle? It’s “cup ear” in Chinese and I’ve always called it that…)

Next, I traced the template on a part of the bag with the pattern that I liked. (I used a Sharpie for this so it’s easier to photograph, but one could use a pen or a pencil)

Then I removed the side of the bag where it’s folded, so it would be easier to cut out the teacup.

Then I cut along the top edge of the teacup, and the general area around the teacup through BOTH layers of the bag.

So now we have two pieces, with a straight edge at the top.

I then cut a piece of cotton thread, about 5 inches in length.

I tied a knot close to one end of the thread. Then I placed a drop of white glue on the back of the piece that doesn’t have the teacup tracing on it, about 3/4 inch from the top edge. I then put the end of the thread into the drop of glue, with the knot just below the glue, like so…

Then I cut out a scrap piece of paper (from the cut-off of the template) about 1/2 inch tall and 1 inch wide. I glued this piece of paper on top of the thread and glue dot, with the knot sticking out, like so…

The thread is now locked in and won’t get pulled out easily.

I then slather a generous amount of glue from a glue stick onto the back of the piece with the teacup tracing on it (not white glue, or the paper will buckle), and then pressed it onto the piece with the string, lining up the top straight edges of the two pieces (it’s OK if the other edges don’t line up, as long as the top edges are lined up).

Wait a moment or two for the glue to dry completely, then cut out the teacup shape. Again, it’s probably easier to use the utility knife to cut out the inside part of the mug ear (aka mug handle).

Ta-da! We’re almost done!

Now for the tea tag. One could do lots with it, like write a message (like happy father’s day?), make a monogram (cut out a letter from the magazine?), or just leave it blank. But here’s what I made…

I salvaged the folded side of the bag that I removed earlier, and cut out a 1″x2″ rectangle, then folded it in half, with the white side facing out.

I then cut out some tea leaves on one half with the utility knife (free-hand too! I was pretty proud of myself).

I then used a tapestry needle to poke a hole through the middle of the fold.

Then I threaded the end of the thread (with the other end already attached to the teacup) through the hole. I then slather a generous amount of glue with the glue stick on the half of the paper with the leaf design. I placed the thread end on middle fold of the paper, so it lied along the fold, then I put a drop of white glue on the thread.

Fold the top down and… ta-da! A one-of-a-kind paper-cut tea tag!

And guess what? The bookmark is ready to mark those pages! :D

I also made a pink one, with a flower tea tag, for an herbal tea kind of day…


Now I’m going to make myself a nice cup of tea. Thanks for stopping by! Have a great weekend!


blooming kaleidoscope


Recently I received a lovely email from a visitor to the blog :D She’s an editor of a book arts journal in Australia (being able to connect with wonderful people from different corners of the globe is one of the best things about keeping a blog! :D), who kindly shared not only encouraging words but also lots of great ideas and inspiration about printmaking and book arts. (One of which is gelatin printing – so intriguing! I’ve got to try that out soon!)

Conversations about book arts reminded me of a bookbinding class I took while in university. (Ah, that was quite a few years ago…) The bookbinding course was one of my favourite classes, and one of the coolest assignments was the altered book project, using discarded books from the Reference Library.

I pulled this botanical reference book from the discarded book pile.


I couldn’t read the text, but I loved the pictures of flowers and plants. One of my first childhood toys was a kaleidoscope, and I remembered how much time I’ve spent looking through it, couldn’t put it down, just mesmerized. I thought the bright photographs of the plants and flowers would make beautiful images to look through with a kaleidoscope. So that was what I made (cylinder on the right), and I covered it with the end papers of the book.

It really does work! See? This is the hole through which one looks in, made with the table of contents.


The book now houses the interchangeable “lenses”, made with the pages of photographs and illustrations from the book. Kind of looks like a collection of specimens in petri dishes.


The end piece fits around the looking tube like this…


And you turn it and take a look through… (psst! click for a larger image!)


It’s more crafty than “artsy”, and I guess since I was attending an art college I should be making something “artsy”, with more of a statement or meaning or whatever, but I was rather happy with it. Just a simple appreciation of light and the perfect beauty of nature.

And with the brilliant weather we’ve been having lately, I’ve had a great time looking through all of the “specimens” again with the lovely sunlight streaming through.

In order for the kaleidoscope to work I made the images transparent. That process in itself needs a post of its own, I think. I’ll write about it more in the next week or so, stay tuned! :D

Have a great day! :D

happy mother’s day!

Wishing all mothers the most joyous day of celebrating and honouring their unconditional, selfless love.

with paper petals and a thankful heart,
trish


(pop-up bouquet from here)

sunday video

A short and sweet video for the May 2011 ipad issue of Martha Stewart Living (via Upon a Fold) by the magazine’s art director Erin Jang. Bursting with colours and animated with joy, perfect for Easter day! :D Have a wonderful and happy day, everyone!


Kevin


Not exactly like Kevin from Up, but since I was wearing blue when I took the photo it kinds of remind me of him :D

More crafting with kids last week. A rather large group of kids. What’s simple and straightforward and costs next to nothing?

The animal masks from RiceBabies reminded me of the mask-making workshop from school. The masks we made were less “sculpted” than the RiceBabies masks, but still three-dimensional. Last time I presented the idea to other kids they were pretty impressed, so I decided to go with it. I even found a pack of 200-sheet construction paper at the dollar store for $2. The cashier wouldn’t believe me until she scanned the bar code.

This is the template we used. See? Pretty simple. I suppose one could refine its shape more by having 3 cuts on each side instead of 2. And it doesn’t have to be perfect either, since it’s going to be decorated and shaped. This is just on a piece of 9″x12″ construction paper, and it’s large enough for an adult’s head, like mine. I just estimated the position for the eyes; I think placing them slightly above the middle and 3 fingers apart generally works well.

And then it’s building and drawing the features of the mask – the sky’s the limit! We weren’t going to be able to use paint, so I made this test one with construction paper and drew on it with pencil crayons. It worked out fine, though it needed to be decorated first before shaping and stapling the mask together. Definitely better to use card stock.

I think it’s a pretty good project for a rainy day, like today. Happy Saturday, everyone!

city of light


One of the best things about making crafts with children is that I get to try it out first :D

Frugal Family Fun Blog has a brilliant idea for making suncatchers, with contact paper (or clear shelf-lining) and bits of tissue paper, or this self-adhesive document protector I found at the dollar store, for $1/roll.

I built my “city” on one sheet of plastic, sticky side up, and then covered it with another sheet of plastic. And there are so many other things one can make with the same idea, like this lovely fall tree, and snowflakes.

When I was a kid I liked to make suncatchers with wax paper and crayon shaving, like these, and these. I loved to mix different colours and watch them swirl and blend together under the heat of the iron.

Anyway. I thought the contrast between the tissue paper city and the real city makes an interesting picture. And I hope the kids enjoy making this as much as I did. We’ll see…

I’m definitely enjoying getting more sunlight each day as we approach summer. How about you?

happy spring!

Happy first day of spring, friends! :D


Diagram for my daffodil came from this book. But a similar one is posted here if you’d like to make some to celebrate spring’s arrival, like our friend Wage here.

Have a great day!

Related Posts Plugin for WordPress, Blogger...

about genuine mudpie

Hello, my name is Trish. I live in Toronto. I like to make things (particularly with yarn). This is a place where I share my crafty endeavours and things that inspire me. Thank you for visiting! Would love to hear from you - feel free to leave a comment! :D

To read the story of genuine mudpie please see the about page.

If you'd like to borrow an image or two, that's cool, just remember to link back to this blog :)

subscribe

Enter your email address to subscribe to genuine mudpie and receive notifications of new posts by email!


my flickr

The Small Is Beautiful Manifesto