Usually I’d be having a regular work day over Lunar New Year, but this year it falls on a Saturday! So I thought I’d celebrate by trying out a rice cooker turnip cake recipe :D
I remember my Hakka grandmother making lots and lots of turnip cakes in preparation for new year. Turnip cake is also Mike’s favourite at dim sum. So even though I’m not so good with cooking, I thought I’d give it a try. And it actually turned out quite well, and tasted like turnip cake! The recipe I found is all in Chinese, but if you can’t read Chinese but are interested in making turnip cake with a rice cooker, here’s what I did :D
The main ingredients are: (they can usually be purchased at Asian grocery stores)
400g daikon radish (I don’t have a scale so I don’t know how much I used for sure, but used one average size daikon radish)
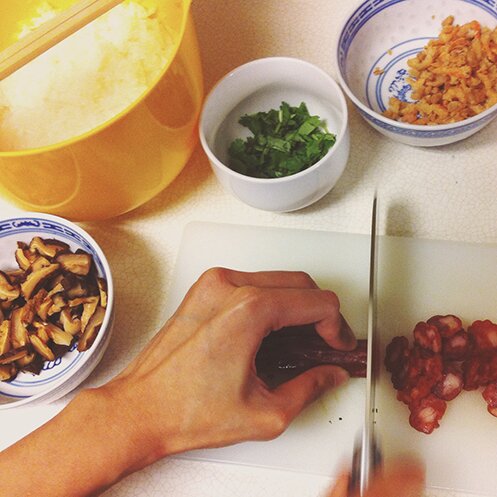
80g Chinese sausage (I used one)
80g preserved meat (?) (not sure what it is in English, didn’t use)
3 shiitake mushrooms (soaked for a few hours to rehydrate)
1 tbsp dried shrimps (soaked for a few hours to rehydrate. I probably used 3 tbsp, as pictured. Didn’t measure. 1 tbsp of shrimps just seems too few. I like shrimps.)
1 cup of rice flour (I used about 1/4 cup more because it looked like I had more daikon than called for)
1 cup of water (I used about 1/4 cup more, and used the liquid created from shredding the daikon, as well as the soaking water from the mushrooms, for flavour)
I also used a small amount of cilantro, chopped
Seasoning for the daikon:
1 tsp chicken instant stock mix
1/8 tsp sugar (didn’t measure, used a pinch)
1/8 tsp salt (same as above)
a bit of white pepper
Seasoning for mushrooms/shrimps/sausage:
1/8 tsp soy sauce (a few drops)
1/8 tsp sugar (a pinch)
1/8 tsp rice wine (didn’t use, because I don’t have rice wine)
1) Chop mushrooms into thin strips. Roughly chop shrimps.
2) Chop Chinese sausage into small bits
3) Mix mushrooms, shrimps and sausage together with seasoning (the soy sauce, sugar and rice wine)
4) Heat wok (I used a frying pan because I don’t have a wok), quick fry mushrooms, shrimps and sausage with 1 tbsp of oil. Put in a dish and set aside.
5) Peel and shred daikon. Drain and save the liquid in a bowl, add water (I use the water from the mushroom soak, filtered with a coffee filter) to make 1 cup. In a bowl mix this liquid with rice flour. Set aside.
6) Heat wok (I used a large frying pan), quick fry the shredded daikon with the daikon seasoning and 1/2 tbsp of oil. Turn down heat and cover, cook for a few minutes until soft. Mix in the mushrooms/shrimps/sausage and cilantro. Turn off heat. Mix in the rice flower mixture quickly.
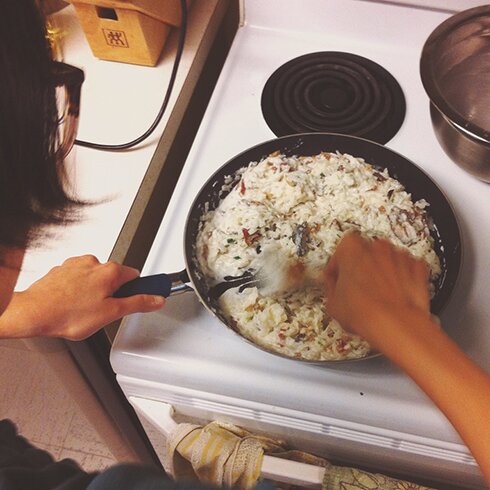
7) Grease rice cooker, pour mixture into rice cooker. Cook in rice cooker on white rice setting.
It looked like I had enough to make 2 cakes so I made an extra small one on the steaming rack in the rice cooker, on a greased tin plate. When the rice cooker finished cooking for the first time, the small turnip cake didn’t look cooked, and I wasn’t sure about the larger one in the rice cooker, so I cooked it again on the “quick steam” setting. After that the large one looked done (has a slight translucent quality), but the top one still looked uncooked (opaque like rice pudding), so I steamed it the old school way, until it looked cooked.

Here’s the large one cooked in the rice cooker. I’m quite proud of how it turned out! :D
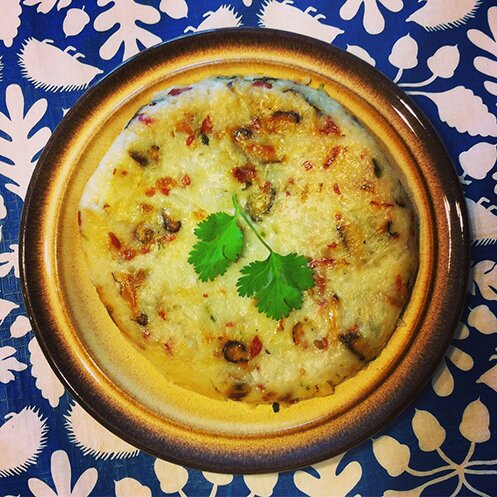
The large one is for a family gathering tomorrow. The small one we cut up, pan fried and ate :)
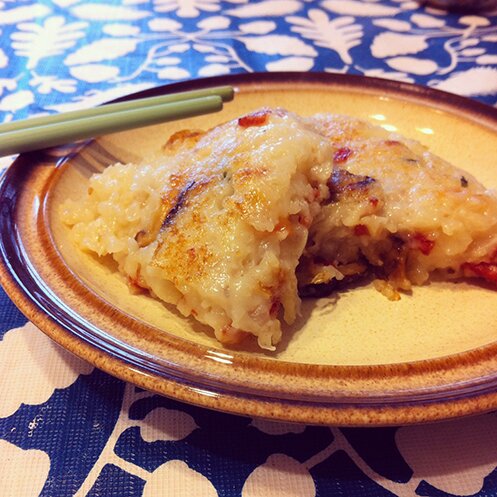
It’s stickier than it’s supposed to, I think I used too much daikon, and didn’t drain it enough (I think one is supposed to press the shredded daikon to get all the liquid out). But it tasted like turnip cake! Which is a Chinese New Year miracle given my culinary skills, or our rice cooker is magical :D
May the new year bring you good health, much success and lots of happiness!