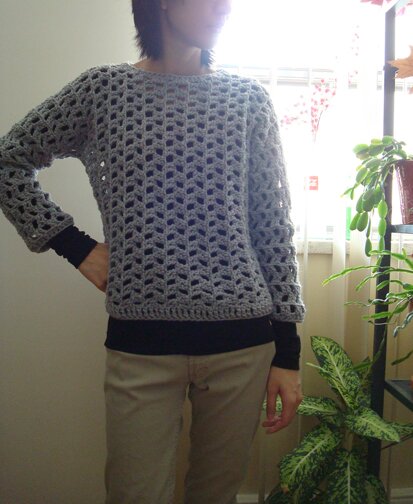
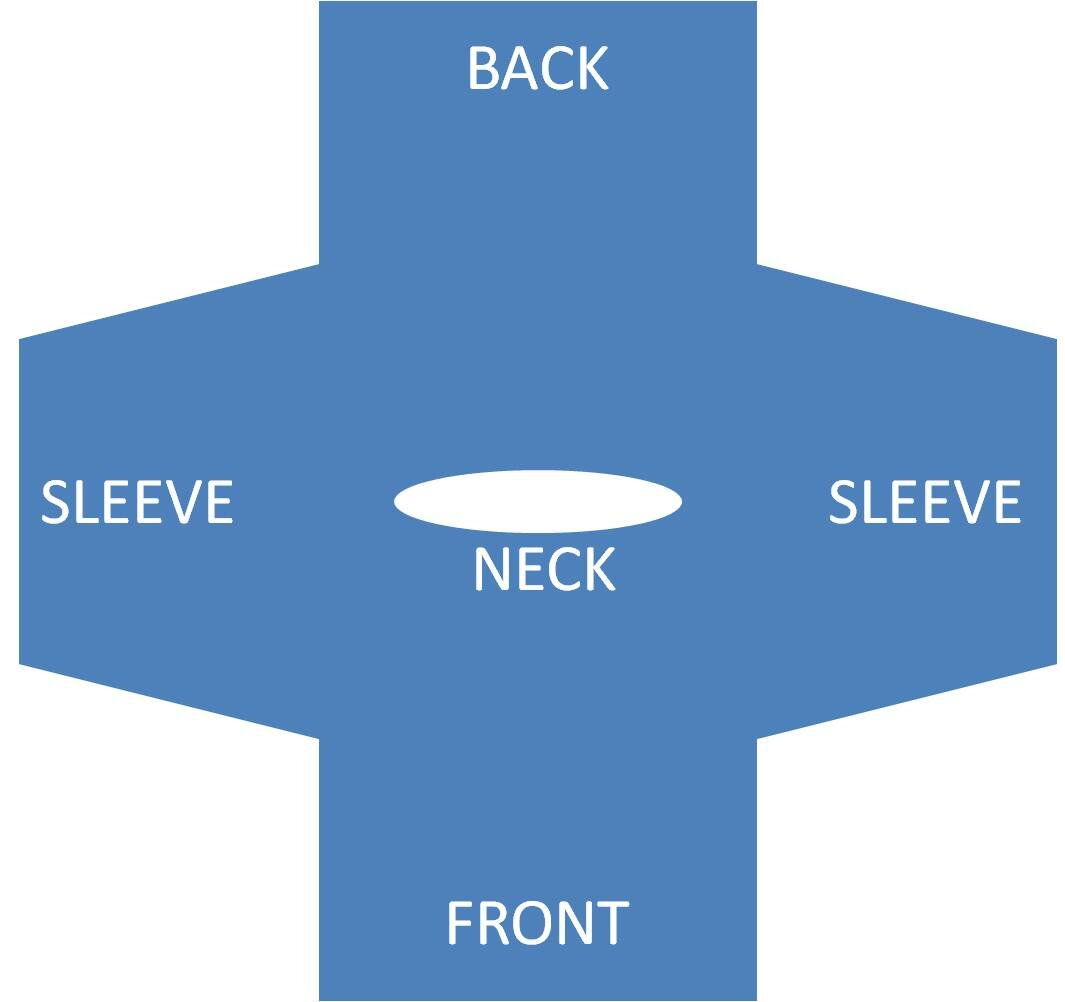
Sideways is a pullover that is worked in one piece in a sideways manner, from one sleeve cuff to the other, forming a herringbone-like pattern. Then it is folded in half along the shoulders, with the side underarm seams sewn together.Â
Â
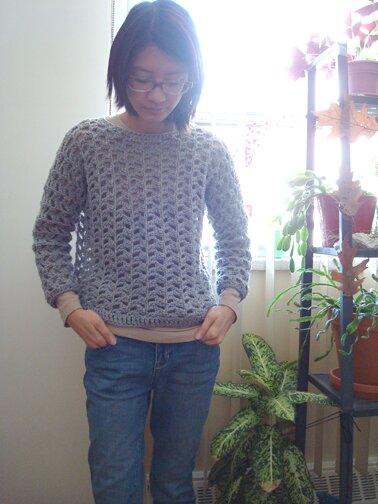
I bought a giant ball of cheap and cheerful Red Heart acrylic to experiment while making up this pattern. Turned out a little stiff but I don’t mind it. But I would imagine it would look rather nice with a yarn that has a nicer drape, like Caron Simply Soft or Bernat Satin.
Yarn: worsted weight, approx. 700 ydÂ
Hook: 6.5mm, 5.5mm
Measurements:
Bust: 38“
Length: 18“Â
Sleeve length (underarm to sleeve cuff): 13“
Neck opening: 15″
My pattern writing ability is limited so I don’t want to attempt making different sizes. But here are some simple ways that I can think of for alteration:
To make smaller sizes I would suggest using a DK or sport weight yarn with a 4.5 mm hook and using the pattern as is.
To make larger sizes I would suggest increasing the number of foundation chains by multiples of 4, and then adding more rows in between increases and decreases in the sleeves, and adding more “work in pattern” rows in the middle of front and back.
More notes…
This pattern hasn’t been tested, and it’s written from a crude diagram that I drew while crocheting. I tried to elaborate as much as possible when writing it out, and it’s a very simple pattern repeat, but some experience in crocheting is required to understand the abbreviated parts of the pattern (i.e. where it says “work in pattern”). The basic pattern repeat is rows 2–3. It would be pretty obvious what you need to do once you get the hang of the pattern repeat, but probably not a beginner’s project.
In the pattern wherever it says dc into a ch 2 or ch 1 space I actually crochet into the chain to make the fabric less bulky/stiff given the yarn I was using, but you can just crochet into the ch 2 or ch 1 space too, if you prefer.
Ok… on to the pattern.
Â
Pattern
Sleeve, with larger hook
Row 1: ch 36, dc in 4th ch from hook, dc in next ch, ch 2, sk 2 ch, *dc in next two ch, ch 2, sk 2 ch*, rep from * to *, end with dc in last two ch, turn.
Row 2: ch 4, 2 dc in next ch 2 sp, *ch 2, 2 dc in next ch 2 sp*, rep from * to *, end with ch 1, dc in top of last dc, turn.
Row 3: ch 3, dc in next ch 1 sp, ch 2, *2 dc in next ch 2 sp, ch 2*, rep from * to *, end with dc in last ch 1 sp, dc in top of last dc, turn.
Row 4 (increase row): ch 3, dc in same st, ch 2, *2 dc in next ch 2 sp, ch 2*, rep from * to *, end with 2 dc in top of last dc, turn.
Rows 5–16: repeat rows 2–4 four times
Row 17: repeat row 2
Body
Row 18: repeat row 3, don’t turn at the end of the row, ch 44, remove hook from look, don’t fasten off. Attach a separate ball of yarn at top of ch in the beginning of row, ch 41, fasten off.
Row 19: place hook back in the loop at the end of row 18, turn. ch 3, dc in next ch, ch 2, sk next 2 ch, *dc in next two ch, ch 2, sk next 2 ch*, rep from * to *, end with 2 dc in final two ch, turn.
Row 20:Â ch 4, 2 dc in next ch 2 sp, *ch 2, 2 dc in next ch 2 sp*, rep from * to *, end with ch 1, dc in top of last dc, turn.
Row 21:Â ch 3, dc in next ch 1 sp, ch 2, *2 dc in next ch 2 sp, ch 2*, rep from * to *, end with dc in last ch 1 sp, dc in top of last dc, turn.
Row 22–25: repeat rows 20–21 twice.
Front
Row 26 (decrease, neck shaping): mark the midpoint across body, which is the 18th set of 2‑dc. Repeat row 20, end with 2 dc in the ch 2 sp before midpoint, dc in next dc, turn.
Row 27 (decrease, neck shaping): ch 3, 2 dc in next ch 2 sp, work in pattern to end, turn.
Row 28 (decrease, neck shaping): work in pattern until last ch 2 sp, 2 dc in last ch 2 sp, dc in top of turning ch, turn.
Row 29: ch 4, 2 dc in next ch 2 sp, work in pattern to end, turn.
Row 30: work in pattern until turning ch from last row, dc in 4th ch of turning ch, dc in 3rd st of turning ch, turn.
Row 31–33: work in pattern.
Row 34 (increase, neck shaping): work in pattern until last two st, dc in last two st, dc again in last st, turn.
Row 35 (increase, neck shaping): ch 3, dc in next dc, ch 2, 2 dc in next ch 2 sp, work in pattern to end, turn.
Row 36 (increase, neck shaping): work in pattern until last ch 2 sp, 2 dc in last ch 2 sp, ch 2, 2 dc in top of turning ch, fasten off.
Back
Row 26 (decrease, neck shaping): attach yarn at midpoint. ch 3, 2 dc in next ch 2 sp, work in pattern to end, turn.
Row 27 (decrease, neck shaping): work in pattern until the last ch 2 sp, dc in last ch 2 sp, 2 dc-tog in ch 2 sp and turning ch, turn.
Row 28Â (decrease, neck shaping): ch 3, 2 dc in next ch 2 sp, work in pattern to end, turn.
Row 29: work in pattern until last ch 2 sp, 2 dc in last ch 2 sp, ch 1, dc in turning ch, turn.
Rows 30: ch 3, dc in ch 1 sp, ch 2, work in pattern to end, turn.
Rows 31–33: work in pattern.
Row 34Â (increase, neck shaping): ch 4, dc in first dc, dc in next ch 1 sp, ch 2, 2 dc in next ch 2 sp, work in pattern to end, turn.
Row 35 (increase, neck shaping): work in pattern until last ch 2 sp, 2 dc in last ch 2 sp, ch 2, dc in 4th ch of turning ch, dc in 3rd ch of turning ch, turn. Â
Row 36Â (increase, neck shaping): ch 4, dc in first dc, dc in next ch 1 sp, ch 2, 2 dc in next ch 2 sp, work in pattern to end, turn.
Body, joining front and back
Row 37: work in pattern until last ch 2 sp of BACK, 2 dc in ch 2 sp, ch 2, [dc in top of turning ch of BACK, dc in the first dc of FRONT], ch 2, 2 dc in next ch 2 sp, work in pattern to end, turn.
*Tie the bases of the two stitches in square brackets together with a short length of yarn*
Rows 38–44: work in pattern. There should be 35 pairs of 2‑dc across the front and back of body on the rows that begin and end with a pair of 2‑dc. Fasten off at the end of row 44. Turn.
Sleeve
Row 45: Join yarn in ch 2 sp after the 11st pair of dc’s, ch 3, dc in same ch 2 sp, *ch 2, dc in next ch 2 sp* 13 times. Turn.
Row 46: work in pattern.
Row 47: ch 2, dc in first ch 1 sp, ch 1, 2 dc in next ch 2 sp, work in pattern till last ch 2 sp, 2 dc in last ch 2 sp, ch 1, 2 dc tog in 4th ch and 3rd ch of turning ch. Turn.
Row 48: ch 3, dc in next ch 1 sp, 2 ch, 2 dc in next ch 2 sp, work in pattern till last ch 1 sp, dc in ch 1 sp, dc in top of turning ch. Turn.
Rows 49–61: repeat rows 46–48 four times.
Rows 62–63: work in pattern. Fasten off at the end of row 63.
The entire sweater is now finished! We’re almost there :D
Finishing
Fold sweater in half along shoulder line with right sides facing together (which ever side looks better to you can be the “right side”), sew side and underarm seams together. Turn right side out.
Using the smaller hook, crochet a round of hdc evenly around each sleeve cuff and neck opening, and a round of tr around bottom edge of sweater. (2 st in each end of row seems to work out pretty evenly for me.)Â
Weave in ends, put on sweater and be cozy :D
Â
Please don’t hesitate to drop me a note if there’s anything unclear or if you spot any mistakes in the pattern.
Have a wonderful week, everyone!
Â
 Â