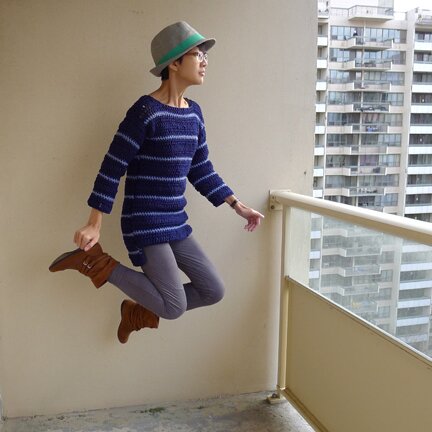
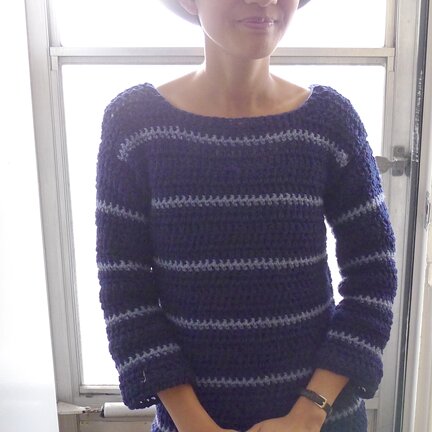
Pattern for a sweater that I talked about a while ago. Have been working on it slowly since the end of summer. And of course I have to celebrate its completion with a levitating photo :D It features an uneven hemline, with the back piece is longer than the front piece. It’s more like a tunic, so it can be worn over leggings.
Yarn weight: light worsted
(I used this acrylic yarn that I have a huge pile of in my stash, I like that it doesn’t stretch out of shape easily, especially when it’s crocheted with a large hook)
Yardage: aprox. 1400 yards for main colour, 150 yards for contrasting stripesÂ
Hooks: 9mm and 6.5mm
Measures:
Length from shoulder to bottom edge of back piece — 27“
Bust — 34″
(Though the sweater is quite stretchy, and pattern is easily adjustable by adding or subtracting foundation stitches. One may need more yarn if making a larger sweater.)
Sleeve circumference at shoulder — 14″
Stitches used:
Single crochet — sc
Double crochet — dc
Double crochet together — dctog
Single crochet together — sctog
Slip stitch — sl
Note:
1. Throughout the pattern, the turning ch 3 in dc rows counts as a dc, but the turning ch 1 in sc rows (stripes) do not count as an sc.
2. The main colour is carried up (not fasten off) when making the stripe rows, but the stripe colour yarn is fasten off at the end of each stripe section and not carried up over main colour sections.
PATTERN
Back:
With main colour and larger hook, ch 43.
Row 1: dc in 3rd ch from hook, dc in each ch across, turn.Â
Row 2: ch 3, skip first dc, dc in each dc across, turn.
Row 3: repeat row 2, at the end of the row attach stripe colour, switch to stripe colour while carrying the main colour up.
Row 4: with stripe colour, ch 1, sc in first dc, sc in each dc across (including top of turning ch‑3 of previous row), turn.
Row 5: ch 1, sc in first sc, sc in each sc across (but not in the turning ch‑1 of previous row), switch to main colour, fasten off stripe colour, turn.
Row 6: ch 3, dc in first sc, dc in each sc across, turn.
Rows 7–9: repeat row 2.
Repeat rows 4 to 9 six times.
Next rows: repeat rows 4–7 once.
Neck shaping (right, facing you):
Row 1: ch 3, skip first dc, dc in next 9 dc, 2 dctog over next 2 dc, turn.
Row 2: ch 3, skip first dc, 2 dctog over next 2 dc, dc in each dc across, turn.
Row 3: ch 3, skip first dc, dc in each dc across, fasten off.
Neck shaping (left, facing you):
Row 1: count 29 dc from the right edge, attach yarn to next dc. ch 3, skip first dc, 2 dctog over next 2 dc, dc in each dc across, turn.
Row 2: ch 3, skip first dc, dc in each dc until last 2 dc, 2 dctog over next 2 dc, turn.
Row 3, ch 3, skip first dc, dc in each dc across, fasten off.
Front:
Crochet exactly the same way as Back, except repeat rows 4–9 five times instead of six times.
Crochet neck shaping the same way as Back.Â
Sleeves:
With main colour, ch 29.
Rows 1–6: same as Back rows 1–6.
Row 7 (increase row): ch 3, skip first dc, 2 dc in next dc, dc in each dc until last 2 dc, 2 dc in next dc, dc in top of turning ch, turn.
Rows 8–9: ch 3, skip first dc, dc in each dc across, turn.
Rows 10–12: same as Back rows 4–6.
Repeat rows 7–12 twice more.
Next 3 rows: ch 3, skip first dc, dc in each dc across, turn.
Next 6 rows: repeat Back rows 4–9. Fasten off.
The sleeve should be 33 stitches wide at the top edge. Repeat for the other sleeve.
Assembly:
Crochet shoulders together using slip stitch.
Mark the 17th dc at the top edge of the sleeve. With right sides facing, match the 17th dc at the top edge of the sleeve to the shoulder seam and pin it down. Pin down the rest of the top edge of the sleeve to the front and back of sweater. Crochet sleeve to body of sweater. It might need a slight bit of stretch to make sure that the sleeve is 14″ wide when unfolded. Repeat for the other sleeve.
Lower edge:
With smaller hook, main colour and right side facing, attach yarn to centre back of hem, sc in each st until the edge.
You are now working along the side of the rows in the longer back piece. ch 2, sl st in the top of first row from the bottom edge, ch 2, sl st in top of second row, ch 2, sl st at the point where the back piece meet the front piece.
sc in each st along the front hem, sc in the point where the front piece meets the back piece.
Now work along the side of the rows in the longer back piece. ch 2, sl st in base of second row from the bottom edge, ch 2, sl st in the base of first row, ch 2, sl st in the bottom corner.
sc in each of the remaining st in the back hem. Fasten off.Â
Neck edge:
With smaller hook, main colour and right side facing, attach yarn to centre back of neck. sc evenly around neck. Generally, I worked 1 sc in each st, and 2 sc in each row when I’m working on its side, and 3 sctog when there is a steep curve (in the first 2 neck shaping rows). I hope this makes sense. Ultimately it’s about crocheting around the neck in a way that pulls it together a little.
Weave in all ends.
And that’s it! Let me know if you spot any mistake or have any question!
Happy fall! :D


Very important question : How much yarn do I need to buy, I was going to buy 3 rolls of Lion Brand Yarn and each roll is 145 yards so thats 435 yards all together. Is that enough or do I need to buy one more?
so sorry that I didn’t include that information in the pattern! depending on the size you’re making, you’d probably need at least 1000–1200 yard. crocheting does use up a lot of yarn. hope this helps! thanks so much for visiting!
Hey! I really like this pattern and want to start on making it… but I notice you don’t have a gauge of any sort… do you have any idea on what it was? I just don’t want to start and get half way done and realize that the gauge is completely off and I’m making an awfully small or large sweater! haha.
Thanks,
Ari
thank you for asking about the gauge! i included it on the ravelry page but forgot to put it in the pattern too. here it is:
11 stitches and 6 rows = 4 inches. to make a swatch: ch 13, dc in 3rd ch from hook, dc in each dc, turn. *ch 3, skip first dc, dc in each dc across, last dc in turning ch, turn*. Repeat from * to * until there are 6 rows altogether.
hope this helps! thank you for giving this pattern a try!
Thanks so much — this helps a ton.
Can you explain the neck shaping a little more to me what you mean by right and left and where i start it? I’m still a beginner so some patterns are confusing.
hi Lexi, thank you for giving this pattern a try! the right side of neck shaping is a continuation from the back. so don’t fasten off after the end of the section under “back”, and just turn the piece and follow the pattern. For the left side, count 29 dc from the right edge (the side that you just finished making the neck shaping section) on the last row of back, then attach yarn to the next dc, and follow the pattern from there. hope this is helpful!
Thank you so much!