So, when we were planning our wedding 7 years ago I learned of this term, “going away outfit”. It’s supposed to be the outfit that the bride changes into when the couple leaves the reception to go on their honeymoon (at least that’s what I heard).
I never had any dress change during my wedding, let alone a going away outfit. But summer trips are also great opportunities to make new clothes! Last year I made a new shirt for our trip to Chicago.
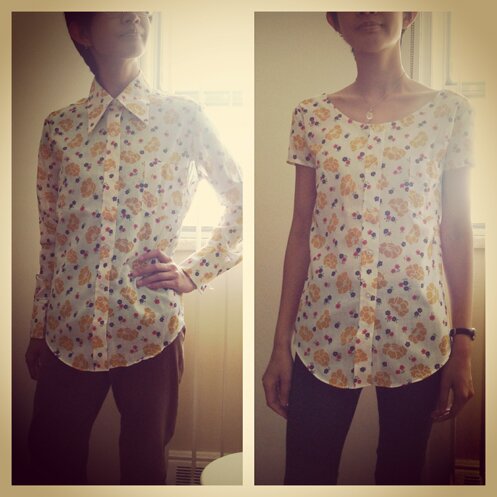
And so this year I thought I’d make a new shirt too. Brings new meaning to the idea of a “going away outfit”. The new shirt is made from a thrifted shirt from Black Market. There was this whole lot of them and they looked brand new. Overstock that’s been sitting in some basement for years, I guess? They all featured exaggerated pointy collar. I think it’s a lovely shirt, the pointy collar is quirky, my friend bought the same shirt and she looks super fabulous in it. It just… didn’t look like something I would wear. But I LOVE the print.
So I removed the collar, cut the sleeves short, took in the sides a bit, and hemmed the neck and sleeve edges. Better, isn’t it?
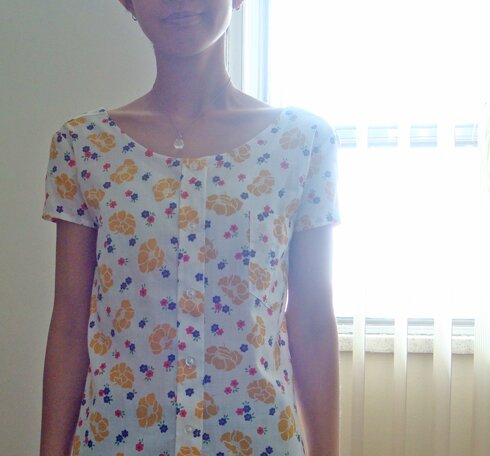
I’m even able to preserve the pocket! And I love its length. Here’s a closer look at the lovely print.
But next time I’ve really got to measure. I cut away too much fabric around the sleeves and it almost didn’t fit, had to reduce the seam allowance to 1/4″ (>_<) I’ve really got to measure from now on…
These shirts were 5 bucks each! Maybe I should get a couple more with different prints…
SO! Where are we going, you ask? Quebec! Haven’t been there since my family took a bus tour there when I was a kid. Can’t wait to see it again with new eyes. Will be posting pictures when we’re back, of course!
Wishing you a fabulous week with fun and inspiring adventures, wherever you are :)


I think that you did a great job, It is so lovely!
thank you! and thanks so much for visiting! :D
Love this!
thank you! :D
I really love this blouse redesign! You did a wonderful job and it’s making me take a look at thrifted clothing in a different way. :)
thank you for visiting my blog Itaya! thrift store shopping is so much fun :D
Hi! great redesign! do you have a tutorial for this? Thanks!
Thanks so much for visiting, Vida! I didn’t write a tutorial for this, but planning on refashioning another one of these shirts (different print :D), so I might write a tutorial when I start working on that, since there seems to be quite a bit of interest!
I love your updated shirt. Sure will give this a try. I love thrifting, now I have something new to hunt :)! A tutorial would be great.
Thanks
Thank you for visiting Ruth! :D
Yes, this is a very cute top and it would be nice to have a tutorial. You have inspired me to try to refashion one myself.
I’ve found nice shirts in the thrift store and would like to have a different top from them. Thank you for sharing.
Janet.
thanks so much Janet! i’ve been planning to write a tutorial, but haven’t been sewing much this summer and focusing on knitting instead… i do still plan on refashioning the other shirt i have sometimes soon… will keep you posted! :D
Lovely, lovely idea! Recycling this old shirt made it look so fresh and new. Thank you for sharing your inspiration!
Thank you for visiting, Anna! :D
Thank you for this lovely idea. Now I have a question. Can you serge a sweater if you cut it down to redesign it somehow. Been thinking about this lately… and to add crocheted trim.
Thank you again.…the idea is awesome.
Hi Carol, thanks for visiting! I’ve never used a serger, so I’m not sure…
I have my own silk big shirts. And I will use your idea and add a chain belt around the waist. They were barely worn and I kept them. As the fabrics are beautiful …you know the era, shoulder pads. Thx!
I have re fashioned sweaters without a serger. Used a wide zig zag stitch with longer stitch. I call it a running zig zag. After stitching the seam, i use a regular zig zag to prevent ravel. I hold it so the seam finish does not stretch. Have made hats and mittens from old sweaters.
thanks Lola! happy sewing! :D
i use zig zag stitch to prevent fraying in fabric too :D
Hi there! I love the shirt redesign. I’m wondering how you hemmed the neck? Did you do it little by little, sort of puckering the fabric slightly as you go, or is there some fancy way to hem a neckline where it lies flat? Thanks so much for sharing!!
Thanks for visiting, Alex! I just rolled the hem little by little, and yes, the fabric would pucker slightly as I roll it. I do pin it down before sewing it with the machine. Hope this helps!
I love your cute blouse trish. I’ve done a few of these because of lovely fabrics and it’s fun to get to sew only the fun area, having all the boring, basic stitching done already. I know this is a very old post, but hopefully will still help others. It is in no way a criticism of trish’s work, it’s just different. Each of us finds our own method when you do something enough times. Depending on the fabric, I’ve had to redo trish’s method because of all I didn’t know, even though in my imagination it was very lovely and perfect in every way! Lol
Remember, the sharper the curve on a neckline, the more puckering there will be through the curves! This methodhas worked for me but I generally like a more finished look. Having a mother who was a designer and professional, I was taught well. But she also used shortcuts.
Neckline could be faced with narrow bias tape, remembering to cut small slits in the curved seam allowance areas of bias tape up to, but not into the stitching, allowing you to ‘slightly’ stretch the fabric in curved area when sewing, easing out any puckering. On right side,stitch in the ditch to keep fabric flat when finished. Underneath, pin, then stitch bias tape to blouse so you don’t have raw bias tape edge. If you choose trish’s method, sew a few basting stitches thru the curved area of neckline only, on seam line (to remove soon),depending onfabric. Cut small slits up to stitching, as above, gently stretching as you sew curved neckline seam. Remove basting stitches. Hopefully, you have now eliminated as much puckering as possible. If you have a looser woven fabric, this may not be a problem and you saved yourself all this compensating for the lack of stretch in woven fabrics. I hope this is clear. Try your method on scrap fabric first for easing thru the curved area so you won’t ruin your pretty blouse and to give you confidence enough to try it. :) Happy sewing. Gotta love upcycling!
Thanks so much for visiting Lee Ann! And thank you for sharing your sewing knowledge! Happy crafting!
I was trying to think of ways to make some cute spring and summer tops. This has help spark my creative juices. I really like the finished product
Thank you so much! Happy sewing! :D