Errata in row 1 — sorry about that!Â
 New pattern! :DÂ
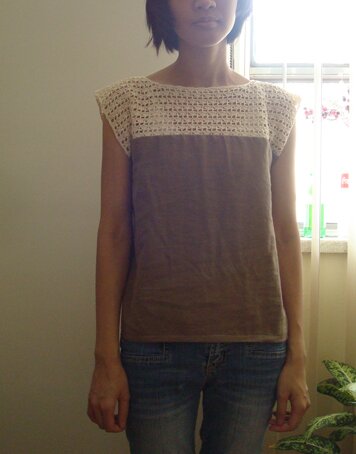
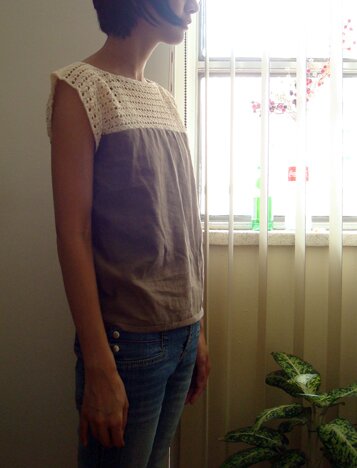
Really liking those half-lace blouses that are popular nowadays. So I figure I could make my own lace :D
It’s basically a part crochet, part fabric square top (my favourite kind of shirts!) with neck shaping.
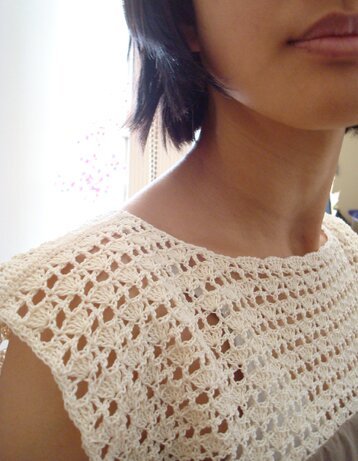
I tried to make a ginkgo leaf pattern in the lace.
The size I made is 34″ around. But it’s a simple grid-like pattern repeat so every part is easily adjustable.Â
I used one skein of #10 cotton crochet thread, and a 2.5mm hook.
Lace pattern starts from the bottom.
Shell = 5 dc in 1 st
Shell in the beginning/end of row = 3 dc in 1 st
Lace (make 2)
ch 135. (for size adjustments, add or minus multiples of 6 stitches. 6 stitches equals approx. 0.75″)
Row 1 (WS): ch 3, dc in 4th ch from hook, dc in each ch across.Â
Row 2 (RS): ch 3, 2 dc in same st, skip 2 dc, dc in next dc, [skip 2 dc, 5 dc in next dc, skip 2 dc, dc in next dc] across, skip 2 dc, 3 dc in the top of turning ch. Turn.
Row 3: ch 5, skip shell in the beginning of row, dc in next dc, [ch 2, dc in 3rd dc of shell, ch 2, skip rest of shell, dc in next dc] across, ch 2, dc in top of turning ch. Turn.
Row 4: ch 3, 5 dc in next dc, [dc in dc, 5 dc in next dc across], dc in 3rd ch of turning ch. Turn.
Row 5: ch 5, dc in 3rd dc of shell, [skip rest of shell, ch 2, dc in next dc, ch 2, dc in 3rd dc of shell] across, ch 2, dc in top of turning ch. Turn.
Row 6: ch 3, 2 dc in same st, dc in next dc, [5 dc in next dc, dc in next dc] across, 3 dc in 3rd st of turning ch.
Row 7 — 16: crochet rows 3–6 twice, then rows 3–4
Right neck shaping:
Row 17: work as row 5 until 15 dc’s are made, dc in 3rd dc of next shell, turn.
Row 18: ch 3, skip 1st dc, dc in next dc, [shell in next dc, dc in next dc] to end, 3 dc in turning ch, turn.
Row 19: ch 5, work as row 3, dc in 3rd dc of last shell, skip rest of shell, dc in next dc, turn.
Row 20: ch 3, skip 1st dc, shell in next dc, work as row 4 to end.
Row 21: ch 5, work as row 5, dc in 3rd dc of last shell, dc in turning ch.
Row 22: repeat row 18.
Row 23: ch 1, sc in same st, sc in each st across. Fasten off.
Left neck shaping:
With wrong side facing, counting from the left edge, attach yarn to 3rd dc of the 8th shell.
Row 17: ch 3, skip remaining dc of shell, dc in next dc, work in pattern to end, turn.
Row 18: work in pattern until second last dc, dc in 2nd last dc, dc in last dc, turn.
Row 19: skip 1st dc, dc in 3rd dc of 1st shell, continue in pattern to end, turn.
Row 20: work in pattern, end with dc in turning ch, turn.
Row 21: ch 3, dc in 3rd dc of 1st shell, continue in pattern to end, turn.
Row 22: work in pattern, end with dc in turning ch, turn.
Row 23: ch 1, sc in same st, sc in each st across. Fasten off.Â
Repeat from beginning for the other piece.
With right sides together, sew shoulder seams together.Â
With right side facing, work a row of sc evenly across each sleeve edge by crocheting 2 sc in each row.
With right side facing, attach yarn to a stitch in the centre of neckline and sl st in every st around neckline.
Slightly block or gently press the piece so it lies flat.
Now the sewing begins!Â
Determine total length of blouse, or how long you want your blouse to be.
Fold crocheted piece in half along shoulder seams and measure its height from shoulder to bottom of piece.Â
Subtract height of crocheted piece from total length of blouse = length of fabric needed.
Measure width of crocheted piece from sleeve edge to sleeve edge = width of fabric needed.
Add 1/2″ seam allowance on all sides.
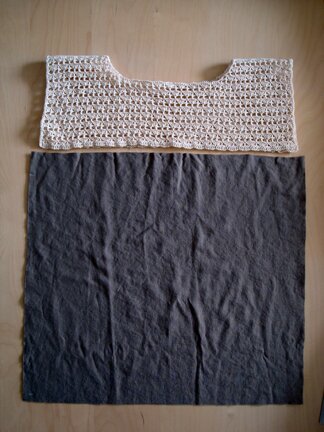
Cut 2 pieces of fabric to measurement.
With the sewing machine, I zigzag stitched around all sides on both fabric to minimize fraying.
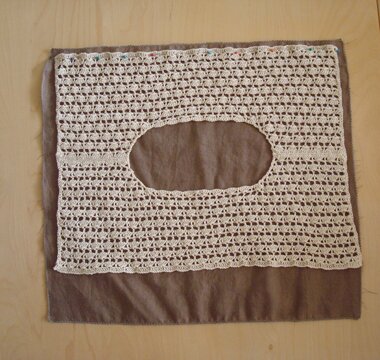
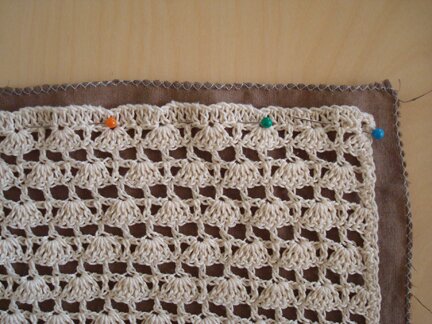
With right sides together, centre crocheted piece on fabric along top edge. Pin bottom row of crocheted piece to the top edge of one piece of fabric, leaving the 1/2″ seam allowance on fabric, like so…
Close up of pinning…
Using small and close-together running stitches, hand-sew fabric and crochet piece together along the stitches between the dc row and the first shells row (where I placed the pins in the photo above).
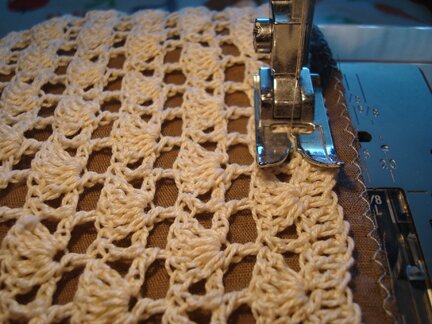
Then machine-sew along the same line with large stitches, like so.
Repeat with the other side of the crochet piece and the other piece of fabric.
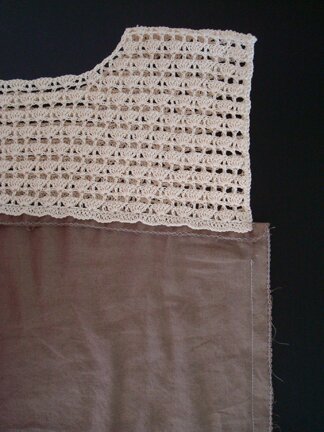
Press seam allowance downward (see photo below).
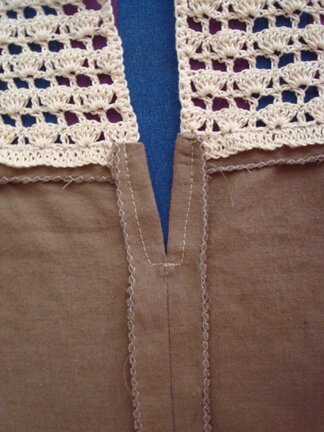
For the length of the armholes, I measured from top of shoulder to mid chest. Alternatively, one could measure a sweater that fits well from top of shoulder to underarm to get the measurement. Mark where the armhole ends on the fabric. Then sew each side seam up to that mark, like so…
Press side seams open. Then sew a V‑shape around the bottom of each arm hole, with the seam allowance of the fabric wrapping around the edge of the crochet piece. Back stitch a couple of times at the bottom of the V, across the side seam. Like so…
Press and sew hem. And we’re all done! :D
Feel free to drop me a note if you want any clarification!
Have a wonderful Thursday! :D
This is really cute! Thanks for the tutorial.
Very pretty! :)
So cute!! Looks like a fabulous pattern; thanks for sharing!
I’m stuck on row 2 of the lace. I have printed out the full instructions. Maybe you could email me?
Hi Marie, thank you for giving my pattern a try! I’ve emailed you, but i’m posting my response here too in case others are interested.
For row 2, you’re basically alternating between a dc and a shell (5 dc in one space) along the row, with 2 stitches between each dc and shell. There’s a close-up of how the 2nd row looks in the photo with the sewing machine, and photo of pinning.
In the very first stitch of the row you’ll do a half shell (3 dc in one space, but the beginning ch 3 counts as a dc, so you’re just doing 2 dc in the very first stitch of the row).
In the very last stitch of the row (a turning ch from the previous row) you’ll also do a half shell (3 dc into the top of the turning ch).
Hope that helps! Happy crocheting!
Hello I am so excited too see this bluse its a must for me too try it’s a design from you that is so creative it’s the look well let you knowing that i did it thanx so much for the time and efort, taking care of a very sick dog but there was this and it made me smile so by renee
Wow its really cute and simple — I have to make this! It looks modern and not at all that kind of “horrible-crochet-takes-over-the-world” — well done! :D
idea utile e carina. Grazie!
Great idea..
I have been looking for a diy top just like this for a few days now! I am so glad I found your blog via Pinterest!! This is adorable! Making one for me and my daughter!! Thanks so much for sharing your tutorial! :)
i’m glad you like the pattern! happy crocheting/sewing! :D
Great idea! :) I hope I can make one! Thanks for the pattern.
Manca
thank you for visiting, Manca! glad you like the pattern!
Hello,
I’ve just discovered your blog and this blouse in particular through http://www.threadandneedles.com
This top is beautiful ! I will have to find the French equivalence for the crochet abbreviations, but as soon as I have it, I’ll try your pattern. Thank you !
thank you for visiting, Audrey! :D
I really like this shirt and I’ve tried to make my own. Everything was going on perfectly but.. I did it too small (It is my first item with the sewing machine). I would like to send a picture but i don’t know how.
I LOVE this! I just started one dor myself with size 10 thread and an E hook. However, after two rows I found thatrhe pattern was uneven. So for others who want to make this and adjust the size, the number to chain would be a multiple of 6 plus 3 (for the end shell stitch). Thank you so much for posting a pattern for this!
thaaaaank you so much for share all your projects. All of them are beautiful and wonderful. since I saw your blog , I love crocheting
thanks so much for visiting my blog monica! happy crafting! :D
This is the coolest shirt ever!! I am on now working on the back piece. You are very generous to share this awesome pattern when you could easily sell it. Thanks again!
thank you for visiting, Jessica! glad you like the pattern. happy crafting! :D
Lovely garment! I’ll try to make something similar some day!
thank you, Ana!
It would be helpful to know what size shirt she normally wears (XS, S, M…), so that others who try to make one would have a reference for how much they might need to scale up or down. I’d love to give it a try, but I’m a little worried about sizing without knowing that or having a gauge.
thanks for visiting Rebecca! the size i made is 34″ (which is usually a small or extra small in most clothing stores and pattern books); for size adjustments, add or minus multiples of 6 stitches in the foundation ch. 6 stitches equals approximately 0.75″, as indicated in the pattern. hope this helps!
I love this tutorial and made a Ginkgo top lady year. This week I made another crochet top by recycling a dress and although I used a different stitch for the crochet element the whole thing was completely inspired by your tutorial. Thanks
http://patternpiper.com/2015/02/19/crochet-clothing-dress-refashion/
Hi, I made this and loved it! Thanks so much for a lovely pattern! I also shared it on my blog. Janette xoox
thanks so much for trying out the pattern Janette! it’s so beautiful! the fabric is gorgeous and i love the colour of yarn you used!
oooh, a refashion! such a lovely top, it looks amazing!
When I chained 135,it ended up being huge. I am about the same size as you so I didn’t plan on any adjustments to your pattern. Should it be 60″ or closer to 40″? I can make adjustments but a gauge would be helpful.
Hi Cynthia, thanks so much for trying out the pattern! Wondering what hook size and yarn weight you’re using? If using the same hook size and yarn in the pattern (2.5mm hook, #10 crochet thread), the finished bust should be 34″, and the gauge is 6 stitches for 0.75″, as mentioned in the pattern. It may be slightly larger if you crochet more loosely than I do, but it wouldn’t be 40″ or 60″. Please let me know if this is helpful.
Oh my gosh, this is so pretty! I love the idea! Thanks for the tutorial! :) Lisa
you’re so welcome! glad you like the tutorial!
It’s really woderfull, I love it.
I want to try ! thanks for the tuto !
you’re welcome! happy crocheting! :D
Very clear pattern. Beautiful, thank you.
You’re so welcome! :D
Lovely top! I don’t crochet much or often. Do you think this would be a beginner piece? Or should I just try it?
hi Marlene! thanks so much for visiting! i’d say definitely give it a try! if you come across any problems just let me know and i can try to clarify :D
Hi Trish
This pattern is gorgeous — I really like it! But I would like something for a long-sleeved t‑shirt. I want to keep the sleeves but replace the top part with a crochet yoke. I tried to figure out how to adapt your pattern, but I’m not so good at that…any ideas? Thanks so much!!
hi Sonia! thank you for visiting! for what you’re describing, i would just make the shirt as per the pattern, and then sew the sleeves on. it would make a sort of box-shaped top. hope this helps!
Hi there — I’m going to give this pattern a try, but just wondered what kind of fabric you used please? Thank you!
hi Anna, thanks for giving this a try! i just used cotton. happy crafting!
Hi Trish, I’m just trying out ur crochet pattern. In row 4 and 6 in brackets it says dc in dc, 5 dc in next dc. This made my row too bulky. I wondered if it is meant to be the same as row 2 where it skips 2 dc between shells?
Thank you
hi Debbie, thanks for giving the pattern a try! Rows 4 and 6 are not meant to be the same as row 2, because row 2 is the only row that is crocheted on top of a row of dc’s with no space in between. There is only 1 dc between shells in rows 4 and 6; the stitch count and the overall pattern won’t work if there are 2 dc between shells in these rows. I wonder if the bulkiness is related to the weight of the yarn you’re using or the hook size? If not, you might also want to double check that you’re following pattern for rows 3 and 5 accurately, i.e. dc’s with ch‑2 space in between? Hope this helps!
Oh ok…THANKS Trish
Hello. I love this pattern. However I am a little confused. In the beginning after the chain the pattern reads WS and I am to dc in every stitch, Row 2 RS and the pattern begins at the end of that it states turn. My confusion is at the end of the foundation row I am still on the RS so do I turn to so I am on the WS? This is my first time doing this kind of pattern so I want to make sure I am absolutely correct. Thank you.
Hi Mica, thanks for giving the pattern a try! You should turn the piece at the end of every row to work on the following row. So row 1, which is dc in every ch, is the wrong side. You turn at the end of row 1. The right side is facing you when you work on row 2, then at the end of row 2, you turn the piece, so that the wrong side is facing you when you work on row 3. Hope this makes sense! Happy crocheting!
Hi. I see the measurement is 34″ around but it’s crocheted flat… So is it 17″ across and then once sewn together it is 37″?
I seem to need 20″ across (L cap sleeve edge to R cap sleeve edge), since I am larger than you are! So I need to add 3″ to width. Your directions say to add 6 sts for each .75″, so that would be 36 stitches extra, right??
Thank you
So
Much!
I meant to type that it is 34 across, not 37. Oops.
Hi Naidre, thanks for giving my pattern a try! Yes, the top I made is 17″ across for each of the front and back pieces, and sewn together they make 34″ around. So if you’d like to add 6″ in total so that you have 40″ around, you would add 3″ to each of the front and back pieces. 6 sts = 0.75″, and 3″ divided by 0.75″ = 4, which means that you’d need to add 24 stitches to each of the front and back pieces. Hope this helps! Happy crocheting!
Thanks for your reply!! This will be my first summer project! I’ll report back to you.
I love this project. I would like to try to make this. Thank you for sharing.
Thank you! Happy crocheting!
Thank you for sharing, I loved it.
thank you! happy crocheting!
MUCHAS GRACIAS POR EL TUTORIAL!! ME SERÃ DE GRAN UTILIDAD
You’re welcome! Thank you! :D
Thank you for this tutorial,Trish!! You helped me a lot…I didn’t no how to
attach the yoke to the skirt with the machine…!!
Have a nice day.….!!!!
you’re welcome! glad you enjoyed the tutorial!
Thank you so much for this pattern! Blouses like this are my favorite. I bought one from Old Navy 2 years ago, that I love. It only came in white and I am the clumsiest person I know. I can not wait to make this is different colors and to try using this weight yarn.
I’m glad you like the pattern! Happy crocheting!
hola, siempre intente realizar, me encanto el diseño
gracias por dar las explicaciones, tratare de hacerlo en un talle más grande
thank you for giving the pattern a try!