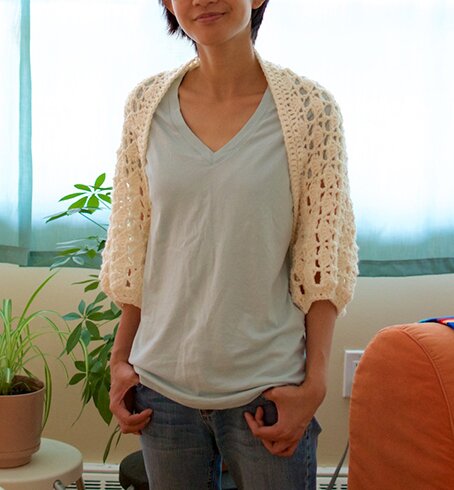
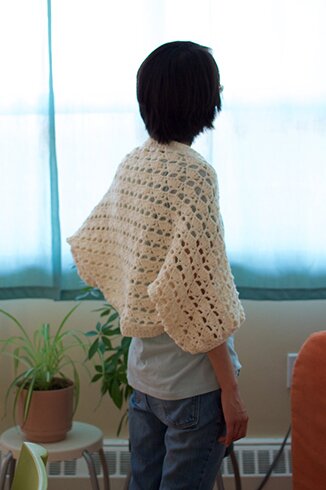
This shrug uses the same lace pattern as the ginkgo top (and almost the same stitch count!), but with much heavier yarn and larger hooks. Basically, a blown up version of the ginkgo lace pattern. And no neck shaping! Isn’t that nice? :D Such is the beauty of shrugs.
I thought it would make a nice piece for late summer nights easing into fall.
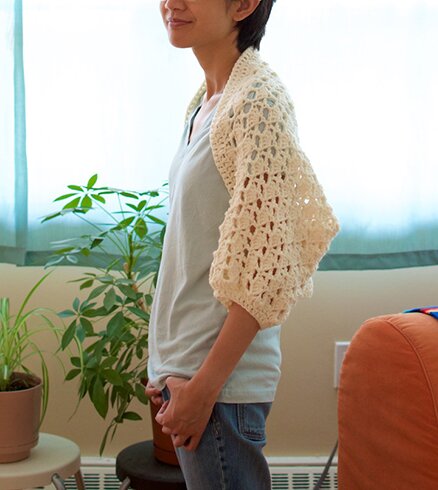
The shrug measures 38.5″ from cuff to cuff, and 20″ from neckline to bottom edge. It’s a very quick make, took me 2 evenings to finish while watching TV :)
What I used:
Worsted weight yarn, approx. 700 yards
6mm and 5.5mm hooks
Tapestry needle for sewing.
Pattern:
Note for size modifications: to increase the length from cuff to cuff, i.e. longer sleeves, add multiples of 6 ch to foundation chain. 6 stitches = 1.75″
With larger hook, ch 136.
Begin with row 2 of the ginkgo lace pattern (but slightly modified, because we’re skipping the first row of dc’s in the original pattern) as follows:
Row 2: 2 dc in 4th ch from hook, skip 2 ch, dc in next ch, [skip 2 ch, 5 dc in next ch, skip 2 ch, dc in next ch] across, skip 2 ch, 3 dc in last ch. Turn.
The rest is just the same as the ginkgo lace pattern. To make things easier I’ve pasted it below.
Note: shell = 5 dc in a stitch, or 3 dc in a stitch
Row 3: (WS) ch 5, skip shell in the beginning of row, dc in next dc, [ch 2, dc in 3rd dc of shell, ch 2, skip rest of shell, dc in next dc] across, ch 2, dc in top of turning ch. Turn.
Row 4: (RS) ch 3, 5 dc in next dc, [dc in dc, 5 dc in next dc across], dc in 3rd ch of turning ch. Turn.
Row 5: ch 5, dc in 3rd dc of shell, [skip rest of shell, ch 2, dc in next dc, ch 2, dc in 3rd dc of shell] across, ch 2, dc in top of turning ch. Turn.
Row 6: ch 3, 2 dc in same st, dc in next dc, [5 dc in next dc, dc in next dc] across, 3 dc in 3rd st of turning ch.
Repeat rows 3–6 until piece measures approx. 18″ from beginning, or desired length. Ending with row 4 or 6. Fasten off.
Finishing:
Fold piece in half lengthwise with wrong side facing out. Sew seam together, starting from the cuff edge, along the long side of the piece, sew 5.5″ towards the centre of the piece (about 3 and a half shells). Repeat on the other side. Turn piece right side out.
Edging:
Neckline/front/back: With larger hook and right side facing, attach yarn to any stitch along the last row crocheted, ch 3, dc in each dc except the 3rd dc of each shell. When crocheting along the bottom side of the shrug (i.e. along the foundation ch), work 2 dc in each 2 ch space, and 1 dc in the base of each shell, but skip the ch at the base of a dc. Crochet around until end of round, sl st in top of beginning ch, ch 3. Do not turn, dc in each dc around, sl st in top of beginning ch, fasten off.
Cuffs: With smaller hook and right side facing, attach yarn to any space on cuff edge. The stitches will be crocheted into the side ends of the rows, or “row-ends”. ch 3, 2 dc tog in each row-end around, sl st in top of beginning ch, ch 3. Do not turn, dc in each dc around, fasten off. Repeat on the other cuff.
Weave in ends.

Happy crocheting! :D
i LOVE my ginkgo top and can’t wait to make this! Such a good idea!
So pretty! Thank you for the pattern!
thank you Darlene! :D
thanks so much Sam! happy crocheting! :D
Thank you for sharing! I just love this shrug!!! <3 I´m going to try to make it, thank you very very much!!
Love your page btw! :)
you’re so welcome Virginia! hope you enjoy the pattern! :D
Hi Trish,
Your shrug design is just so cute. I think I made a mistake some how though, I hope you can help. Are all the edges supposed to be straight? My arm edges were on an angle; not straight. I ripped out and am going to start over but don’t want to make the same mistake. I added 10 inches but stayed in the guidelines you gave of multiples of 6. Maybe I skipped a stitch? Do you have any other photos, maybe from before you closed the arms? Hope you can help. Thank you for providing a free pattern and for offering help.
Thank you,
Destinee
Hi Destinee, thank you for giving the pattern a try! Try counting how many shells you have in the first row, then as you go along count to see if you still have the same number of shells every other row, if there are more or fewer shells, that means you’ve added or skipped stitches along the way, usually in the beginning or the end of row. Another reason can be tension, if you started off crocheting more tightly in the beginning and then became more loose towards the end, or vice versa. I don’t have other photos of the shrug, but it should just be a rectangle before sewing the sleeves together, with all straight edges. Hope this helps!
it’s so cute, congratulations!!
Thank you! :D
Hi!I really like this shrug. I’d like to do it with a multicolor yarn and the one i like is for a 3 1/2 or 4mm hook. I guess i will need to increase the lengh, isn’t it? Thanks
Hi Alexia, so sorry about the delay in reply! If you’re using a lighter yarn, the gauge will be different, so yes increase the number of foundation ch in multiples of 6 until you get the length you need. Hope this helps! Happy crocheting :)
Thank you so much for sharing your pattern. I’m so excited to make this. Thankfully I already had my yarn. I grew up wishing I had something like this. My grandmother & great grandmother were born and raised in Tokyo Japan and they both wore shrugs like this but they were knitted. I love crochet and cannot wait to crochet my own and many others. I’m always freezing and now I’ll always have this to keep me warm. Again thank you so much for sharing your pattern
You’re so welcome Christina! Happy crocheting!
I am a little confused about sewing for the sleeved .if yoy could email me exactly how the shrug is sewn.Ilove the lacy shell pattern.
Thank you for sharing the pattern. I am excited to make this. I am a confused about how to sew it together. Could you please explain in more detail exactly how to sew it together. Thank you
Thank you for visiting my blog. The sewing instruction is under “finishing” in the post. Basically you would fold the piece length-wise with wrong side facing out. Then sew along the long edges for 5.5″ from the cuff/short edge toward the centre, on both ends. Hope this helps, happy crocheting!