favourite things! the special ornament edition

I love orna­ments. It is my go-to craft when I don’t know what kind of gifts to make for some­one, and with cer­tain ones I hang them around the house on win­dows and plants all year long :D

So here are my favourite orna­ment tuto­ri­als from all around!

This one would be great to make with kids! And I love the rhine­stone eye!
(From All about you)


Per­fect gift for that spe­cial some­one who believes that every­thing is bet­ter with bacon. XD
(From Sere­meres)


My friend point­ed me to this blog and I found this super cute snow­man, which would make an adorable orna­ment! Also check out the pom pom owl tutorial!
(From maed­chen­mitherz)

And while brows­ing around on maed­chen­mitherz (it is such a love­ly blog with such fresh and cute ideas!) I found this! :D

This is not an orna­ment, but I must share a pic­ture — it is just bril­liant! The eyes are actu­al­ly but­ton clo­sures! It has instant­ly jumped to the top of my list of projects! :D
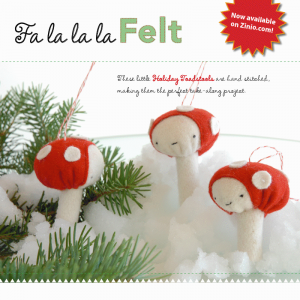
 

These mush­rooms come from the book Fa la la la Felt, the pub­lish­er is shar­ing a tuto­r­i­al from the book for these love­ly mush­rooms! Aren’t they the cutest? I need them on my tree.
(From The Long Thread)

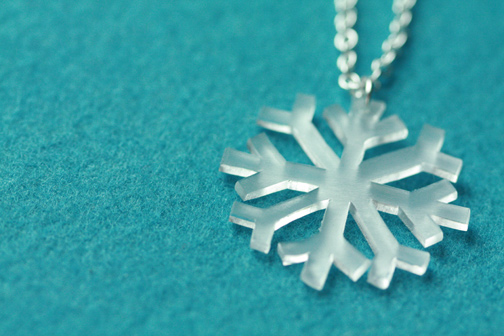
And while brows­ing on The Long Thread, I saw this absolute­ly adorable snowflake necklace…

… made of shrink plas­tic! An orna­ment for the neck! My neck! And so as I typed this I hur­ried to my craft cor­ner to check if I still had shrink plas­tic — and to my relief there is still half a sheet! YES! This, my friend, is also at the top of my project list.


Anoth­er orna­ment involv­ing one of my favourite things — acorns! An acorn cap nest, and the eggs are paint­ed soy beans! :D My tree also needs this.
(From Twig and Toad­stool)


Who would ever be able to tell that this ele­gant orna­ment was once a juice can?
(From michele made me)

And check out these wreath orna­ments made from the hum­ble loo roll!

AND the egg car­ton flow­ers! The pine cone-like one in the front row is sim­ply gor­geous, it will make an excel­lent ornament!

And look at these beau­ti­ful win­ter lanterns!

They’re just breath-taking!

So, clear­ly I’m com­plete­ly side­tracked at this point (read­ing craft blogs is like going down a rab­bit hole!) and this post is no longer just about orna­ments. But now I have enough on my project list to last until next Christ­mas :D And I hope you find inspi­ra­tions in the tuto­ri­als I gath­ered here as well!

Tomor­row I hope to share with you the assort­ment of orna­ments on my tree! Stay tuned! :D


the threadless festive brooch

In my quest for an even sim­pler brooch-mak­ing method than my last fes­tive brooch, I came up with a thread­less ver­sion. It’s not tech­ni­cal­ly thread­less, since rib­bons are made of woven threads. It may be more accu­rate to use the term “no-sew”, but when Mike he saw me mak­ing this he said, “oooh! It’s thread­less!” So I fig­ure I’d stick with “thread­less” :)

I wore it to a Christ­mas din­ner last night! :D

It is so ridicu­lous­ly quick and sim­ple and costs very lit­tle to make, so it might be a good project if one needs to make small gifts for a group of friends or co-work­ers or class­mates or extend­ed female fam­i­ly mem­bers. And with this method one could com­bine dif­fer­ent colours of rib­bons, which I think makes it even more fun and festive.

So, any­way, one could prob­a­bly fig­ure out how to make it just by look­ing at the pic­ture, but I thought some step-by-step pic­tures would also be helpful.

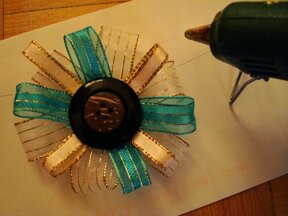
First, using pieces of rib­bons around 7 inch­es in length, I made loops and taped them in the cen­ter with dou­ble sided tape, like so…

After mak­ing loops with dif­fer­ent colours, I lay­ered them, over­lap­ping in the cen­ter, and then sta­ple them togeth­er in the center.

I then attached the but­tons with hot glue.

And final­ly, I attached the pin back with hot glue.

And there we have it, a 5‑minute fes­tive brooch! (That is, if one does­n’t spend half a night pick­ing out colours of rib­bons and com­bi­na­tion of but­tons like me.) One could also thread a rib­bon or what­not (I used raf­fia) through one of the rib­bon loops to make it an orna­ment when not wear­ing it as a brooch!

Have a love­ly day! :D

the making of festive brooches

Whoa! It’s Decem­ber already! Friends are say­ing that their hol­i­day dec­o­rat­ing / bak­ing / shop­ping are well under­way, but since I’ve spent the past month trav­el­ling I’m bare­ly feel­ing the Christ­mas excite­ment at this point. A fes­tive craft might help fix that!

Actu­al­ly, I need­ed to find sim­ple yet fes­tive craft ideas for an upcom­ing project. I spent last night search­ing on dif­fer­ent blogs and craft sites for projects that involved the least amount of sewing and use of hot glue. This idea came about as I was twid­dling around with some rib­bons. I thought they’d make nice last-minute gifts so I made a bit of a tuto­r­i­al to share :D

Apolo­gies for the hor­rid dis­coloured pic­tures and the funky back­grounds — I was in a bit of a rush and did­n’t get around to set­ting up a nice pho­to-shoot. But I hope you get the idea. As always if there’s any question/comment feel free to drop me a note! :D

To make one fes­tive brooch, I used:

30 — 40 inch­es of 3/4‑inch ribbon

assort­ment of buttons

a push pin

some kind of thick padding, like a sponge, or thick piece of Styrofoam

sewing nee­dle, threaded

a pin back

a hot glue gun

felt (option­al)

Step 1: Wrap rib­bon around 4 fin­gers secure­ly but not so tight that it can’t be slipped off the hand after, and ensure that the loops are stacked neat­ly on top of one anoth­er, like so…

Step 2: Slip loops of rib­bon off the hand, hold­ing it in the cen­ter, like so…

Step 3: With the push pin, pin the stack of rib­bon to the piece of padding (I used a new kitchen sponge) in the cen­ter-ish point of the rib­bon (does­n’t need to be per­fect, just make sure that the pin goes through all the lay­ers), like so…

Step 4: Fan out the rib­bon loops by gen­tly tug­ging on the loops, like so… (it helps to begin by tug­ging the top half and bot­tom half toward oppo­site direc­tions a bit at a time. And yes, it’s much more effi­cient to do this with two hands. I only pho­tographed one hand because one hand need­ed to hold the camera.)

Step 5: When sat­is­fied with the shape, hold it togeth­er in the cen­ter and take it out of the sponge/foam with the pin still in it, like so…

Step 6: Remove pin, still hold­ing it togeth­er in the cen­ter, take the thread­ed sewing nee­dle and make a small cross stitch through all the lay­ers in the cen­tre, like so…

Step 7: With same thread, sew but­ton in the cen­ter. I like to top it with anoth­er small­er but­ton in con­trast­ing colour.

Step 8: Sew through but­tons twice and tie off at the back (it helps to line up the but­ton holes).

Step 9: Attach pin back to the back with a big glob of hot glue (apply glue to the rib­bon, NOT to the pin. Hot glue + met­al pin = burnt fingers!)

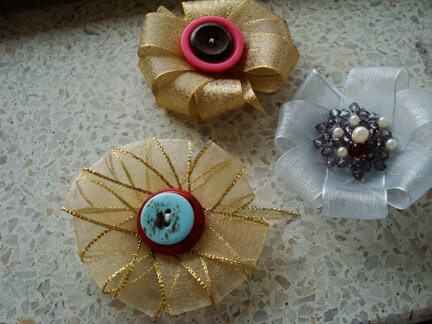
And there you have it, a brooch to put any out­fit into fes­tive mode! :D Here’s one made with a sheer kind of rib­bon, which I prefer.

Now, if one has more time beads can be sewn in the cen­ter instead of buttons.

I ini­tial­ly made the bead­ed pin as a sam­ple for pho­tos and thought I would put it in the shop after, but after tak­ing pic­tures of it this morn­ing with this par­tic­u­lar sweater I’ve decid­ed that I’m keep­ing it :P The shop will have to wait.

For bead­ed brooches I would rec­om­mend sewing the pin back to a piece of felt and then hot-glu­ing the felt to the rib­bon flower, so it’s more stur­dy, like so…

With the mul­ti-steps I think I made it look more com­pli­cat­ed than it actu­al­ly is. It’s actu­al­ly quite straight­for­ward, and took me an hour to make the two but­toned brooches, and that’s with me being inde­ci­sive about the colour com­bi­na­tion of the but­tons.  It would be fun to play around with dif­fer­ent tex­tures and length of ribbons.

Hope you enjoy this and thank you for visiting!