from the deep, dark sea…

Have been neglecting my shop for a while (it’s a rented cubby in my friend’s gift shop). It was sparse and pitiful-looking when I went in to look for a greeting card earlier this week :’( So I plunked myself down in my studio (aka couch and coffee table) this weekend, and came up with these –

A family of deep sea creatures :D

Photo 2015-08-30, 6 59 41 PM

Close-up of “Inky and the Moon” — moonstone and crocheted squid.

Photo 2015-08-30, 6 56 16 PM

I also like to spend a lot of time writing and drawing the packaging. I hope the customers find them as amusing as I do… (Mike walked by when I was working on the cyclops and he commented, “he’s watching you!”, hence the tagline. We’re a great team :D)

Photo 2015-08-30, 6 34 26 PM

I’m actually terrified of deep water, and cannot swim to save my own life, but I’m strangely attracted to sea-related things… I have more ideas swimming in my head (haha) for sea creature brooches and such, looking forward to making them in the upcoming weekends (or maybe even during the week if I can conjure up the energy)!

Hope you have a fantastic week!


yarn-filled day of fun!

At the TTC Knitalong — an annual charity event in which groups of crafters spend a Saturday travelling (and knitting/crocheting) on public transit to visit multiple yarn shops across the city.

Proceeds of the event go to a local women-centered agency, participants get to hang out with fellow crafters and meet new people, yarn shops get lots of visitors and love — everybody wins! Whoever invented this is a genius. It is in its 10th year and this year’s got the biggest turn out yet! The only disappointment is that I didn’t know about this in previous years… will definitely join again next year.

And now, some pictures from my day :D

My group started at Wool-Gathering in the west end. It has on display this beautiful rug, which makes me want to learn rug hooking one day.

Photo 2015-08-22, 11 05 23 AM

I also love these small rugs with vibrant, abstract designs.

Photo 2015-08-22, 11 14 20 AM

Our next stop was Passionknit. Look at these delicious colours! More excited than a kid in a candy shop :D

Photo 2015-08-22, 12 40 46 PM

I spotted this photo of me on instagram, knitting along on the subway, and chatting with our awesome team captain :D (if you’re wondering, I’m making a keyhole scarf in fisherman rib)

11363888_1680194598866267_2110060111_n

In the meanwhile, our other team captain completed a snowflake on the subway while standing the entire time!

Photo 2015-08-22, 12 19 23 PM (1)

Then we hopped on the approaching train above and made our way to a sun-filled Lettuce Knit in Kensington Market. These friendly ones are enjoying the sunny spots and relaxing by the knitting pile…

Photo 2015-08-22, 2 36 15 PM

Also hanging out in the sun…

Photo 2015-08-22, 2 31 25 PM

This was when I remembered what my mom used to always say to me when I was a kid and we were at the store and I wanted to bring home all the plush animals. “You can give it a hug and put it back.” Such dreamy colours…

Photo 2015-08-22, 2 46 51 PM

We spent some time on the patio outside. Spotted these cheerful yarn-wrapped branches. My phone camera does not do the colours and sunshine justice.

Photo 2015-08-22, 2 58 29 PM

And this beautiful yarn-bombed bike!

Photo 2015-08-22, 3 02 09 PM (1)

More knitting on the streetcar…

Photo 2015-08-22, 3 24 44 PM (1)

… and arriving at our final shop, The Knit Cafe :D I’ve always been a big fan of the shop and its fabulous window displays.

Photo 2015-08-22, 3 58 21 PM

People chatting about patterns, marveling at the wool, the warm afternoon sun pouring in, the ball-winder busy spinning… the happiest place :)

Photo 2015-08-22, 4 04 14 PM

And look who I ran into :D

Photo 2015-08-22, 4 02 37 PM

Found the secret knitting garden.

Photo 2015-08-22, 4 07 07 PM

Here we are at our final stop, the Firkin for drinks, food, and more knitting.

Photo 2015-08-22, 5 32 18 PM (1)

I didn’t buy a whole lot that day, wasn’t at all prepared with shopping list or even project list, and feeling slightly overwhelmed most of the time (not a bad thing though), mainly because I didn’t know what to expect. But I did get a skein of hand-dyed wool from Wool-Gathering (far left), because the colours remind me of sunsets, and a giant skein of Cascade Ecological wool (centre), because I love the colour and it was the last skein on the shelf (I already have an idea of a sweater for it, but have to finish my holiday crafting first). ALSO! I won a draw at Lettuce Knit, which generously donated 4 skeins of wool the colour of strawberry ice cream :D I was rather surprised, because I don’t ever win anything.

Photo 2015-08-22, 7 41 05 PM

This means I definitely have to join the knitalong again next year :D

I actually don’t knit or crochet on public transit very often, because sometimes I get motion sickness from it, especially on the bus. But after the knitalong I think I will start bringing my knitting to work, so I can at least knit after work on the subway (there is no hope of getting a seat in the morning, and I haven’t developed the skill to knit/crochet while standing yet :P). It’s actually quite calming, and I think it will do me more good in terms of de-stressing than playing Angry Birds.

Hope everyone has a wonderful week! :D


water’s edge, a remake


2015-07-25 00.04.34

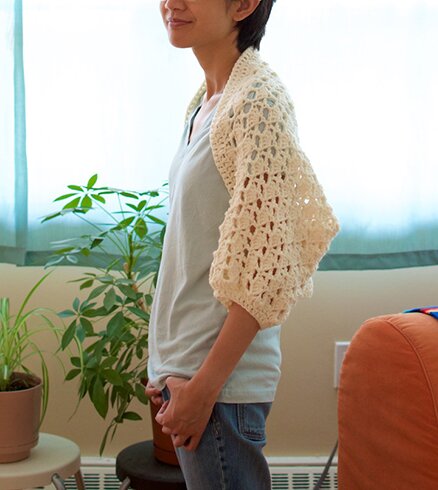
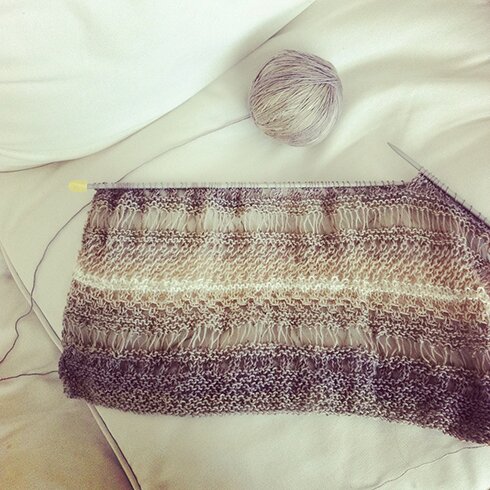
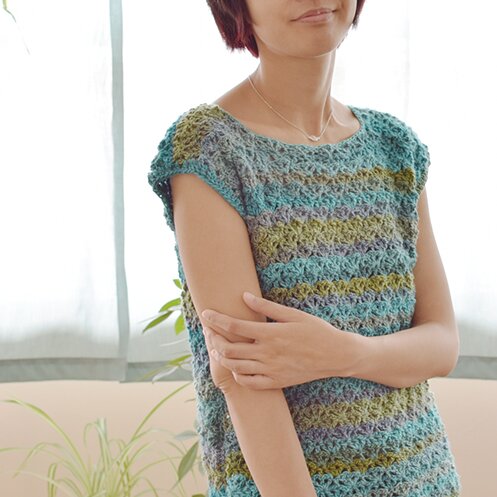
A remake of the Pastel dress, with a yarn that reminds me of the seashore — the different shades of blue in the distance, the greens of algae and seaweed washed up on the rocks.

Similar to the remake of the Ginkgo top, this sweater uses the same lace pattern as the top of the Pastel dress (which was a variation of the Ginkgo lace pattern), minus the armhole shaping and with a simpler boat neck shaping.

2015-07-25 00.08.50


The yarn I used was Mary Maxim Prism in Still Waters. I love this yarn. It’s affordable, super washable, the colours are amazing, has a nice drape. I wish there is a Mary Maxim closer to where I live… *sigh*

It has a very simple shape and stitch pattern, so I imagine it would look nice with a variegated yarn like Noro, or a sparkly yarn for fancier occasions :)

I used:

Light worsted weight yarn, approx. 700 yards

5 mm and 4.5 mm hooks

Tapestry needle for sewing

Sweater measures: 34″ around, 19.5″ in length

Length is easily adjustable by working more or fewer rows. Width can be adjusted by adding or subtracting stitches in the foundation ch by multiples of 6.

6 stitches = 1 3/8”

Pattern:

Stitch pattern:
Fan = [dc, 2 ch, dc, 2 ch, dc] in same space

Front: 

With 5 mm hook, ch 85.

Row 1: dc in 6th ch from hook, skip next 2 ch, dc in next ch, [skip next 2 ch, fan in next ch, skip next 2 ch, dc in next ch] to end, [dc, ch 2, dc] in last ch, turn.

Row 2: ch 3, skip first dc, fan in dc between fans, [dc in 2nd dc of next fan, fan in next dc between fans] to end, dc in 3rd ch of turning ch, turn.

Row 3: ch 5, ch in 1st dc, dc in 2nd dc of next fan, [fan in next dc between fans, dc in 2nd dc of next fan] to end, [dc, ch 2, dc] in turning ch, turn.

Repeat rows 2 & 3 until there are 34 rows altogether, ending with row 2.

Neck shaping:

Row 35: work in pattern to the 4th fan of the row, dc in 2nd dc of the 4th fan, dc in next dc between fans, turn.

Row 36: ch 5, dc in next dc, dc in the 2nd dc of next fan, work in pattern till end, turn.

Row 37–38: work in pattern. Fasten off.

Attach yarn to the other corner of row 34, repeat rows 35–38.

Back:

Repeat pattern for front until neck shaping. Work 2 more rows so that there are 36 rows altogether, ending with row 2.

Neck shaping:

Row 37–38: repeat rows 35 and 36 of front. Fasten off.

Attach yarn to the other corner of row 36, repeat rows 37–38.

Assembly:

With right sides together and wrong sides facing, sew shoulder seams together.

With right sides together and wrong sides facing, sew side seams together, starting at the top of the 11th row from the top of the sweater.

Turn sweater right side out.

Edging: with 4.5 mm hook

Neckline: attach yarn to a dc (not part of a fan) on the back of neck. ch 1, sc in same dc, [sc in 1st dc of fan, sc in next ch 2 sp, skip 2nd dc of fan, sc in next ch 2 sp, sc in 3rd dc of fan, sc in next dc] around, sl st in beginning sc of found, fasten off.

Armholes: attach yarn to any space on the armhole. We will be crocheting into the side of the rows, or what I call “row-ends”. ch 3, work 2 dc in each row-end around, sl st in top of beginning ch 3, fasten off. Repeat for the other armhole.

Bottom edge: attach yarn to any ch 2 space, ch 3, work 1 dc in every ch 2 space, every base of a fan, and every base of a dc, sl st in top of beginning ch 3, fasten off.

Weave in all ends.

And it’s done! :D

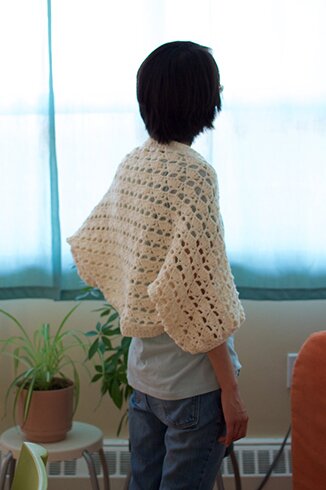
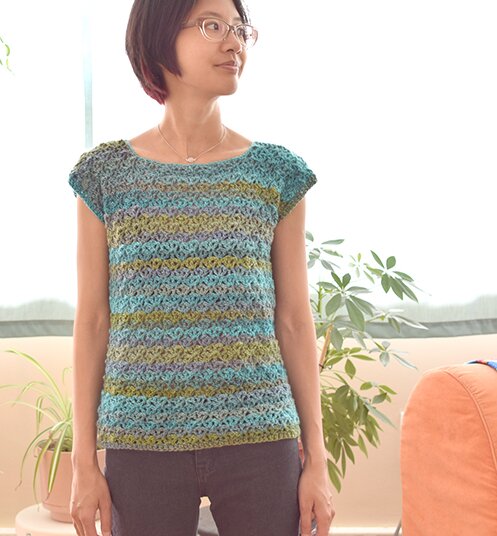
Here’s an in-between shot in which I was caught adjusting the necklace, which I thought turned out kind of cool and stylish :D

2015-07-25 00.08.06


Hope you enjoy the remake! Have a happy Saturday! :D


remake! ginkgo shrug

DSC_0003

This shrug uses the same lace pattern as the ginkgo top (and almost the same stitch count!), but with much heavier yarn and larger hooks. Basically, a blown up version of the ginkgo lace pattern. And no neck shaping! Isn’t that nice? :D Such is the beauty of shrugs.

I thought it would make a nice piece for late summer nights easing into fall.

DSC_0004

The shrug measures 38.5″ from cuff to cuff, and 20″ from neckline to bottom edge. It’s a very quick make, took me 2 evenings to finish while watching TV :)

DSC_0010


What I used:

Worsted weight yarn, approx. 700 yards

6mm and 5.5mm hooks

Tapestry needle for sewing.

Pattern:

Note for size modifications: to increase the length from cuff to cuff, i.e. longer sleeves, add multiples of 6 ch to foundation chain. 6 stitches = 1.75″

With larger hook, ch 136.

Begin with row 2 of the ginkgo lace pattern (but slightly modified, because we’re skipping the first row of dc’s in the original pattern) as follows:

Row 2: 2 dc in 4th ch from hook, skip 2 ch, dc in next ch, [skip 2 ch, 5 dc in next ch, skip 2 ch, dc in next ch] across, skip 2 ch, 3 dc in last ch. Turn.

The rest is just the same as the ginkgo lace pattern. To make things easier I’ve pasted it below.

Note: shell = 5 dc in a stitch, or 3 dc in a stitch

Row 3: (WS) ch 5, skip shell in the beginning of row, dc in next dc, [ch 2, dc in 3rd dc of shell, ch 2, skip rest of shell, dc in next dc] across, ch 2, dc in top of turning ch. Turn.

Row 4: (RS) ch 3, 5 dc in next dc, [dc in dc, 5 dc in next dc across], dc in 3rd ch of turning ch. Turn.

Row 5: ch 5, dc in 3rd dc of shell, [skip rest of shell, ch 2, dc in next dc, ch 2, dc in 3rd dc of shell] across, ch 2, dc in top of turning ch. Turn.

Row 6: ch 3, 2 dc in same st, dc in next dc, [5 dc in next dc, dc in next dc] across, 3 dc in 3rd st of turning ch.

Repeat rows 3–6 until piece measures approx. 18″ from beginning, or desired length. Ending with row 4 or 6. Fasten off.

Finishing:

Fold piece in half lengthwise with wrong side facing out. Sew seam together, starting from the cuff edge, along the long side of the piece, sew 5.5″ towards the centre of the piece (about 3 and a half shells). Repeat on the other side. Turn piece right side out.

Edging:

Neckline/front/back: With larger hook and right side facing, attach yarn to any stitch along the last row crocheted, ch 3, dc in each dc except the 3rd dc of each shell. When crocheting along the bottom side of the shrug (i.e. along the foundation ch), work 2 dc in each 2 ch space, and 1 dc in the base of each shell, but skip the ch at the base of a dc. Crochet around until end of round, sl st in top of beginning ch, ch 3. Do not turn, dc in each dc around, sl st in top of beginning ch, fasten off.

Cuffs: With smaller hook and right side facing, attach yarn to any space on cuff edge. The stitches will be crocheted into the side ends of the rows, or “row-ends”. ch 3, 2 dc tog in each row-end around, sl st in top of beginning ch, ch 3. Do not turn, dc in each dc around, fasten off. Repeat on the other cuff.

Weave in ends.

DSC_0007

Happy crocheting! :D


tiny sushi, episode two!

P1070701


Today we’re going to make tiny nigiri :D

Here is my hand in the picture for scale…

Photo 2015-05-30, 10 23 30 PM

It only consists of 8 rows altogether, so it’s a super quick make. The assembly instruction sounds more complicated than it actually is. I will be using some origami terms in hopes that it will make it a bit easier to understand, but as always please feel free to drop me a note if you want clarifications :)

I used:

A bit of light worsted weight yarn in white and other nigiri colours (I was using a variegated orange for salmon and yellow for egg)

3mm hook

A bit of black yarn (optional — if adding seaweed wrapping)

What I did:

*turning ch does not count as a stitch.

Row 1: with white, leaving 12″ tail for sewing in the beginning, ch 3, sc in second ch from hook, sc in next ch, turn.

Rows 2–4: ch 1, sc in each of next 2 sc, turn.

Rows 5 (this will be the right side): fasten off white, switch to nigiri colour, ch 1, sc in each of next 2 sc in back loop only, turn.

Rows 6–8: ch 1, sc in each of next 2 sc, turn. Fasten off at the end of row 8, leaving long tail for sewing.

Assembly:

Here’s where some origami moves might be handy… we’re just going to need valley fold and mountain fold:


(source)

So, we’ve crocheted a narrow strip. With right side facing, valley fold one of the short ends to the middle of the strip. The middle of the strip is marked by the “ridge” created by stitches crocheted in the back loops only (row 5). Using long yarn end, secure the fold by sewing the end to the middle and sewing the side seams together. Repeat with the other short end. Fasten off and cut the colour yarn tail, but don’t cut off the white yarn tail.

Then, still with right side facing, mountain fold the strip in half along the middle “ridge”. Secure the fold with a few stitches through all the layers of the nigiri with the white yarn tail, being careful not to let the stitches show on the egg/salmon side. Fasten off, weave in ends.

If desired, wrap and tie black yarn around the nigiri to imitate seaweed.

P1070704

They make great earrings and magnet, and maybe miniature dollhouse food?

Have an awesome week, everyone!


tiny sushi, episode one!

P1070700

Tiny and easy. Looks like I’ve got a bit of a theme going after the tiny donuts!

I have a couple of sweater patterns that I’ve been hoping to share, but I just haven’t had the time or energy to sit down and write it. So for now, tiny and easy it is :)

These are super quick to make! And they are very tiny. Here is my hand in the picture for scale. They’re about 7/8″ in diameter.

P1070698

I just happen to have scraps of variegated green and orange yarn at home, they worked beautifully for avocado/cucumber and salmon.

P1070699

The “pattern” is not at all original. A quick search on Ravelry would yield a couple of crochet sushi pattern made in the same method, like this one (ingenious! I actually made one for a sushi-loving friend years ago), and this one. But I suppose the stitch count that I came up with is particular to these tiny maki rolls, so I thought I’d share it. It’s also not so much a pattern but more like a recipe. One can easily adjust the length and width to include more fillings for the maki rolls.

I used:

tiny bits of black, white and other colours for desired fillings, in worsted or light worsted weight yarn.

3mm hook

tapestry needle

What I did:

Note: turning ch does not count as a stitch.

Row 1: Using filling colour yarn, ch 3, sc in 2nd ch from hook, sc in next ch, ch 1, turn.

Row 2: sc in each of next 2 sc, ch 1, turn.

Row 3: sc in each of next 2 sc, switch to white yarn, fasten off filling yarn, ch 1.

Rows 4 — 12 (9 rows): repeat row 2. At the end of row 12, switch to black yarn, fasten off white yarn, ch 1.

Rows 13 — 24 (12 rows): repeat row 2. Fasten off, leaving a 10″ tail for sewing. Weave in ends.

Assembly:

Starting from the end with the filling colour, roll up the strip tightly. Sew end of strip to the maki roll, then sew through the diameter of the maki roll in different directions a couple of times. Fasten off, weave in ends.

And we’re done! Easy, right? I found it pretty hard to stop making them :S But what can one do with so many tiny sushi rolls? They’re very light, so great for earrings! I’ve made these yam roll earrings for the shop :D

Photo 2015-05-24, 10 33 18 PM

And I made a futomaki brooch sort of in a free-form style. It is listed in my Etsy shop — customizable and freshly made-to-order! :D

Photo 2015-05-29, 9 17 05 PM

Photo 2015-06-02, 12 13 05 PM

And here we have it, futomaki and friends :D

P1070697

But wait, we’re not done with sushi making! In our next episode we will make easy nigiri! Stay tuned! :D


lately

Lately, I’ve been working on this nice knitted lace top (it’s a free Ravelry download! :D).

Photo 2015-04-25, 8 49 59 AM

I got this yarn last year to make the Convergence top. I was using a bit of a heavier yarn than called for, so I increased the hook size to 4mm instead of 3.75mm, expecting that the entire top will turn out a bit larger, which would be fine for me, because I like loose fitting tops in the summer, and the measurements for size small really looks rather small even for me… but for some reasons it turned out narrower than the given measurements, and wayyy longer. So I took it apart. And I’m now working on this knitted top. I think the lace panels go well with the variegated yarn :) Will definitely show you when I’m done!

Lately I have also been enjoying some konbu cha in the evening :D

Photo 2015-04-23, 9 39 31 PM

Not to be confused with kombucha, which is the sweetened fermented tea. Konbu cha is kelp tea. My friend, who is Japanese, gifted it to me last week when we ran into each other at a workshop :D It tastes like seaweed salad in a cup, and to me it tastes more like broth than tea, but I love it! I love kelp. I will have to get more of it at Asian grocery stores.

Lately I have also been working on a couple of Etsy orders, one of which is the tiny yeti pin. Here he is, all ready for his journey to a good home :D

Photo 2015-04-19, 12 26 18 PM


Hope you are having a good week!


let’s make tiny donuts! :D

And the tiny donut party continues! *throws glitter*Photo 2015-04-04, 11 47 19 AM
Before digging our hands into yarn and making more donuts, we need to pick a winner for the giveaway!I used this simple random name-picker tool. And the winner is…

giveawaywinner

DARLENE!!! Congratulations!!! :D *throws more glitter*

(Now we all gotta imagine ourselves all glittery from head to toe, ’tis how a virtual party works, except we’re not really covered in glitter and we don’t have to spend hours washing it out of our hair only to find more glitter on us weeks later — ’tis the beauty of virtual party :D and if you’re receiving this post by email you might want to click on to the actual blog so you can get more of the glitter experience ;) anyway, I digress)

Darlene please send me an email at genuinemudpie(at)gmail(dot)com, letting me know which 3 donuts you want and your mailing address :)

Thank you everyone for participating, and leaving all the wonderful comments about this blog (and donuts!)! It means the world to me that you’re enjoying reading about my crafty adventures! I look forward to sharing more craftiness with you! :D

And now, we make more tiny donuts! :D

This is actually more like a recipe than a pattern. My donut turns out to be just shy of an inch across. You can make it smaller or larger by using a lighter (fingering, embroider thread?) or heavier (worsted) yarn, and changing hook size accordingly (2mm for finer yarn and 3.5mm for worsted, for example). You can also make a larger donut by increasing the number of beginning ch by multiples of 2, and repeating row 3 a couple of times (more about that in the recipe below). I wouldn’t start with fewer stitches than what the “recipe” calls for though, it can be really tricky to manage such small number of stitches.

I initially developed this recipe to make donut earrings for my shop. It took a few attempts to get the size right and the icing looking the way I wanted. I think I’ve perfected the recipe now :) AND!! The entire donut is only made of 5 rows! You can make an army of them in an evening :D

I used:

Small amount of sport weight yarn in donut and icing colours (tan, brown, pink, yellow, white, etc.)

Embroidery thread in sprinkle colours

3mm hook, 2.5mm hook or smaller (for pulling in ends)

Needles for sewing and embroidering

Recipe:

Round 1: With donut colour (i.e. tan), ch 8, join with first ch to form ring.

NOTE: The side that is facing you (i.e. the front of the work) is the INSIDE of the donut. For the first 3 rounds you’re working with the inside of the donut facing you. So the back of the work is the outside of the donut.

Here I have finished the first 3 rounds of the donut, crocheting with the inside facing me.

Photo 2015-04-11, 10 57 57 AM

Here is what the outside of the donut looks like after the first 3 rounds.

Photo 2015-04-11, 11 00 27 AM

Round 2: ch 1 (does not count as a stitch), sc in first ch, 2 sc in next ch, [sc in next ch, 2 sc in next ch] around, sl st in first sc to join (12 sc).

Round 3: ch 1, sc in each sc around, sl st in first sc to join (12 sc).

NOTE: If you’remaking a larger donut and started with a few more beginning ch’s, you can repeat round 3 one or two more times.

Round 4: Attach icing colour, fasten off donut colour. TURN (now you’re working with the outside of the donut facing you), ch 1, sl st in each sc around in the front loop only, sl st in first sl st to join (12 sl st). (Be careful not to pull too tight while making the sl st in this round, otherwise the next row would be difficult.)

Here I’m working on found 4, inserting my hook in the front loop of a stitch.

Photo 2015-04-11, 11 05 21 AM

NOTE: If you’remaking a larger donut and started with more beginning ch’s, you can repeat round 3 one or two more times with icing colour before starting round 5.

Round 5: ch 1, TURN (now you’re working with the inside of the donut facing you again), working in the front loop only, sc in first st, 2 sc tog over next 2 st, [sc in next st, 2 sc tog over next 2 st] around, sl st in first sc to join (8 sc), leaving a long tail for sewing, fasten off.

Sew the final icing round to the first donut round using whip stitch, matching the stitches.

Photo 2015-04-11, 11 23 19 AM

I find it really difficult to sew the donut together with stuffing inside, and because the donut is so tiny I don’t feel it needs stuffing. I just pull all the yarn ends into the donut with a crochet hook after it’s sewn together.

Embroider sprinkles to your heart’s content :)

Pull all yarn ends and thread ends into the inside of the donut with a small crochet hook.

And here we have it, a tiny donut! :D

Photo 2015-04-04, 11 49 01 AM


If you’re making these donuts, let me know what flavours you’re making, I’d love to see them! :D

Hope you have a wonderfully sparkling weekend! :D *throws glitter*


one more day!

Donuts

One more day to leave a comment before I draw a name for the tiny donut give-away tomorrow (Friday) night at 11pm EST!

The winner gets to choose 3 of the tiny donuts shown in this post, and I will attach a tiny safety pin to each one too so they can be worn as brooches :)

To enter you just need to leave a comment on this post or the previous post. If you subscribe to this blog (thank you!) and receive blog posts by email, please comment on the actual blog post (rather than sending a reply email) so I can include your name in the draw :D

Will be announcing the winner AND posting the donut pattern on Saturday! :D Stay tuned! Until then, have a happy Friday!