keep calm and smell the lavender

I was mak­ing some sleep and relax­ation balms and salves as gifts. Part­ly also because I want­ed to start mak­ing my own lip balm because the EOS stuff I’m using seems to make my lips peel…? Very annoying. 

Any­way, after doing much research and com­par­ing recipes, because I also don’t want to invest in a lot of mate­r­i­al to start (and essen­tial oils tend to be a bit cost­ly), I bought some basic mate­r­i­al and made some sol­id per­fume kind of balm, and a salve for heels as well. 
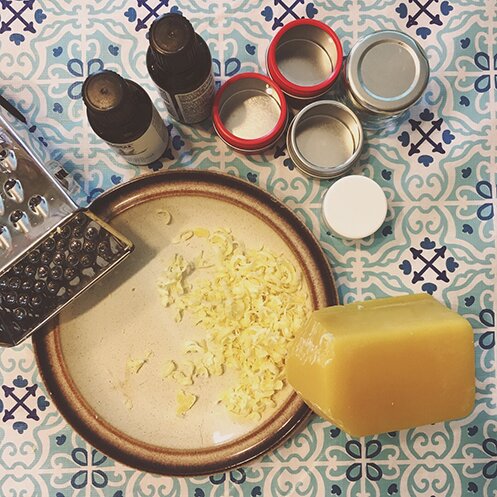
For the sol­id per­fume, I used one part beeswax and one part extra vir­gin olive oil. The olive oil we just always have for cook­ing, and the beeswax I got it from the Bee Shop, from local bee keepers. 

For the first batch I used:

  • 2 tbsp of beeswax
  • 2 tbsp of olive oil
  • Melt­ed the beeswax and oil in a dou­ble boil­er (which is a mason jar in a pot of sim­mer­ing water over medi­um heat)
  • After it all melt­ed I mixed in 15 drops of laven­der oil and 10 drops of cedar­wood oil
  • Dis­trib­uted in clean small con­tain­ers (tiny jam sam­ple jars and David’s Tea tins!) — I filled 2.5 con­tain­ers, and then made a bit more fol­low­ing the same beeswax to olive oil ratio to make 4 containers.

This sleep balm proves to real­ly work for sleep, applied to the tem­ples and soles of feet before bed. My friend and I both tried it and it worked! So If you have trou­ble sleep­ing I’d sug­gest giv­ing it a try! I tried it as a lip balm but it did­n’t go on very well.

I then made some salves for heels, because I was giv­ing it to some­one who does­n’t like strong scents. It has less laven­der, and has coconut oil. I used:

  • 3 tbsp coconut oil
  • 3 tbsp extra vir­gin olive oil
  • 1 tbsp beeswax
  • Melt­ed the oils and beeswax togeth­er in dou­ble boiler
  • Once all melt­ed, added 10 drops of laven­der oil and 5 drops of cedar­wood oil
  • Dis­trib­uted in 4 small containers

So I did some exper­i­men­ta­tion on myself with this salve. It works well on the heels, but not so great on the lips or face, as it is quite greasy-feel­ing. I think it’s also great for dry hands and it smells great. I think maybe this is why a lot of lip balm recipes call for shea but­ter or cocoa but­ter. I’ll give that a try when I have a chance to go to the health food store. 

Also, I only bought a 175g block of beeswax and I still have more than half left! It goes a long way.

Hap­py weekend!


adventures in flameworking

I’ve always been fas­ci­nat­ed by glass, espe­cial­ly the kind of small glass sculp­tures or beads where a form or swirls of colours are enclosed in clear glass. It’s like a world unto itself. I’ve been want­i­ng to take flame­work­ing class­es for a long time, but did­n’t quite have the mon­ey or the time. In the begin­ning of the year I decid­ed to make time to do some­thing I want­ed, and remem­bered that years ago I bought this small pen­dant of a jel­ly fish encased in a drop of clear glass from a local artist. So I looked her up, and found that she offers class­es at a stu­dio not too far from me, at quite a rea­son­able rate! Excit­ed, I signed up right away.

And these are my very first batch of beads!

To be com­plete­ly hon­est, half way through the first class I had the thought that it was a bad idea after all and I should just leave, because I was so uncom­fort­able with open flames, and the glass was­n’t melt­ing the way it should because I was­n’t hold­ing it in the right spot in the flame, I was ter­ri­fied of the glass or the torch explod­ing or me doing some­thing stu­pid and catch­ing on fire (vivid imag­i­na­tion some­times is a hin­der­ance to learn­ing), and I could­n’t see prop­er­ly because I was wear­ing these gog­gles on top of my glass­es… but towards the end of the class I seemed to have got­ten the hang of mak­ing round beads. I made three prop­er ones (the 3 green/clear donut-shaped ones on the left — the teacher made the small opaque green one as demo, she just let me keep it :D), and one of them I made into a neck­lace right away when I got home :D

The next class we tried mak­ing dif­fer­ent shapes and adding sculp­tur­al com­po­nents. That snowflake is a bit sad-look­ing but it was fun to try.

If you’re in the city and would like to give flame­work­ing a try, check out the nano­pod stu­dio! (that’s me con­cen­trat­ing very hard in the plaid shirt)

On a relat­ed note, I saw an image of a bead­ed death’s head hawk moth one day, and decid­ed that I want­ed to make a bead­ed moth. So I looked up bead embroi­dery, found this very help­ful tuto­r­i­al, and tried just mak­ing a test one on felt, with the beads I have on hand.

I found it a bit dif­fi­cult to keep to the exact shape I drew on the felt, the wings are more round­ed than I intend­ed, but it may get bet­ter with prac­tice. Next time I’ll get more moth-like colour beads and try anoth­er design.

Hope every­one have a good week!


one busy elf!

Now that the hol­i­day’s over, I can show you the Christ­mas gifts I made and all the fun I’ve been hav­ing since the fall! This was one busy elf!

So I made a num­ber of wash cloths, to give with arti­san soaps that I got from craft fairs, very prac­ti­cal gifts that I thought every­one could use :) The but­ter­fly wash cloth is from this Pail­lon Cloth pat­tern, which was a lot of fun to make with a var­ie­gat­ed cot­ton. The tiny fish ones are for my niece and nephews, from this pat­tern on Rav­el­ry. The hang­ing tow­el was a mod­i­fi­ca­tion of the Cir­cle Cloth pat­tern. Also made a cou­ple of these pineap­ple hang­ing tow­els.


I took a work­shop in Novem­ber with my co-work­ers at a glass shop mak­ing mille­fiori pen­dants. I’ve made one for myself before and it was a lot of fun, so I made anoth­er for a gift :)

While mak­ing pom pom hair ties for my sin­cere sock cup­cake project, I thought I’d also try mak­ing some soot sprites hair ties for a cou­ple of Stu­dio Ghi­b­li fans :D

Caught in a per­fect­ly tiny tin! :D (that used to hold some spark­ly tea)

These hedge­hogs mitts are for my niece, made almost entire­ly in com­mute. Excel­lent pat­tern from mom.me.

Spent a cou­ple of Sun­day after­noons at the Gar­diner Muse­um drop-in clay class, and made an army of orna­ments and tea bag hold­ers! It was a great way to spend a week­end after­noon cre­ative­ly, must go back sometimes!

And my newest inven­tion — sushi sock rolls! :D For my dear friend’s baby. I used this 2‑needle baby sock pat­tern, but had to mod­i­fy it quite a bit to get the black part long enough to roll around. So the socks are faaar­rr too big for the baby right now, they’re more for a tod­dler. But they’ll fit soon enough! And the idea is that when the child out grows the socks, they can be rolled up and sewed togeth­er per­ma­nent­ly and be used as play food, or a pin cush­ion :D

 Now, the biggest project ever under­tak­en — behold the polar bear blanket!!!

I’ve been work­ing on it for months and it’s for my par­ents! Wish I have a bet­ter pic­ture of it, but it’s just so big! I did­n’t have the room in my place or my par­ents’ for a good pho­to shoot. So here it is on my par­ents’ bed :) This is my first attempt at cor­ner-to-cor­ner cro­chet as well. I first made the polar bear blan­ket from Sim­ply Cro­chet mag­a­zine (issue 50), then thought my par­ents would prob­a­bly like a larg­er blan­ket. So I thought I’d add squares around it. I used the pine cone pat­tern from Make & Do Crew, then found and mod­i­fied some knit­ting and cross-stitch­ing graphs to make the snowflakes and the north star. Dis­cov­ered that Microsoft Excel is a great pro­gram to draft cro­chet charts! 

And now, one great gift I received from my sis­ter — from the awe­some Out of Print cloth­ing, a Miss Pere­grine shirt!

Stay pecu­liar and lev­i­tate!

(Well, maybe not too much lev­i­ta­tion this year. I haven’t tried tak­ing this kind of pho­tos for a while, and then after­wards my knees were a bit sore… anoth­er year old­er, after all. But stay pecu­liar, definitely!)

Hap­py first week of Jan­u­ary! Hope every­one had a re-ener­giz­ing hol­i­day and have a great start to the new year! :D


new year, new wallpaper! :D

I was feel­ing very proud of this fluffy wreath and its mer­ry mush­room friends (which I made from a giant pipe clean­er and wine corks), and Mike kind­ly took real­ly nice pho­tos of them and made it into a desk­top wall­pa­per for me, thought I’d share it with you! :D 

Just click on the size you want and it should bring up an image that you can save.

iPad

iPhone

Desk­top

Wish­ing every­one a very hap­py new year! May 2017 bring much joy, lots of crafty adven­tures and many blessings :)


happy Christmas everybody! :D

Wish­ing every­one a joy­ous hol­i­day and many bless­ings for the new year!


And here’s a bit of behind-the-scene with this greet­ing card… every year Mike and I make Christ­mas cards togeth­er to send to friends and fam­i­ly. It’s a bit of a tra­di­tion of ours. This year we came up with the jel­ly­fish idea. We thought about lino block prints (which we may still try anoth­er year) and sim­ply print­ing an image from the com­put­er. Even­tu­al­ly we ran out of time, so I just thought I’d try my hands on what­ev­er we had in the house, which was an eras­er and a big old util­i­ty knife. 

Turned out not so bad did­n’t it? :D I’m quite proud of it actu­al­ly. I also carved the hol­ly stamp, and the berries are stamped with the end of a bam­boo skew­er. Mike typed the text with his grand­moth­er’s type writer.

Cheers to anoth­er year of sim­ple joys, new adven­tures and shared journey! :) 


a merry fluffy Christmas

Our decor is pret­ty min­i­mal this year but it does­n’t mean that it’s any less fun!

I was hop­ing to replace the paper flower wreath on our apart­ment door (which cov­ers up a half-peeled/­dis­in­te­grat­ing Neigh­bour­hood Watch stick­er), and I’ve been want­i­ng to make a pom pom wreath, but I know that I would­n’t have time to make all the pom poms. While brows­ing at Michaels I saw this giant, the most fluffy pipe clean­er, so I thought I’d try twist­ing it into a wreath! 

At first I was just going to twist it into a sim­ple, round wreath, with mush­rooms made of wine corks that I’ve been sav­ing for that pur­pose. But then I thought, what if the wreath has arms? What if it’s a wreath-shaped crea­ture? So the fluffy wreath with its mush­room friends were born :D

I’m only show­ing a close up of the wreath right now because these friends deserve their own post, so stay tuned! :D

(The wreath end­ed up on the wall inside the apart­ment because I could­n’t bear to leave them on the out­side of our door in the hallway)

The left over pipe clean­er turned into a tiny Christ­mas tree :D with a very excit­ed Totoro.

But we still need­ed some­thing fes­tive on our door. So I final­ly made the delight­ful plum pud­ding pom pom from Fleur Berna­dine! There are a num­ber of plum pud­ding pom pom tuto­ri­als out there, but I love that this one incor­po­rates a but­ton at the top. 

The fluffy plum pud­ding cer­tain­ly brings some hol­i­day cheers to the cur­rent­ly very grim-look­ing hall­way, which is cur­rent­ly under­go­ing ren­o­va­tion (please excuse the poor lighting).

I don’t have a pom pom mak­er so I made one with card­board using this tuto­r­i­al, which is very handy with tem­plates for dif­fer­ent sizes of pom poms. But it turns out to be quite chal­leng­ing (per­haps because it was my first time try­ing to use a home­made pom pom mak­er and I had dull scis­sors). Maybe I’ll invest in a pom pom mak­er. Just think about all the pos­si­bil­i­ties that pom poms can make! Pom pom ani­mals, pom pom fruits, pom pom wreath…

Mer­ry craft­ing! :D


the most sincere socks

photo-2016-12-05-11-09-36-am-1

‘Tis the count­down to Christ­mas, I thought I’d share a most sin­cere idea for the most prac­ti­cal gift. Who does­n’t need an extra pair of socks? Great alter­na­tive to choco­late cov­ered marsh­mal­low San­tas when you need to get an under $5 secret San­ta gift. 

The pom pom on top is actu­al­ly a fun fes­tive hair tie! I’ll show you how I made that as well.

I got a pack of 5 reused yarn socks from MUJI, they’re soft and love­ly (not to men­tion that it’s such a nice relax­ing expe­ri­enc­ing when brows­ing around at the MUJI store) and cost around $20 CAD, which rounds out to about $4 a pair. 

This is super sim­ple and involves things that you prob­a­bly have stashed away at home if you’re a crafter:

  • A new pair of socks in cup­cake colour
  • An elas­tic band
  • Light card stock or scrap­book­ing paper (I bought a sheet of gold metal­lic paper from Michaels for 99 cents)
  • Cup­cake wrap­per tem­plate (there are tons of print­able tem­plates out there, I can’t seem to find the one I used >_<, but this one seems just as great)
  • Scis­sors
  • Scotch tape
  • Mug of tea (essen­tial!)

Here we have our pair of socks, and the elas­tic band.

photo-2016-12-05-10-05-19-am

With the socks stacked togeth­er, fold them in half length­wise. The heels will stick out but that’s ok.

photo-2016-12-05-10-06-03-am

Start­ing from the cuff end, roll up the socks.

photo-2016-12-05-10-06-40-am

Secure the sock roll with elas­tic band.

photo-2016-12-05-10-07-11-am

Have a sip of tea. Trans­fer cup­cake wrap­per pat­tern onto the back of card stock / scrap­book­ing paper, and cut out the pattern.

photo-2016-12-05-10-13-58-am

Wrap the wrap­per around the sock roll, and secure with a piece of tape.

photo-2016-12-05-10-15-33-am

Repeat with all the pairs of socks you’ve got and set them aside.

photo-2016-12-05-10-23-12-am

Now we make the pom pom hair tie :D 

I used: 

  • A fork
  • Small amount of red worsted weight yarn 
  • Small amount of spark­ly sil­ver yarn (for a fes­tive touch)
  • Scis­sors
  • Hair elas­tics
  • Fab­ric glue (great to have, but not essential)

Using a fork to make small pom poms isn’t my orig­i­nal idea. There are a few tuto­ri­als out there, like this one from Eskim­i­mi Makes.

Basi­cal­ly, you would wind the yarn around the prongs of the fork (as you can see I used two dif­fer­ent yarns, and I cut off a length of the sil­ver yarn for wind­ing, rather than wind­ing direct­ly from the skein, to make things easier)…

photo-2016-12-05-10-27-02-am-1

… after you’re done wind­ing, cut yarn. Then cut a length of red yarn about 6 inch­es long, and tie the yarn around the mid­dle by thread­ing one yarn end through the base of the 2nd and 3rd prongs of the fork, and the oth­er yarn end between the 2nd and 3rd prongs at the tip.

Trim the pom pom but leave the tying yarn long.

photo-2016-12-05-10-35-35-am

Using the tying yarn, tie the pom pom to the hair elas­tic with dou­ble knot. Apply a dab of fab­ric glue (if you have it) to the knot to extra secure it.

photo-2016-12-05-10-37-45-am

Here we have our cup­cake top­pings! I also bought these adorable straw­ber­ry bells from Etsy sell­er Mim­iLo­lo, I attached them to cell phone charm hang­ers (not sure if they’re called that, but you know what I mean), thought they’d make great zip­per pull or fes­tive back­pack orna­ments! :D

If you know that the gift recip­i­ent won’t like hair ties or zip­per pulls, a sim­ple Toot­sie Pop might make the best alter­na­tive topping.

photo-2016-12-05-10-53-11-am

I pulled the hair elas­tic / cell phone charm hang­er through the mid­dle of the sock rolls using a cro­chet hook.

photo-2016-12-05-10-54-44-am

Ta-da! The most sin­cere socks of them all! Linus would be proud. (see It’s the Great Pump­kin, Char­lie Brown)

photo-2016-12-05-11-48-23-am

I put some of them in recy­cled pack­ag­ing from gift soaps.

photo-2016-12-05-11-12-43-am

And I made a flat-bot­tom gift bag with wrap­ping paper fol­low­ing this tuto­r­i­al. I then fold­ed the top down, punched two holes at the top through all lay­ers, thread­ed a fan­cy string through and tied a bow.

photo-2016-12-05-11-33-15-am

Have a sweet week, everyone! 

photo-2016-12-05-11-08-16-am


weekend quick make, with hex nuts!

Came across a book on mak­ing jew­el­ry with hard­ware store mate­r­i­al one day, was curi­ous about what peo­ple make with hex nuts, and spent an evening look­ing at all the dif­fer­ent hex nut tuto­ri­als. Espe­cial­ly love this bril­liant ear­ring idea from Cafe Craftea.

Final­ly went to Cana­di­an Tire on my lunch break one day and picked up the small­est hex nuts I could find.

I sim­ply glued the hex nut onto a 4mm ear­ring post with some E6000 and let it cure over night. Very sim­ple. Made a pair with­out glit­ter because I like the slight­ly steam­punk look :D

photo-2016-11-28-10-04-47-am

And for the glit­ter ear­rings, I glued the hex nuts onto the ear­ring posts like the plain ones, then I filled the hex nuts with a bit of glit­ter nail pol­ish with the help of a tooth­pick. Once the nail pol­ish is dried, I applied a lay­er of Mod Podge Dimen­sion­al Mag­ic to seal it, also with a toothpick.

photo-2016-11-29-7-46-59-am

Quite hap­py with how they turned out :D

Have a good week­end everyone!


lately

I haven’t writ­ten in a while, but I’ve been craft­ing day and night (lit­er­al­ly, I knit in the sub­way in the morn­ing and I chip away every night at this mas­sive cro­chet project as soon as I get home), and have made so many things, that I can’t show you because they’re Christ­mas gifts! But I promise there will be an exten­sive Christ­mas craft­ing post after the holidays!

I do want to share with you this found object art­work I made in a car­ing for self work­shop last week­end (if you can trav­el to the Toron­to area and are inter­est­ed in work­shops that explore the ther­a­peu­tic qual­i­ties of cre­ativ­i­ty and art-mak­ing, do check out Petrea’s web­site and work­shop offer­ings, some free projects there too!). I’ve always loved found object art. This one is — pearls of wis­dom ris­ing out of moss, with a mon­u­ment of past bat­tles that shape this ground, bathing in moon­light. Kind of in the same line as my last post about moss.

photo-2016-11-19-6-32-19-pm

And this is an exer­cise about inten­tion. We think about an inten­tion that we bring to our work, and while think­ing about or med­i­tat­ing on that inten­tion, we choose dif­fer­ent yarn and things to wrap around the twig. There’s a mar­ble in the space where the twig branch­es out, to rep­re­sent clarity.

dsc_3625

There are also oth­er neat things I learned from the work­shop, like draw­ing man­dalas, which I’m try­ing to prac­tice at work as a way to take breaks. Try­ing is the word :S But I’ll share the draw­ings when I have a few more. 

In oth­er news, I attempt­ed to carve a jel­ly fish out of an eras­er. I’ve nev­er tried this before and I think it turned out not so bad! It’s part of a hol­i­day project, which will be revealed at hol­i­day times! :D

photo-2016-11-19-8-14-14-pm

Hap­py week­end everyone!


keep calm and carry moss

photo-2016-10-26-9-41-07-am

I bought these beau­ti­ful vin­tage shad­ow box pen­dants from Etsy shop youarenot­the­bossofme to put moss in :D It turned out beau­ti­ful­ly, I’m so pleased. Looks like there are a few more of these pen­dants for sale, pop by the shop if you’re inter­est­ed in mak­ing some­thing sim­i­lar! I bought the moss from the mod­el-mak­ing sec­tion of my local art store. Or one could put in small stones or yarn or tiny shells or what­ev­er one finds mean­ing­ful to car­ry around.

I’ve always felt more con­nect­ed to water-relat­ed analo­gies — like the riv­er, or the sea, going with the flow, fill the gaps, like what Bruce Lee said,

“You must be shape­less, form­less, like water. When you pour water in a cup, it becomes the cup. When you pour water in a bot­tle, it becomes the bot­tle. When you pour water in a teapot, it becomes the teapot. Water can drip and it can crash. Become like water my friend.”

One can’t make a dent in water, it can’t be hurt. 

But I’ve been feel­ing drawn to moss late­ly. Ground­ed and tena­cious. It can be pulled out of the ground and be dam­aged, but it comes back again, reach­ing and cov­er­ing even fur­ther grounds. Its roots spread wider than eyes can see. It re-emerges always after win­ter frosts.

So maybe it’s about acknowl­edg­ing the hurt rather than say­ing to myself that things don’t or should­n’t hurt. And maybe it’s about stand­ing my ground rather than fill­ing what­ev­er gaps or needs oth­ers put before me, try­ing to be every­thing to everyone. 

A bit of reflec­tion as I enter anoth­er year in my life! :D Anoth­er year wis­er, hopefully.

Thanks for vis­it­ing today!