I made a pair of mittens for a friend :D
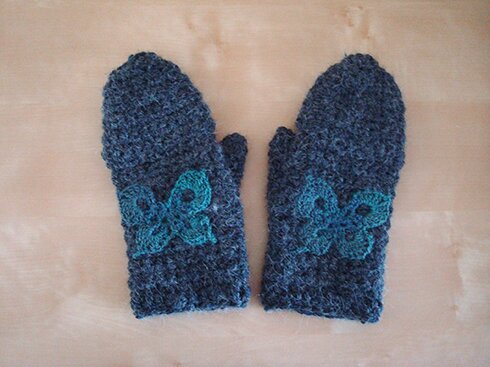
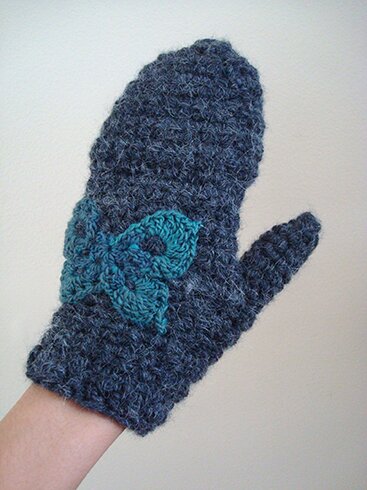
They’re convertible! :D
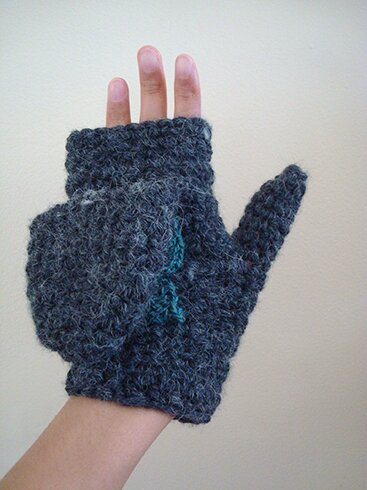
Great for using the phone while outdoors :)
I’m sharing my pattern here so you can make a pair too if you like, and so I can return to this pattern when I need to make another pair :P
They’re very quick to make, because the yarn is thick. Each took me a couple of hours in front of the TV.
The pattern is for the mittens only. The butterfly applique is made following this beautiful pattern. I thought they look nice without being too flashy with the subtle blue/grey/teal tones. The yarn I used for the butterflies is a discontinued sock yarn by Mary Maxim.
I used:
Bulky weight yarn (I used Bernat Alpaca in “Ebony”, it’s very soft)
6.5 mm and 6 mm hook
Size:
It fits my hand, which has an 8″ circumference at the widest part of my palm (including thumb)
Note:
Mitten is crocheted in the round, but turning at the end of every round, except when working on the thumb.
Pattern is written for the right mitt. Pattern for the left mitt is the same as the right one except for rows 11 and 18, instruction for these rows are in (parenthesis).
Pattern:
With larger hook, ch 23, sl st in first ch to form a ring, being careful not to twist the chain.
Row 1: ch 1 (does not count as a st), sc in each ch around, sl st in first sc, ch 1, turn (23 sc).
Row 2 — 10: sc in each sc around, sl st in first sc, ch 1, turn.
Row 11 (thumb opening): sc in first sc, ch 4, skip 4 sc, sc in next sc, sc in each sc around, sl st in first sc, ch 1, turn.
(Left mitt, row 11: sc in each sc until there are 5 sc left in the round, ch 4, skip 4 sc, sc in last sc, sl st in first sc, ch 1, turn.)
Row 12: sc in each sc until 4 ch space, sc in each of the 4 ch, sc in last sc, sl st in first sc, ch 1, turn.
Row 13 — 17: sc in each sc around, sl st in first sc, ch 1, turn.
Row 18 (begin mitten top): sc in first sc, sc in each of next 9 sc in the back loop only, sc in next sc, ch 12, sl st in first sc, ch 1, turn.
(Left mitt, row 18: sc in first sc, sc in each of the next 9 sc in the front loop only, sc in next sc, ch 12, sl st in first sc, ch 1, turn.)
Row 19: sc in each of the next 12 ch, sc in each sc across, sl st in first sc, ch 1, turn (23 sc).
Row 20 — 26: sc in each sc around, sl st in first sc, ch 1, turn.
Row 27: sc in first sc, 2 sc tog, *sc in next 4 sc, 2 sc tog*, repeat from * to * around until there are fewer than 4 sc left in round, sc in remaining stitches, sl st in first sc, ch 1, turn.
Row 28: repeat row 20 (work even)
Row 29: sc in first sc, 2 sc tog, *sc in next 3 sc, 2 sc tog*, repeat from * to * around until there are fewer than 3 sc left in round, sc in remaining stitches, sl st in first sc, ch 1, turn.
Row 30: sc in first sc, 2 sc tog, *sc in next 2 sc, 2 sc tog*, repeat from * to * around, sc in last 2 sc, sl st in first sc, ch 1, turn.
Row 31: sc in first sc, 2 sc tog around, sl st in first sc. Press mitten top flat so that the working loop is in the top right corner. Crocheting through both layers of work, sl st across the last row of mitten top. Fasten off.
Reattach yarn to the stitch next to the beginning ch for mitten top.
Next row: ch 1, 2 sc tog, sc in each sc until stitch just before the beginning ch for the mitten top, 2 sc tog, sc in the remaining loop of each sc (the other loop of each sc in this part is attached to the mitten top) to end, sl st in first 2 sc tog, ch 1, turn (21 sc).
Next 6 rows: repeat row 20 (work even for 6 rows). (In retrospect I thought maybe I made this part a bit too tall. Maybe 5 rows are enough.)
Fasten off.
Thumb
Attach yarn to a stitch in thumb opening.
Row 1: ch 1, sc in each sc. When you come across the side of the row on either side of the thumb opening, insert hook into the side of the row, draw up a loop, insert hook into next sc, draw up a loop, yo and pull through all loops on hook. There are 8 sc around the thumb. ch 1, do not turn.
Row 2–6: work even for 5 rows.
Row 7: 2 sc tog 4 times. Press thumb flat so that the working loop on hook is on the top right corner of thumb. Working through both layers of thumb, sl st in next 2 sc, fasten off.
Cuff
Attach yarn at the bottom of the mitt.
With smaller hook, ch 3, dc in next st, dc in each st around, sl st in top of beginning ch 3, fasten off.
Weave in all ends.
Ta-da!
I hope the pattern is clear! If there’s anything unclear please feel free to post a comment, your question(s) will probably be helpful to others too!
Bye for now :) Stay cozy!