tiny donut party (a giveaway!)

Photo 2015-04-04, 11 47 19 AM

Guess what? It’s the genuine mudpie blog’s 5th anniversary! :D

Can’t believe I’ve been writing and doing crafts on this blog for 5 years already. I’ve definitely slowed down a little with the blogging (but not with the crafting!), especially recently, because of school and work. But I’ve always found it so comforting to return to this space and share what brings me joy. Thank you so much for supporting genuine mudpie by visiting, leaving comments and journeying with me on various crafty adventures! :D

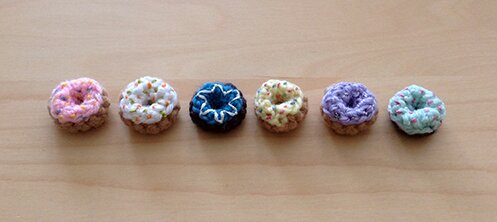
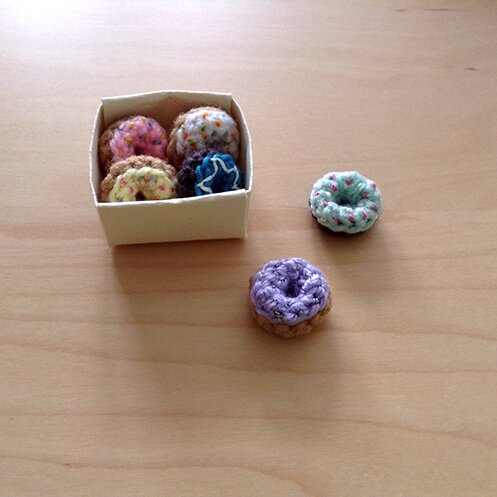
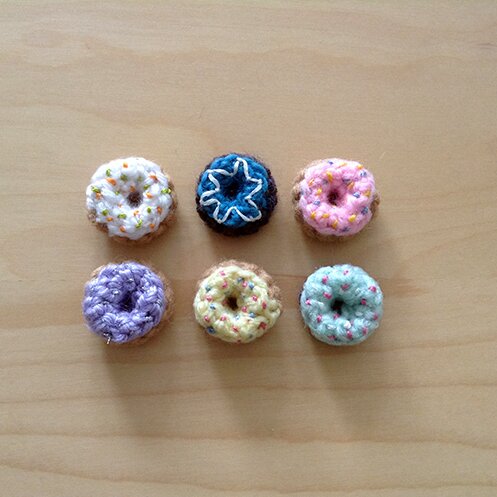
So! To celebrate, I’m doing a giveaway of tiny donuts! Simply leave a comment on this post by next Friday April 8th, and I will randomly draw a name from the comments. I will announce the winner here on Saturday April 9th. The winner can choose any 3 of the donuts shown here. I will attach a safety pin to the back of each donut — so you can wear one proudly and share the rest with your friends (or not :P). And yes, I ship worldwide :)

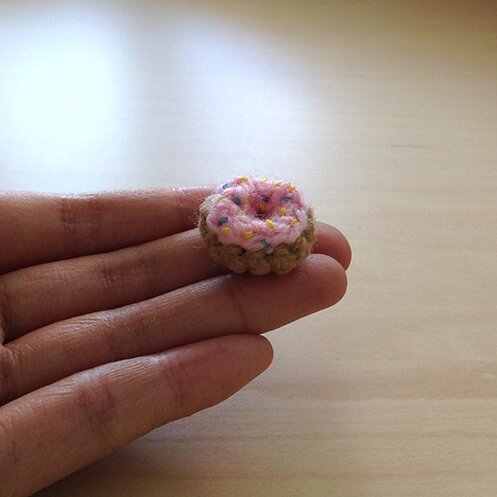
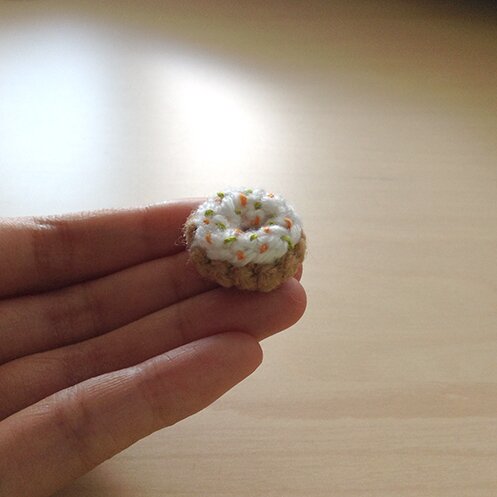
Each donut is a little shy of 1″ across.

Photo 2015-04-04, 12 01 01 PM

And here are some of the flavours :D We have classic pink frosting…

Photo 2015-04-04, 11 49 01 AM

Carrot cake!

Photo 2015-04-04, 11 49 58 AM

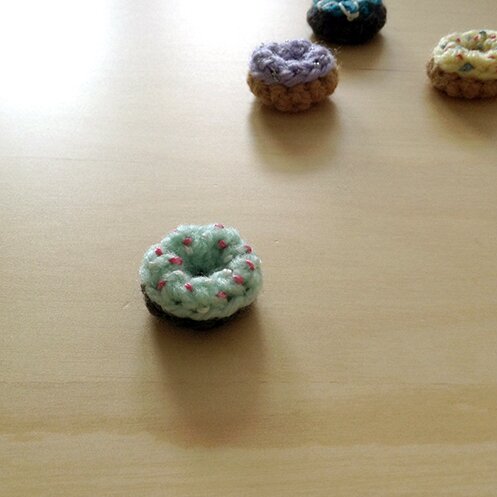
Mint chocolate.

Photo 2015-04-04, 11 57 33 AM

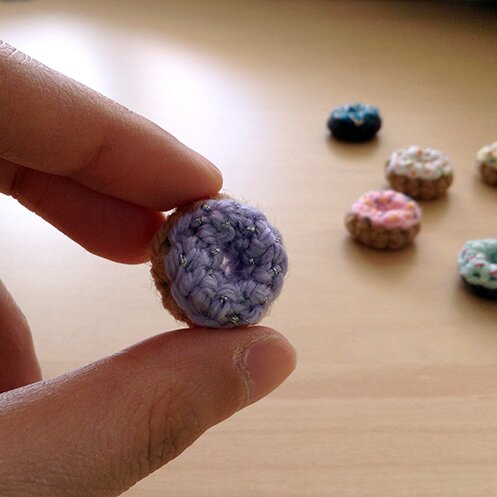
Special sparkly lavender.

Photo 2015-04-04, 11 52 33 AM


And more :)

Photo 2015-04-04, 11 59 12 AM


They’re actually a lot of fun to make and very quick too, so I will also be sharing the pattern next Saturday so everyone can make them :) But if you’d like the chance of receiving cheerful tiny donut pins in the mail, please leave a comment below! :D

Happy Saturday!


ode to luna

rad raddish

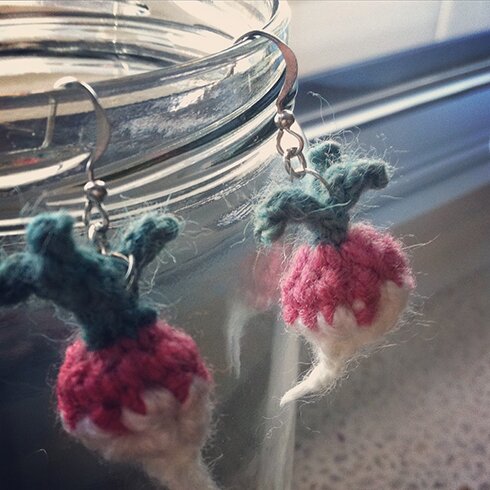
I like Luna Lovegood, and her radish earrings (though apparently they’re supposed to be dirigible plums). I made a pair when I was trying to come up with cool ideas for earrings to put in the shop, so I thought I’d share the pattern too because I think radish earrings are also pretty awesome for spring.

I used:

Deep pink, dark green and white yarn in sport or DK weight

3mm and 1.5mm hooks

Yarn ends for stuffing

Earring hooks

Jump rings

Jewelry pliers

Needle for sewing

Fabric glue (or white glue, but preferably fabric glue because it’s waterproof)

Pattern:

The radish is worked from top down. Do not join at end of round.

Rnd 1: With pink and larger hook, 10 sc in magic ring.

Rnd 2: sc in each sc around (10 sc), switch to white, fasten off pink.

Rnd 3: [2 sc tog over next 2 sc, 1 sc in each of next 2 sc] two times, 2 sc tog over next 2 sc.

Rnd 4: [2 sc tog over next 2 sc] two times, leaving a long tail, fasten off. Stuff radish.

Weave yarn tail through the remaining 5 stitches at opening, pull tight. With 1.5mm hook and the yarn tail, ch 3, fasten off. Put a small dab of fabric glue on the yarn end to shape it to a point.

The leaves are worked continuously, there’s no fastening off in between, but I’ve broken up the instruction so it’s easier to read.

With green and larger hook, ch 6, sl st in 2nd ch from hook, sc in next 2 ch, sl st in next 2 ch,

ch 5, sl st in 2nd ch from hook, sc in next ch, sl st in next 2 ch, sl st in the very first ch,

ch 6, sc in 2nd ch from hook, sc in next ch, sl st in next 3 ch, sl st in very first ch, leaving a long tail for sewing, fasten off.

Assembly

Roll up the base of the leaves, using the yarn tail, sew a few stitches at the base of the leaves to tighten and secure. Sew base of the leave to the top of the radish.

Repeat for the other radish.

Attach jump ring to the base of the leaves of the radish. Attach earring hook to the jump ring.


Hope you’re enjoying the spring sunshine!


finally!

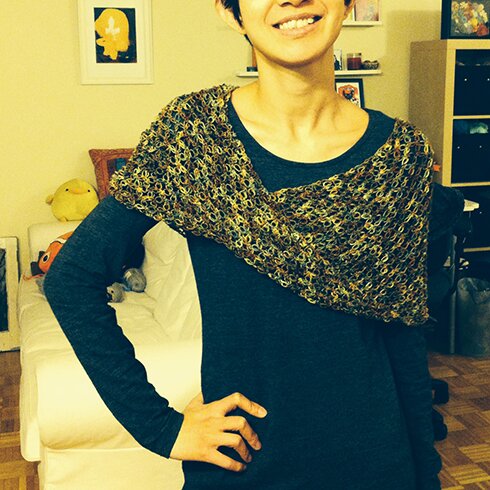
I actually finished making this in the SUMMER. Just never got around to taking a proper photo of it. The wonderful and very generous Amy sent me yarn in the mail to test out her Love-Me-Knot cowl pattern. And finally! Here it is :D

Photo 2015-02-11, 8 18 42 PM

I didn’t make it as long as the pattern calls for and added a twist before joining at the end, so it’s kind of a mobius shawlette. I love the drape and the forest colours in the yarn. I also really like the love knot stitch. I find it very meditative, more so than any other crochet or knitting stitch.

I very much enjoyed the pattern (and the yarn!), thanks so much again Amy!

Hope everyone has a lovely weekend! :D

ode to hedwig

Photo 2015-02-07, 3 35 57 PM

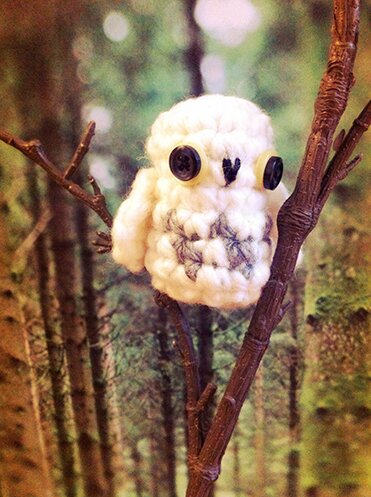
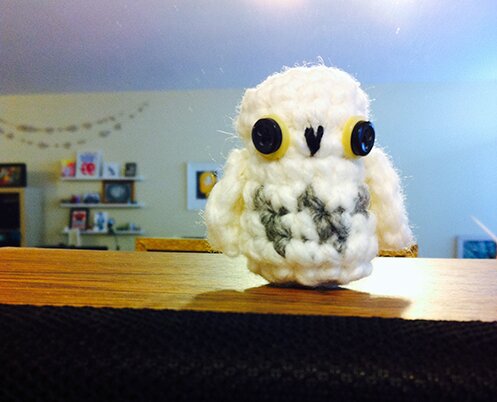
Ode to Hedwig, Harry Potter’s very loyal owl friend, and a token of thanks to Mike’s very kind co-worker, who lent us the entire Harry Potter DVD series over the past month :) because we had never watched or read the series before.

I first started following this owl pattern, but then the yarn I had was a lot heavier than what the pattern calls for, and I would end up with an owl much larger than I wanted, so then I just made up my own stitch count and incorporated grey feather pattern and added wings. But the overall structure is still adapted from the original owl pattern.

I also didn’t have safety eyes, and not sure where I can buy them in the city (does anyone who lives/works in Toronto know where they’re sold?)… I think the stacked buttons look alright, but safety eyes would definitely look nicer.

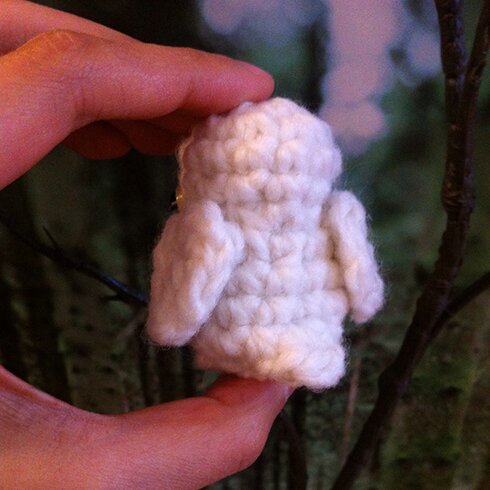
Here’s the back of the owl. It has a bit of a tail. And my hand is there for scale.

Photo 2015-02-07, 3 37 59 PM

It’s a very quick make, the entire owl is just 10 rounds (plus wings). So I thought I’d share my pattern adaptations in case anyone wants to make a quick owl :)

What I used:

A bit of bulky weight yarn in white and grey

4mm hook

Buttons or safety eyes

Sport or DK weight yarn in black for embroidering beak

Needle and thread for sewing and embroidering

Polyfil or yarn ends for stuffing

What I did:

*Don’t join at the end of each round.

Rnd 1: With white, 6 sc in magic ring.

Rnd 2: 2 sc in each sc around (12 sc).

Rnd 3–4: sc in each sc around (12 sc).

Rnd 5: [2 sc tog, sc in next sc] 4 times (8 sc).

Rnd 6: [2 sc in next sc, sc in next sc] 4 times (12 sc).

Rnd 7: sc in next 3 sc in white, attach grey, [sc in grey, sc in white] 3 times, sc in next 3 sc in white (12 sc).

Rnd 8: sc in next 4 sc in white, [sc in grey, sc in white] 2 times, fasten off grey, sc in next 4 sc in white (12 sc).

Rnd 9: Continuing in white, sc in each sc around (12 sc).

Round 10: [hdc, dc, hdc] in next sc, 2 sc tog 5 times, sl st in next sc, leaving a long tail, fasten off.

Stuff owl. Using needle, weave yarn tail through the base of the hdc-dc-hdc clutter and in each of the remaining 5 sc, pull tight and fasten off.

The wings are the same as those in my Tiny Wings bird pattern.

With white, 4 sc in magic ring, ch 2, work 2 dc tog by working 1 dc in magic ring and 1 dc in first sc, fasten off, leaving long tail for sewing when finishing one of the wings. Weave in ends.

Sew eyes, embroider beak, and sew wings on owl.

And tiny Hedwig is ready for action :D

Photo 2015-02-07, 3 39 49 PM


Hoot! Have a lovely week, everyone! :D


insta-sunshine

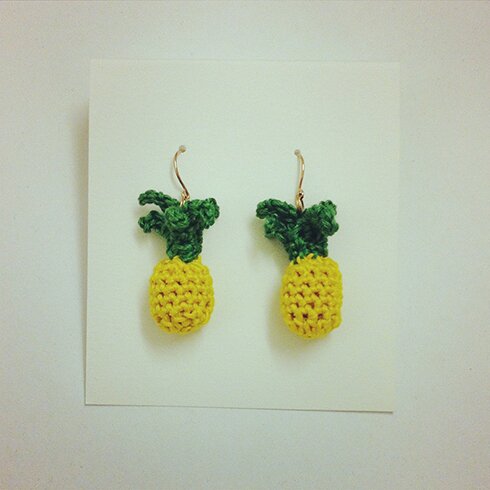
It’s been a cold week around here! Could use some tropical sunshiny-ness right about now, in the middle of January. So I made these :D

Photo 2015-01-18, 7 21 34 PM

Made these using the pineapple from the old piña colada pattern, but using embroidery thread and a 2.35mm hook. I kid you not, I thought I smelled pineapples when I was crocheting this. Need to get some canned pineapples next time I’m at the grocery store…

I then attached jump rings (which I made by bending head pins, because I didn’t have large enough jump rings on hand) to the base of the leaves, then attached the pineapples to earring hooks.

Give this quick project a try and instantly add some sunshine to your day! :D

Have a great week, everyone!


holiday crafting

I was waiting until the last presents were opened to post this :D And by the way, if you’re visiting because of the grown-up cardigan, thanks so much for dropping by! I don’t think I’ve ever had that many views in a day before. Thanks so much for checking out the pattern!

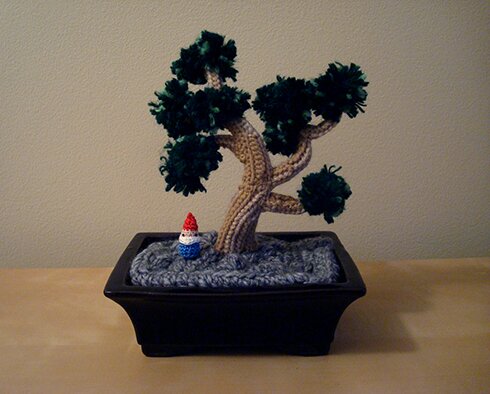
So, holiday crafting! This bonsai is a custom order. I’ve never made anything like this so it was all an experiment. I never really do preparatory sketches (or check gauge, or make swatches) but I actually drew a picture of how I wanted the branches to twist this way and that. It didn’t turn out looking like the picture at all after I inserted the sculpting wires, they seem to have a mind of their own? But I’m glad it worked out looking like a bonsai anyway :D

bonsai 1

And we even had a bonsai pot hidden away in our closet, waiting for years to be used for this of course! It was from a bonsai that didn’t live :( apparently few people can keep a bonsai alive for long — hence the need for a bonsai that never dies!

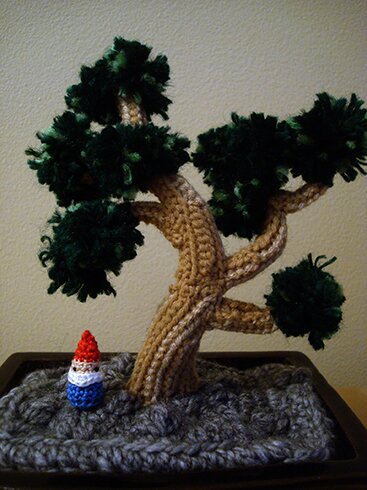
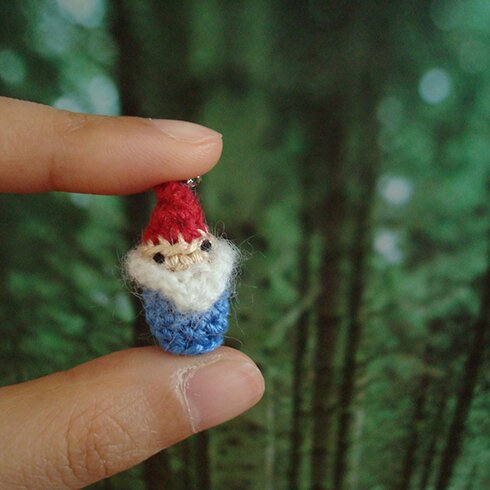
And I added a tiny gnome because I thought the bonsai looked a bit lonely. Here’s a close up of the gnome. It was crocheted with embroidery floss with a 2.3mm hook (2.3 is kind of an odd size for a crochet hook don’t you think? But that’s what it says on the hook… anyway, I digress).

bonsai 2

He’s kind of like a candy corn, except with eyes and a beard. Maybe I can even make a candy corn gnome in the fall… I like the gnome so much that I put him in the shop :D With a new and improved extra fuzzy beard. He is a pin :)

wee gnome

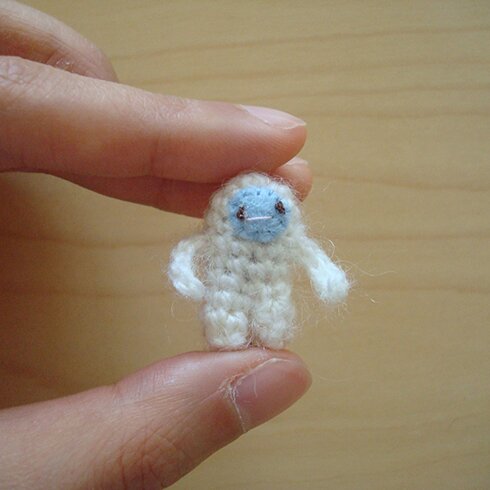
And then Mike requested a tiny yeti pin for his co-worker who is rather fond of yetis. So I thought I could use the same method as the tiny yeti, except with the thinnest yarn I have and the trusty 2.3mm hook…

Behold the tiniest yeti!

tiniest yeti

Doesn’t he look like he’s ready to give the most sincere hug? :D He’s in the shop as well. Both the gnome and the yeti are about an inch tall. My hand is in the pictures for scale.

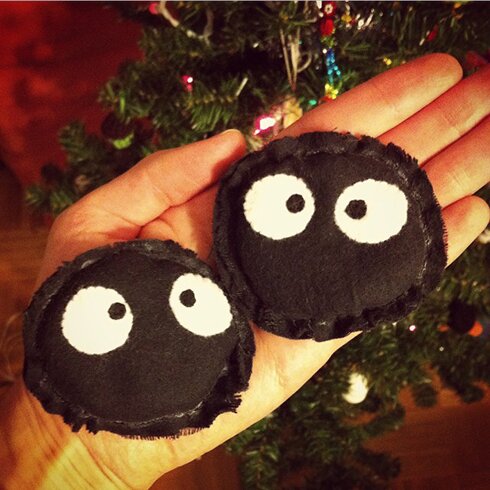
And I made these for Mike — they’re soot spirit hand warmers :D

soot warmers

I decided to make hand warmers for Mike because his hands get really cold in the winter, to the point where he has difficulties typing when he first gets into work in the morning. So I thought these would work great if he pops them in the microwave for 30 seconds before he heads out to subway to work in the morning and before he heads home from the office at night. There are many tutorials on the web showing how to make them (with rice inside). But because I have black flannel on hand I thought it would make really great soot spirits! They appear in My Neighbour Totoro and Spirited Away. Here’s a lovely video montage of them in action if you haven’t seen the movies already :D

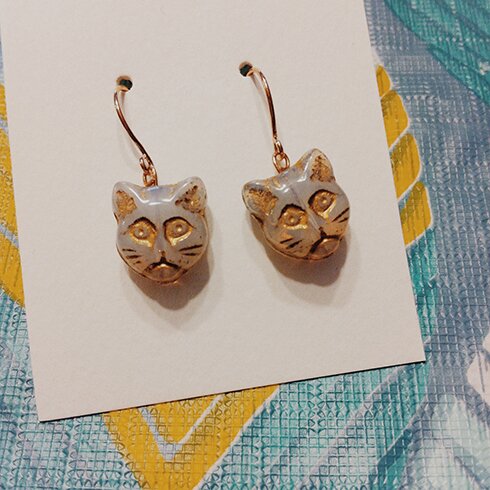
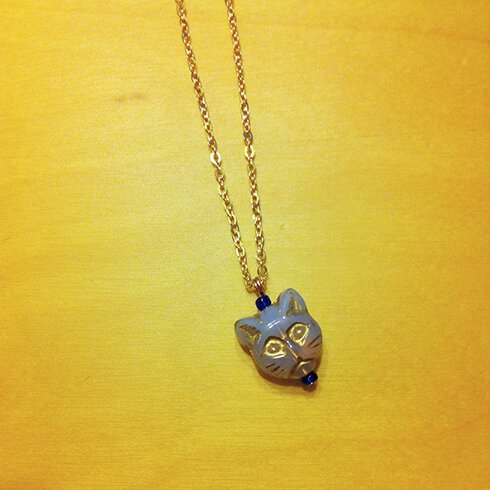
Also made these for my friend’s shop, cat earrings and necklace!

Processed with VSCOcam with m5 preset

cat 3

I bought them from a local Etsy seller, Yum Yum Objects. The shop owner is super friendly, and the package was wrapped in book pages and pattern tissue, with extra cat beads! The cat beads are a beautiful translucent grey that have an iridescent quality to it in the light. And so of course I have to immediately make myself a necklace (and a pair of earrings) when the beads came in the mail! :D I’ve been wearing it for the past few days. So excited.

cat
I also knitted and crocheted an assortment of scarfs/neckwarmers, a shawl, a hat, a few brooches and a loop stitch bathmat for various family members, but didn’t take pictures of them. Aaaand there’s one more gift that I haven’t yet mentioned because it will come with a pattern! So stay tuned! :D

Have a wonderful week everyone!


a grown-up cardigan

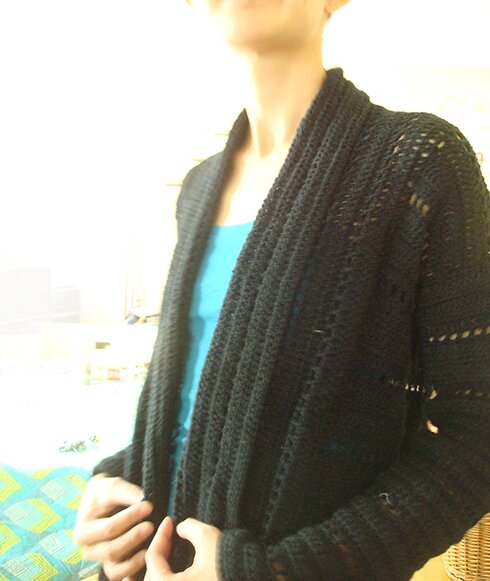
I thought after the Totoro sweater I should make a dressier cardigan for more grown-up occasions like interviews and work.

And today, I’m going to attempt to translate my scribbles and diagrams into an actual pattern! Yes, my diagram of a rectangle, a trapezoid, and several numbers on a single piece of sticky note. I did jot down these things so I can write the pattern later, and I’m sure they made perfect sense then, but how did I expect myself to make sense of it months later? Please bear with me as I try to write a pattern that makes sense, and please drop me a note if you have any questions!

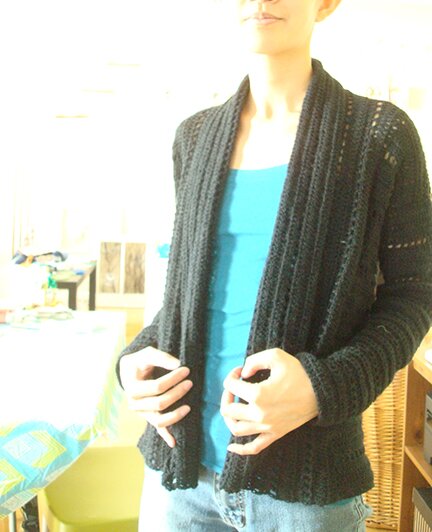
Here’s the cardigan :D

DSC03913

Because I made it in black (for dressiness, you see), I overexposed the photos a lot so you can see the details. I like shawl-style collars, they go well with most shirts. Except maybe collared shirts, but I don’t have many of those.

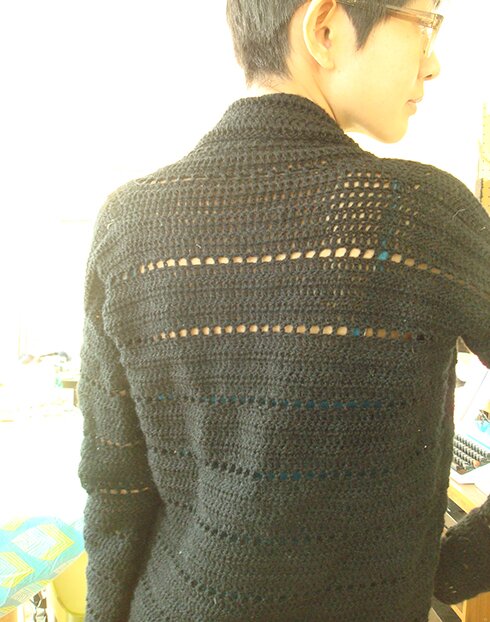
I added some simple details so it’s not just rows upon rows of double-crochet, which would be boring to look at and to make. Here’s the back…

DSC03909


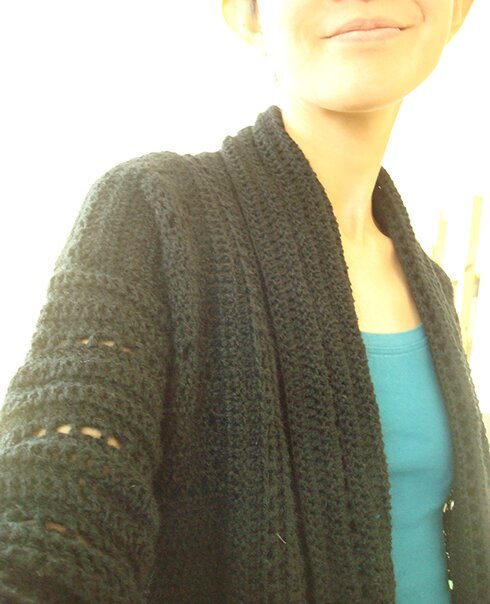
Here’s a close up of the shawl-collar…

DSC03904

The construction is extremely simple. There’s hardly any shaping, just a bunch of rectangular shapes sewn together, and then crocheting along the front and neck to make the collar. So I imagine it would be pretty easy to modify by adding or subtracting stitches as needed.

I got this yarn from my mom, who got it from my grandma in Hong Kong. There was never any label on it. But I compared it with my other yarn and it looks closest to fingering weight. One way to increase the size of the cardigan would be to use a heavier yarn (sport, DK, or worsted with good drape) and larger hooks (5–6.5mm).

Edit: Since I’m seeing A LOT of traffic to this post lately (thanks so much for visiting everyone! I have never had that many views before and I think the site might have crashed for a bit…), I’m reposting here my reply to a visitor’s comment below about adding stitches to the foundation ch to increase the size of the cardigan — hope this helps! As usual please feel free to drop me a note if you have any questions!

to add width to the sweater shouldn’t be difficult, as they are just rectangles. you can add more stitches to the foundation ch. it’s approximately 10 stitches for 2 inches, and the sweater i made is 32″ around. so for example, for a size 36″ sweater I would add 20 ch to the back, and 6 ch to each of the front left and front right pieces (the eyelet row needs an odd number of stitches). so you can add ch in multiples of 10 and split them between the back, front left and front right pieces according to the size you need. the same goes for the sleeves. my sleeves are 11″ around at the widest part. you can also do more increase rows in between so the cuff wouldn’t become too wide, maybe increase every other dc row throughout after the first 6 rows. hope this helps!”

I used:

Fingering weight yarn, about 1600 yards

4 mm hook

Stitch markers (or contrasting colour scrap yarn)

Size:

Bust 32″, length 21″, sleeve length (underarm to cuff) 17″

Gauge:

6 rows of 10 dc = 2″ x 2″

Pattern:

Back

ch 83.

Row 1: dc in 4th ch from hook, dc in each ch across, turn.

Row 2: ch 3 (counts as a dc throughout), dc in each dc across, turn.

Rows 3–5: repeat row 2.

Row 6 (eyelet row): ch 4, skip first dc, dc in next dc, *ch 1, skip next dc, dc in next dc* repeat from * to * to end.

Row 7: ch 3, dc in first ch 1 sp, dc in next dc, *dc in ch 1 sp, dc in next dc* repeat from * to * to end.

For the rest of back:

Work in pattern so that there are 5 dc rows between eyelet rows, until there are 8 eyelet rows altogether, then work 5 more dc rows. There will be 53 rows altogether. Fasten off.

Right and left fronts (make 2)

ch 25.

Work in same pattern for back until there are 53 rows altogether. Fasten off.

Sleeves (make 2)

ch 41.

Work in rows 1–7 of back.

Row 8 (increase row): ch 3, 2 dc in next dc, dc in each dc until last dc, 2 dc in last dc, turn.

Rows 9–11: dc rows.

Row 12: eyelet row.

Row 13: dc row.

Repeat rows 8–13 four (4) more times. Basically, every second row after the eyelet row is an increase row.

Next: work 1 dc row, one increase row, one dc row, one eyelet row.

Next: *work 1 dc row, one increase row, one dc row, one increase row, one dc row*, one eyelet row. (Basically, every second and fourth rows after the eyelet row is an increase row.)

Next: repeat from * to *. Fasten off.

Assembly

With right sides facing each other (wrong side facing you), sew shoulders together.

With right side facing itself, fold sleeve in half lengthwise, mark the center at the top edge of sleeve. With right sides facing each other, pin the center of top edge of sleeve to shoulder seam. Pin the rest of the top edge of sleeve along the front and back pieces. Sew sleeve to front and back. Repeat for the other sleeve.

Sew side and underarm/sleeve seams together.

Turn cardigan right side out.

Collar

With right side facing, attach yarn to lower left corner of cardigan front. ch 3.

Row 1: Evenly crochet a row of dc up the left front, 2 dc tog in the last stitch of the left front and the first stitch of the back, place marker, dc along the top edge of the back, 2 dc tog in the last stitch of the back and first stitch of the right front, place marker, and dc down the right front, turn.

(What seems to work for me to evenly crochet a row along the edges: up and down the front pieces, crocheting into the side of a the rows — dc into the middle of the dc, then dc into the joint between 2 rows. It’s not exactly 2 dc in each row, it’s fewer stitches than that. When working across the back pieces, just dc into each dc.)

Row 2: ch 3, *dc in each dc until the stitch before marker, 2 dc tog, move marker up a row*, repeat from * to * once more, dc in each dc to end, turn.

Row 3: repeat row 2. Remove all markers.

Row 4: eyelet row.

Rows 5–7: dc rows.

Row 8: eyelet row.

Repeat rows 5–8 three (3) more times. Work 3 more dc rows. Fasten off. Weave in ends.

And here we have it, a grown-up-looking cardigan :)

DSC03910


Happy new year everyone! :D

holiday skirt

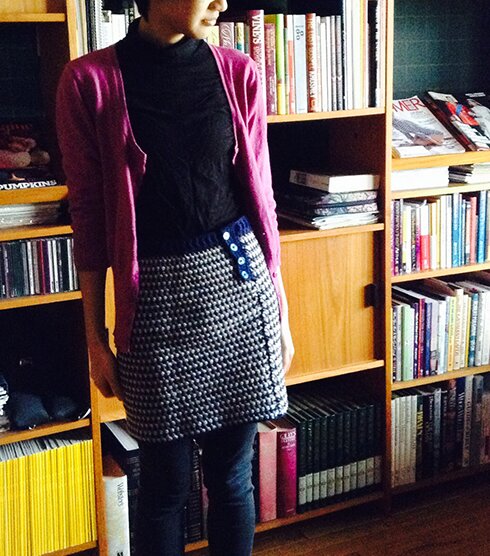
I made this sometimes in the fall, didn’t have a chance to wear it until the holidays :D

Photo 2014-12-27, 12 41 17 PM

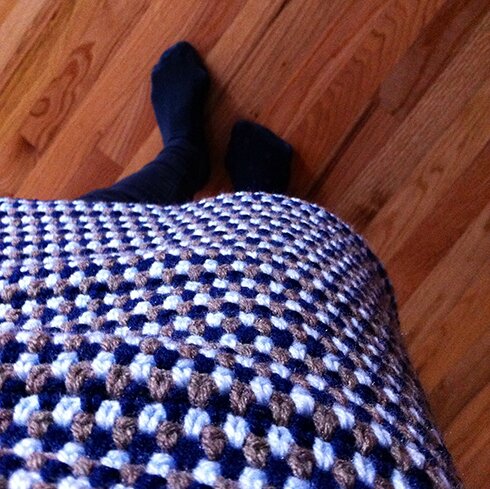
The pattern was from this book. I added the button panel because I wasn’t sure the fabric would have enough stretch for the fitted waist opening to go over the hips. It turned out a bit big on me but I like that it looks woven. Here’s a closer look at my blue/light blue/brown colour pattern :)

Photo 2014-12-27, 11 37 30 AM

More posts on holiday crafting to come! Hope everyone has had a restful and joyous holiday season!


totoro sweater!

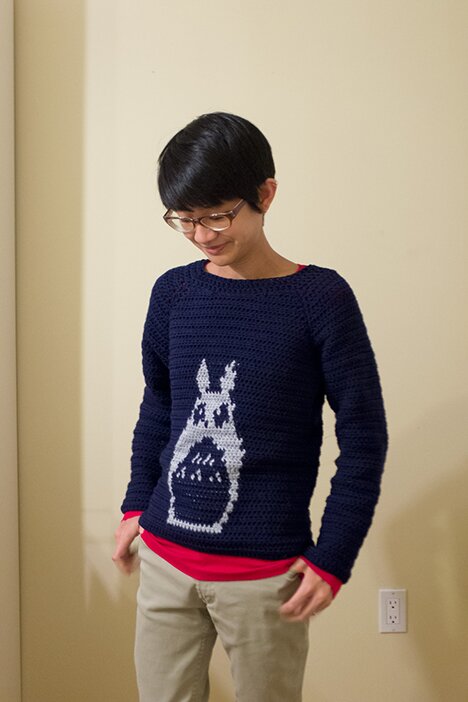
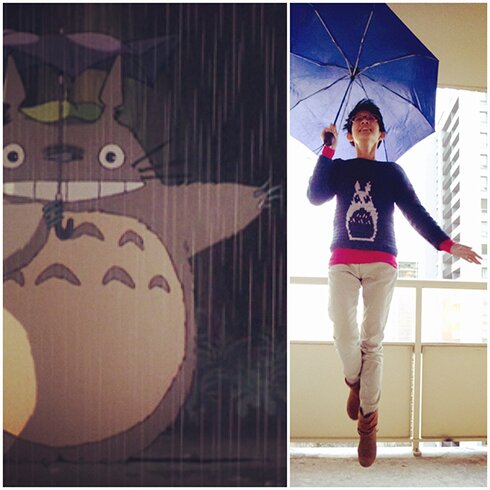
My very own Totoro sweater! :D

Totoro sweater


I made up my own basic raglan sweater pattern and then adapted the knit Totoro chart from this beautiful mitten pattern. I had to take out a few rows in the chart because the hdc’s are taller than knit stitches.

Of course I had to do a levitating shoot for this! (If you hadn’t seen the film My Neighbour Totoro, you can catch a glimpse of Totoro flying in this lovely montage)

Photo


I’m making another one for my sister, so that will give me a chance to write down and test out the pattern for the raglan sweater. One can then incorporate any knit, crochet or cross stitch chart, like this owl chart.

Have a happy Friday and weekend! And happy thanksgiving! I’m grateful for your visit today — thank you for journeying with me on my crafty adventures!

’tis the season to be cozy

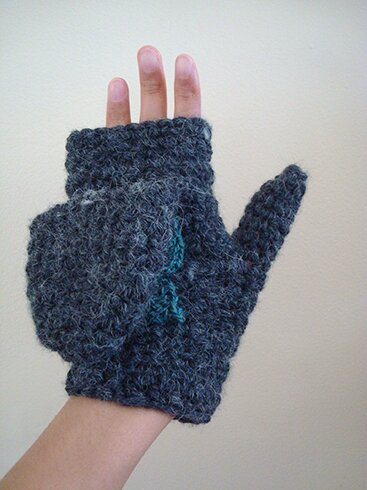
I made a pair of mittens for a friend :D
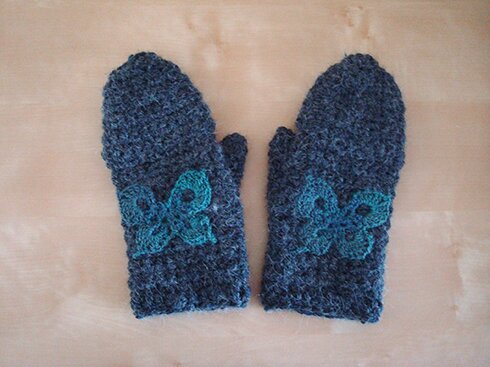
cozy 1

They’re convertible! :D

cozy 2

Great for using the phone while outdoors :)

I’m sharing my pattern here so you can make a pair too if you like, and so I can return to this pattern when I need to make another pair :P

They’re very quick to make, because the yarn is thick. Each took me a couple of hours in front of the TV.

The pattern is for the mittens only. The butterfly applique is made following this beautiful pattern. I thought they look nice without being too flashy with the subtle blue/grey/teal tones. The yarn I used for the butterflies is a discontinued sock yarn by Mary Maxim.

I used:

Bulky weight yarn (I used Bernat Alpaca in “Ebony”, it’s very soft)

6.5 mm and 6 mm hook

Size:

It fits my hand, which has an 8″ circumference at the widest part of my palm (including thumb)

Note:

Mitten is crocheted in the round, but turning at the end of every round, except when working on the thumb.

Pattern is written for the right mitt. Pattern for the left mitt is the same as the right one except for rows 11 and 18, instruction for these rows are in (parenthesis).

Pattern:

With larger hook, ch 23, sl st in first ch to form a ring, being careful not to twist the chain.

Row 1: ch 1 (does not count as a st), sc in each ch around, sl st in first sc, ch 1, turn (23 sc).

Row 2 — 10: sc in each sc around, sl st in first sc, ch 1, turn.

Row 11 (thumb opening): sc in first sc, ch 4, skip 4 sc, sc in next sc, sc in each sc around, sl st in first sc, ch 1, turn.

(Left mitt, row 11: sc in each sc until there are 5 sc left in the round, ch 4, skip 4 sc, sc in last sc, sl st in first sc, ch 1, turn.)

Row 12: sc in each sc until 4 ch space, sc in each of the 4 ch, sc in last sc, sl st in first sc, ch 1, turn.

Row 13 — 17: sc in each sc around, sl st in first sc, ch 1, turn.

Row 18 (begin mitten top): sc in first sc, sc in each of next 9 sc in the back loop only, sc in next sc, ch 12, sl st in first sc, ch 1, turn.

(Left mitt, row 18: sc in first sc, sc in each of the next 9 sc in the front loop only, sc in next sc, ch 12, sl st in first sc, ch 1, turn.)

Row 19: sc in each of the next 12 ch, sc in each sc across, sl st in first sc, ch 1, turn (23 sc).

Row 20 — 26: sc in each sc around, sl st in first sc, ch 1, turn.

Row 27: sc in first sc, 2 sc tog, *sc in next 4 sc, 2 sc tog*, repeat from * to * around until there are fewer than 4 sc left in round, sc in remaining stitches, sl st in first sc, ch 1, turn.

Row 28: repeat row 20 (work even)

Row 29: sc in first sc, 2 sc tog, *sc in next 3 sc, 2 sc tog*, repeat from * to * around until there are fewer than 3 sc left in round, sc in remaining stitches, sl st in first sc, ch 1, turn.

Row 30: sc in first sc, 2 sc tog, *sc in next 2 sc, 2 sc tog*, repeat from * to * around, sc in last 2 sc, sl st in first sc, ch 1, turn.

Row 31: sc in first sc, 2 sc tog around, sl st in first sc. Press mitten top flat so that the working loop is in the top right corner. Crocheting through both layers of work, sl st across the last row of mitten top. Fasten off.

Reattach yarn to the stitch next to the beginning ch for mitten top.

Next row: ch 1, 2 sc tog, sc in each sc until stitch just before the beginning ch for the mitten top, 2 sc tog, sc in the remaining loop of each sc (the other loop of each sc in this part is attached to the mitten top) to end, sl st in first 2 sc tog, ch 1, turn (21 sc).

Next 6 rows: repeat row 20 (work even for 6 rows). (In retrospect I thought maybe I made this part a bit too tall. Maybe 5 rows are enough.)

Fasten off.

Thumb

Attach yarn to a stitch in thumb opening.

Row 1: ch 1, sc in each sc. When you come across the side of the row on either side of the thumb opening, insert hook into the side of the row, draw up a loop, insert hook into next sc, draw up a loop, yo and pull through all loops on hook. There are 8 sc around the thumb. ch 1, do not turn.

Row 2–6: work even for 5 rows.

Row 7: 2 sc tog 4 times. Press thumb flat so that the working loop on hook is on the top right corner of thumb. Working through both layers of thumb, sl st in next 2 sc, fasten off.

Cuff

Attach yarn at the bottom of the mitt.

With smaller hook, ch 3, dc in next st, dc in each st around, sl st in top of beginning ch 3, fasten off.

Weave in all ends.

Ta-da!
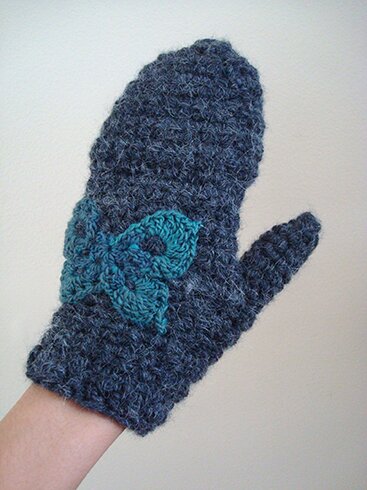
cozy 3

I hope the pattern is clear! If there’s anything unclear please feel free to post a comment, your question(s) will probably be helpful to others too!

Bye for now :) Stay cozy!