treasures from the beach

I don’t swim, or play beach volley, nor do I enjoy sun-tanning, and reading in the sun hurts my eyes, but I do enjoy going to the beach, combing for beach glass! :D

We’ve visited a couple of local beaches this summer and found some really interesting beach glass pieces. This piece has some loopy marking on it (super macro picture taken with the handy Photojojo macro band :D)

13423004_557695034401520_539013977_n

And the other day I made it into a necklace. I was quite pleased with how it turned out :)

Photo 2016-07-12, 7 10 55 PM

Photo 2016-07-12, 7 31 03 AM

This candle holder idea from Lovely Greens has been on my to-make list for a while. Finally I got all the material to put it together. I used drinking glasses from the dollar store, the smallest votive holders I could find, which happened to be at the Muji store, but I think other places like Michaels or Ikea might have them too, and some dollar store sea shells for the base, because the votive holders are much shorter than the glasses.

Photo 2016-07-13, 8 44 44 PM

It’s such a great way to show of the unique pieces of glass. Like this one that seems to come from a screw top bottle.

Photo 2016-07-13, 8 46 03 PM

Mike took some really nice pictures of them with his camera :D

DSC_2974

DSC_2978

Have a bright and happy week, everyone!


Tweet about this on TwitterShare on FacebookPin on PinterestShare on TumblrPrint this page

hey maryjane

Crocheting these sandals made me want to further investigate whether homemade shoes are a viable solution for my oddly shaped, high arch, achy feet. So I thought I’d make another pair in a different style :D possibly something for daily casual wear.

I came across this pattern from Hook Candy on Ravelry and really liked how shoe-like they are. I didn’t want something that would make it look like I’m wearing slippers out on the street.

I just used the same yarn as the sandals because I had a lot of the yarn left over. Used the left over jute as well for the soles and treated it as per the instructions from Wildflowers and Sage’s pattern to make them outdoors ready. And the insoles were made with some leftover Bernat cotton from another project.

Photo 2016-07-06, 2 25 25 PM

I’m quite happy with them! :D I didn’t have to modify the pattern at all to make them accommodate the width of my feet. I did have to add an extra round of single crochet stitches to increase the height of the sides and heels so they don’t feel like they’re falling off my feet, and used double strand of yarn for the entire shoe to make it feel a bit sturdier. They were very comfortable when I walked around with them at home.

Photo 2016-07-06, 2 23 34 PM

Photo 2016-07-06, 2 24 03 PM

The other day I took them out for a test run and wore them to work.

Photo 2016-07-11, 8 13 33 AM

After walking on them for a while the texture of the cotton insoles started to bother my feet. It was quite lumpy, and there was a knot in the jute sole that I didn’t hide and flatten very well, and at the end of the day it was digging into my foot and became a bit painful… (man I sound like the princess in princess and the pea…) and the lack of arch support was a problem as well. So when I got home I put in a pair of foam insoles and tried them on again, they felt much better. I’ll take them out again another day. It would be so nice if I could just make my own shoes from now on and do away shoe shopping forever!

Happy Wednesday, everybody!


Tweet about this on TwitterShare on FacebookPin on PinterestShare on TumblrPrint this page

this week’s awesome finds

Tiny rabbit :) free pattern from G Store Gallery.

Perfect pattern for transit-knitting, from Toronto’s LYS, The Knit Cafe :)

The symbol of friendship is easy to make :D from Persia Lou.

Cute cacti that never die, and double as pincushions! From A Beautiful Mess.

Gorgeous summer tunic, and shared generously by Right Brain Crochet on Ravelry.

Have you seen Finding Dory yet? :D My favourite (besides Dory, of course) is Destiny the whale shark! This pattern is designed as a phone holder but it works just as well as a plush :D it looks kind of complicated but it’s knitted flat so I think I will be able to manage… and did I mention it’s a free download? :D By Reuben Briskie on Ravelry.

Have a wonderful rest of the week, everyone!

Tweet about this on TwitterShare on FacebookPin on PinterestShare on TumblrPrint this page

there is no try

Try not. Do. Or do not. There is no try.” — Yoda

origami yoda

So I did! Folded this origami Yoda on a leisurely Sunday afternoon ^_^

I’ve never gotten into Star Wars as a kid, but recently borrowed episode 7 from our friends, and then decided to watch all of the other episodes to understand the story line. And now Angry Birds Star Wars makes a lot more sense! :D and I developed a new appreciation for the immensely wise Yoda.

The diagram is designed by Fumiaki Kawahata, and it’s linked here. I found parts of it quite difficult to understand, and it’s kind of a complicated model, so I watched this YouTube video and folded along. My folds aren’t very neat, maybe I will fold it again someday. I’m still quite proud of it.

An excellent week, may you have :)


Tweet about this on TwitterShare on FacebookPin on PinterestShare on TumblrPrint this page

hey jute

I have such oddly shaped feet, it’s quite difficult to buy shoes that are comfortable. Shoe-shopping is always a time-consuming ordeal. So I thought, maybe I’d crochet my own shoes! That way I could make them custom fit and comfortable!

I have no idea how to make shoes, but I thought for sure there’d be patterns on Etsy, so I looked, and came across a pattern by Wildflower and Sage. I love that it includes instruction for making the shoes outdoors ready. There actually aren’t very many like this one out there.

Was very excited, went out and bought all the materials right after I downloaded the pattern :D I couldn’t find hemp (which is what the pattern called for) at the local Michaels and Home Depot, so I bought #48 jute, and started on the soles…

Photo 2016-06-25, 4 59 25 PM

Jute is actually kind of hard to crochet with, and I had to use a larger hook than called for. No wonder the pattern called for hemp. Oh well. I just took lots of breaks in between so my wrists don’t get too sore.

So finally I finished making the two soles. If I make them again I probably will follow the pattern for regular width rather than instruction for wide, since I had to use a larger hook. I think wide was too wide. But it’s still ok! There I am waterproofing the soles by lathering them in silicon caulk. The fume was stronger than I thought. Ventilation is imperative.

Photo 2016-06-26, 11 57 13 AM

Slowly working on the straps, trying them on as I go so the strap placements feel right :D I made the insoles with Bernat Maker Home Decor, which feels kind of like a t-shirt yarn.

Photo 2016-06-26, 8 03 54 PM

And here they’re, finished :D

Photo 2016-06-29, 12 31 21 PM

They’re actually really quite comfortable! I think I made the straps on the right shoe too tight though, they keep pushing my foot forward out of the sandals. But maybe as I keep wearing them and the straps stretch the problem will correct itself.

Side view…

Photo 2016-06-29, 12 32 08 PM

I’m quite happy with them! Will find an opportunity to test them out outside sometimes!

Photo 2016-06-29, 12 34 22 PM

It’s really an excellent pattern, highly recommend it! :D

Hope everyone have a happy rest of the week!


Tweet about this on TwitterShare on FacebookPin on PinterestShare on TumblrPrint this page

hongdae

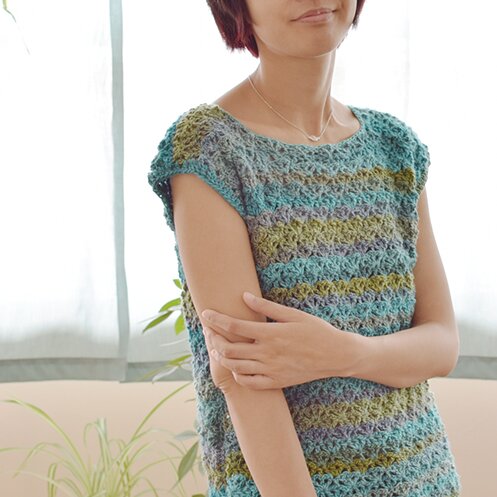
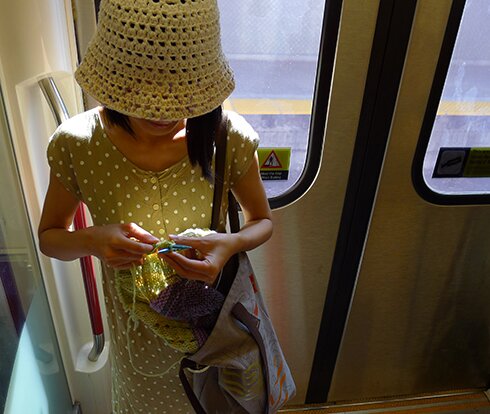
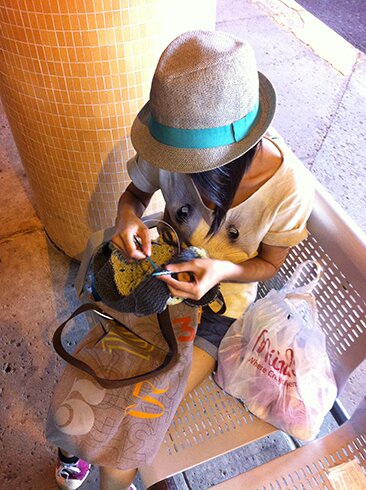
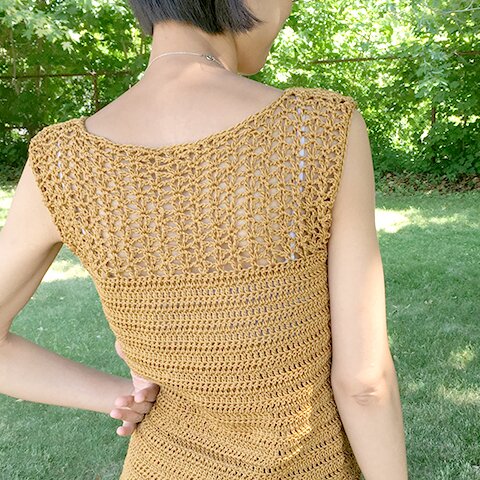
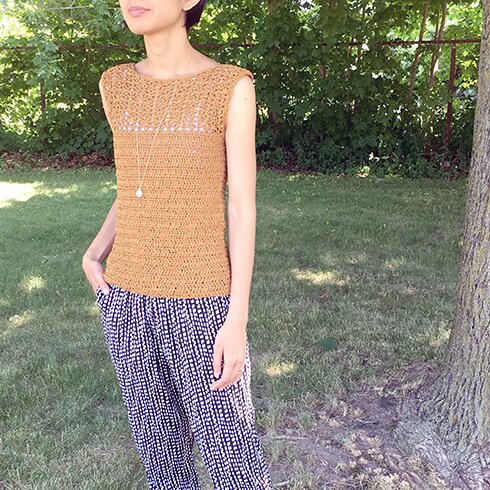
So named because I tried working with this yarn on a project while staying in Hongdae, Seoul, and because this hipster mustard yellow seems to go well with the neighbourhood that is known for its urban arts and many indie cafes.

I ended up frogging the project that I was working on while in Hongdae. In the meanwhile, the Ginkgo pattern has been getting a lot of traffic lately and I’ve been thinking about doing a crochet-only remake for those who are not really into sewing. So I thought I’d use this yarn for a new pattern.

Photo 2016-06-24, 11 45 23 AM

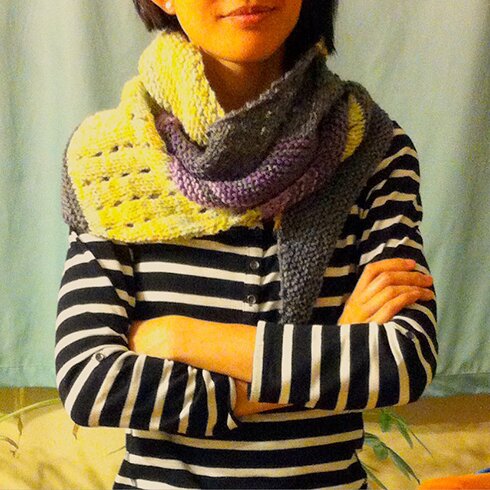
As with all of my patterns, I made the garment to fit me, but it doesn’t involve much shaping at all and I think it’d be pretty easy to adjust size.

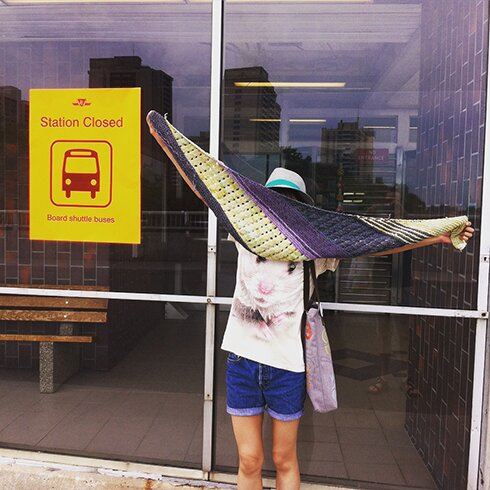
Closer up of the lace pattern :D

Photo 2016-06-24, 11 42 21 AM

I used:
Mirasol IllarisDK weight 100% cotton, 5 skeins, 580 yards (you’d need more yarn if you were making a larger size)
4.5 mm hook
Tapestry needle

Finished measurements:
Bust 30″
Length 20.5″
Length — shoulder to underarm 7″
collar width 9″

Gauge: 6 dc = approx. 1″
To adjust size, add or decrease multiples of 6 ch in foundation ch.
One could also make it wider for a cap-sleeve boxy-top look.

Pattern:

Front:

ch 63

Row 1 (RS): dc in 4th ch from hook, dc in every ch across, turn (61 dc).

Row 2–33: ch 3 (counts as 1 dc throughout), dc in every dc across, turn.

Start lace pattern: 

Row 1: ch 1 (does not count as a st), sc in first dc, *ch 2, sk 2 dc, dc in next dc, ch 2, dc in same dc, ch 2, sk 2 dc, sc in next dc* repeat from * to * till end of row, turn.

Row 2: ch 5 (counts as dc and ch 2), dc in first sc, ch 2, sc in ch 2 sp, *ch 2, dc in next sc, ch 2, dc in same sc, ch 2, sk next ch 2 sp, sc in next ch 2 sp*, repeat from * to * till last sc of row, ch 2, dc in last sc, ch 2, dc in same sc, turn.

Row 3: ch 1, sc in first dc, *ch 2, dc in next sc, ch 2, dc in same sc, ch 2, sk next ch 2 sp, sc in next ch 2 sp*, repeat from * to *, ending with sc in 3rd ch of turning ch, turn.

Rows 4–12: Repeat rows 2–3 four more times, then row 2 once more.

Left shoulder:

Row 1: ch 1, sc in first dc, *ch 2, dc in next sc, ch 2, dc in same sc, ch 2, sc in next ch 2 sp*, repeat from * to * two more times, turn.

Row 2: ch 2, sk first ch 2 sp, sc in next ch 2 sp, *ch 2, dc in next sc, ch 2, dc in same sc, ch 2, sc in next ch 2 sp*, repeat from * to * once more, ch 2, dc in last sc, ch 2, dc in same sc, turn.

Row 3: ch 1, sc in first dc, *ch 2, dc in next sc, ch 2, dc in same sc, ch 2, sc in next ch 2 sp*, repeat from * to * once more, turn.

Row 4: ch 1, sc in first sc, [sc in ch 2 sp, sc in dc] twice, sc in ch 2 sp, 2 sc in sc, [sc in ch 2 sp, sc in dc] twice, sc in ch 2 sp, sc in last sc. Fasten off.

Right shoulder:

Attach yarn to the beginning of row 12 of lace pattern at the 3rd ch of turning ch. Work the same as left shoulder.

Back:

Work the same as front until shoulders. Repeat lace pattern row 3, then row 2.

Left shoulder: Work rows 3–4 of shoulder for front.

Right shoulder: Attach yarn to the beginning of row 14 of lace pattern at the 3rd ch of turning ch. Work the same as left shoulder.

Assembly:

With wrong sides together, sew shoulder seams together.

With wrong sides together, sew side seams together, starting at the base of the 2nd dc row below the start of the lace pattern, and sewing to the bottom edge of the garment.

Turn garment right side out. Work one row of sc evenly around the collar, basically working 1 sc in each dc, sc, and ch 2 sp. Then work one row of sc evenly around each of the armholes. I find that it turns out pretty even when I work 1 sc in each row-end, and 1 sc in a space between 2 rows.

Weave in all ends. And we’re finished :)

Photo 2016-06-24, 11 41 01 AM

As always if you spot any mistakes or have any questions please feel free to drop me a note, and I will correct or try my best to assist!

Happy first week of summer!


Tweet about this on TwitterShare on FacebookPin on PinterestShare on TumblrPrint this page

summer wanderings — doors open

Photo 2016-05-28, 1 25 12 PM

It was Doors Open Toronto at the end of May. We try to visit one or two building every year. This year we decided to take the long trek to Fool’s Paradise, the former home of Canadian artist Doris McCarthy, who lived to be 100, and donated her home to be an artist-in-residence centre after her passing.

Her home was the first one built on this stretch of the road. She designed and drafted the blueprint for the house.

Photo 2016-05-28, 1 12 11 PM

As soon as we entered the front door we were greeted by this rug, made by McCarthy.

Photo 2016-05-28, 11 52 25 AM

Paper owl guarding her desk and all her tools still. “Like she never left,” said the tour guide.

Photo 2016-05-28, 12 02 10 PM

The Chapter Room”, which she built to write her memoir. It is the coziest room I’ve ever found myself in.

Photo 2016-05-28, 11 59 26 AM

Perhaps a sunny reading nook.

Photo 2016-05-28, 12 11 40 PM

Her beautiful chandelier and her beautiful arctic landscape.

Photo 2016-05-28, 12 09 28 PM (1)

The tour guide told us that McCarthy built all the cupboards in the kitchen by making cardboard mock-ups.

Photo 2016-05-28, 12 06 43 PM

Neighbourhood children used to skate on this pond in the winter.

Photo 2016-05-28, 12 29 35 PM

And at the edge of the backyard is the cliff of Scarborough Bluffs.

Photo 2016-05-28, 12 21 11 PM

There were visitors picnicking…

Photo 2016-05-28, 1 05 03 PM

And painting :)

Photo 2016-05-28, 1 08 34 PM

After our own picnic we explored a nearby park. The dandelions were like glowing orbs lining the path.

Photo 2016-05-28, 1 40 19 PM

Looking down from the cliff. The water was so blue.

Photo 2016-05-28, 1 33 10 PM

Next time we’ll visit the bluffs from below the cliffs so we can see the layers of sediments!

Hope everyone is having a good weekend!


Tweet about this on TwitterShare on FacebookPin on PinterestShare on TumblrPrint this page

this week’s awesome finds

All the summery stuff! :D

Cut fox print, also great for t-shirt! :D From Patchwork Cactus.

These cat donuts are soooo adorable. Original recipe is not in English, but Google Translate does a good job! From Schoen Und Fien.

So pretty and summary, strawberry shortcake in a jar <3 Looks simple enough for non-bakers like me to make, especially if I buy pre-made pound cake… From Make & Takes.

Cutest jellyfish I’ve seen! Pattern from One Dog Woof.

Clothespin fairies for rainy day craft parties and sunny day garden parties. From Crafts Unleashed.

More rainy day crafts! Loo roll ninjas on Kids Activities Blog.

These are the most gorgeous dish cloth, inspired by old-times linoleum floors. Pattern on Mason-Dixon Knitting.

This is just plain awesome. The tutorial uses colour gel filters, I’m not sure where to get those, but I think for a smaller version tissue paper will be OK. From Oh Happy Day.

Enjoy the sun! :D

Tweet about this on TwitterShare on FacebookPin on PinterestShare on TumblrPrint this page

in transit

P1080453

Was looking for a project that would be small enough to work on while taking public transit. I find it a great way to de-stress to/from work and dealing with rush hour traffic. (And so it is also necessary to learn to knit while standing in a moving train — it’s quite a skill, if I do say so myself :D)

I found this lovely pattern on Ravelry by The Yarn Juice. I’ve always been partial to sideways triangular scarfs with contrasting stitch patterns and colours. This pattern is perfect.

I started on Victoria Day holiday while taking the bus to my parents’. This makes waiting for the bus much more tolerable.

day1

On the streetcar to the beach!

Photo 2016-05-24, 1 48 19 PM

Post-long weekend morning… but look, we got seats! This happens like once every 6 months. I’m really pleased with how the purple contrasts with the variegated lime/yellow yarn (which by the way I got in Halifax, hand-dyed by East Anchor Yarns, and I’m so happy to incorporate it in something I can wear :D).

Photo 2016-05-25, 8 28 32 AM

Fast-forward to weekend again, taking the long subway ride to Scarborough Bluffs (more on that trip later).

P1080452

This is me binding off 7 days later. It’s a super quick knit! (And yes, that is a Michaels bag with more yarn in it for my next projects.)

Photo 2016-05-29, 5 13 19 PM

Arriving with a finished scarf! :D (ironically, there was a scheduled closure in the subway line that weekend, which made our travel time quite a bit longer. Well, more time for knitting!)

Photo 2016-05-29, 5 46 29 PM

I’m really pleased with how it turned out. I love everything about it. I love all the different textures layered together when it’s wrapped around the neck. And it’s wide enough to drape over the shoulders. It’s far too warm to wear it right now but I’ll be sure to bring it with me everywhere comes this fall.

Photo 2016-06-03, 9 45 40 PM

Photo 2016-06-03, 9 43 52 PM

I used worsted weight yarn and 6mm needles, rather than DK yarn and 5mm needles as called for in the pattern, because I have a lot of worsted weight scarp yarn. It’s really a great way to use up scarps. I think I will make another one as a gift. I also got to practice using circular needles, which I never really liked using. But it’s great for knitting in transit.

Hope everyone’s having a good weekend!


Tweet about this on TwitterShare on FacebookPin on PinterestShare on TumblrPrint this page