this week’s awesome finds

What to make with just a few days before Christmas?


Make a snowy forest globe (or a village of globes!), with dollar store supplies! From Ruffles and Stuff.

Knit a couple of leafy washcloths! (also double as pot holders!) From Ravelry designer Megan Goodacre.

Knit a chunky slouchy cozy hipster hat! From Little Things Blogged.

Crochet a super cute festive mouse ornament! From Lucy Ravenscar.

Knit a super soft scarf with fluffy chunky yarn :) From Lion Brand Yarn.

Make some My Neighbour Totoro characters out of toilet paper rolls, to put on the tree! :D From Sandra Brundell. (Post is in Swedish, but the craft is pretty self-explanatory :D)

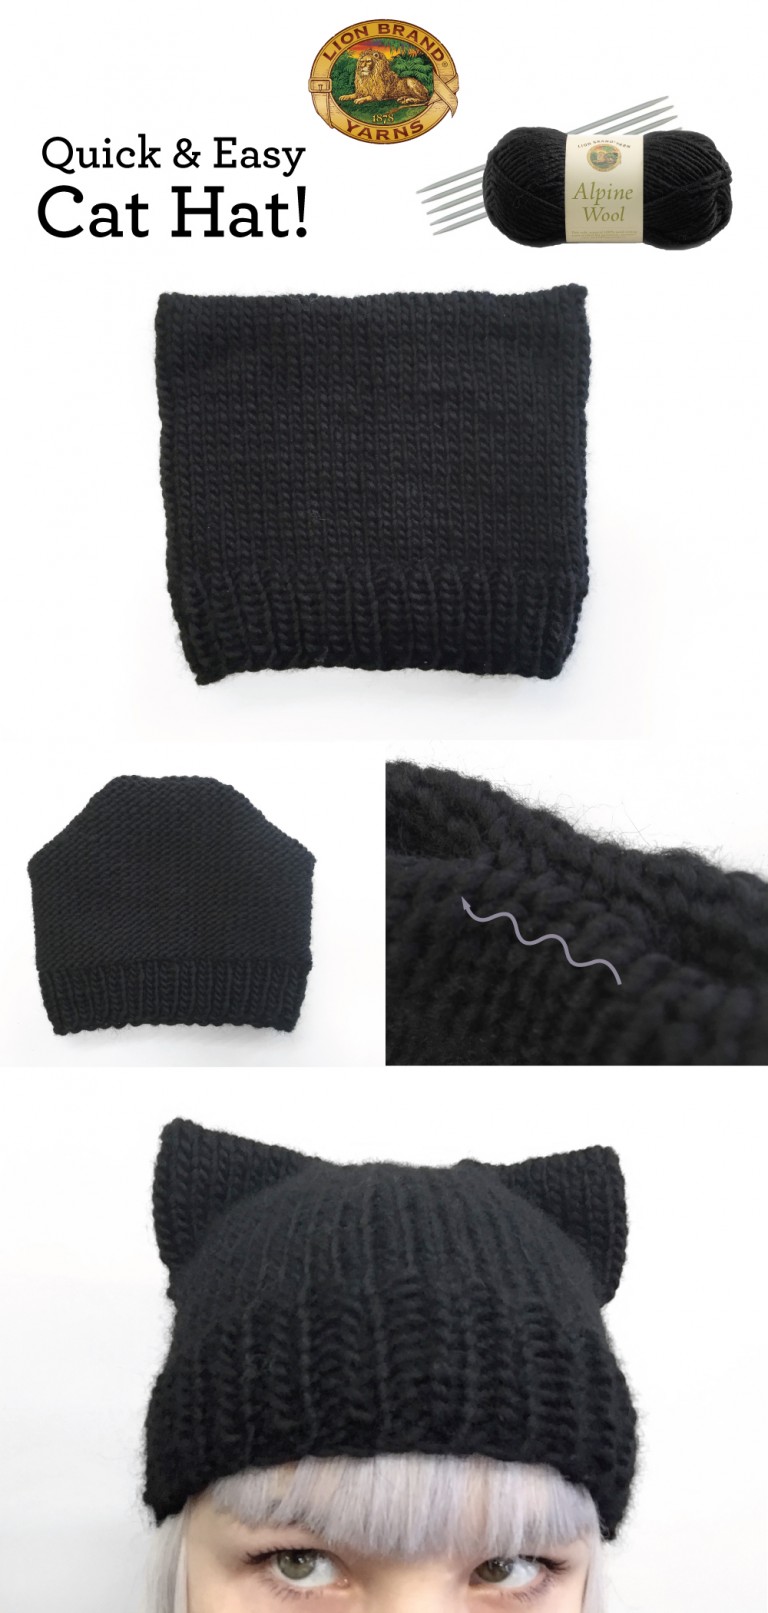
Knit a quick and easy cat hat! From Lion Brand Yarn blog.

Happy crafting! May the festivities fill your week with joy :)

Tweet about this on TwitterShare on FacebookPin on PinterestShare on TumblrPrint this page

merrymaking

DSC_1278

Santa’s favourite! :D

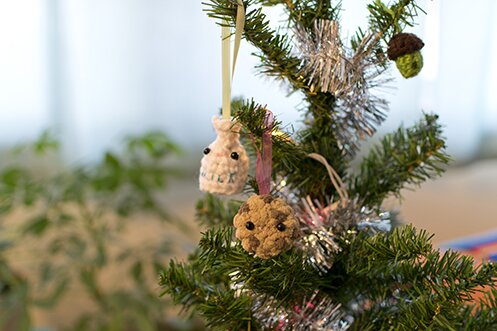
Made these for the shop as an ornament pack. Just one of the many things that I’m making. Making things is probably my favourite part of Christmas :)

I made the cookie with scraps of Bernat Blanket, which made it extra soft, like real soft-baked cookies, haha.

Wishing you a happy rest of the week!


Tweet about this on TwitterShare on FacebookPin on PinterestShare on TumblrPrint this page

this week’s awesome finds!

Featuring quick gifts to make! :D

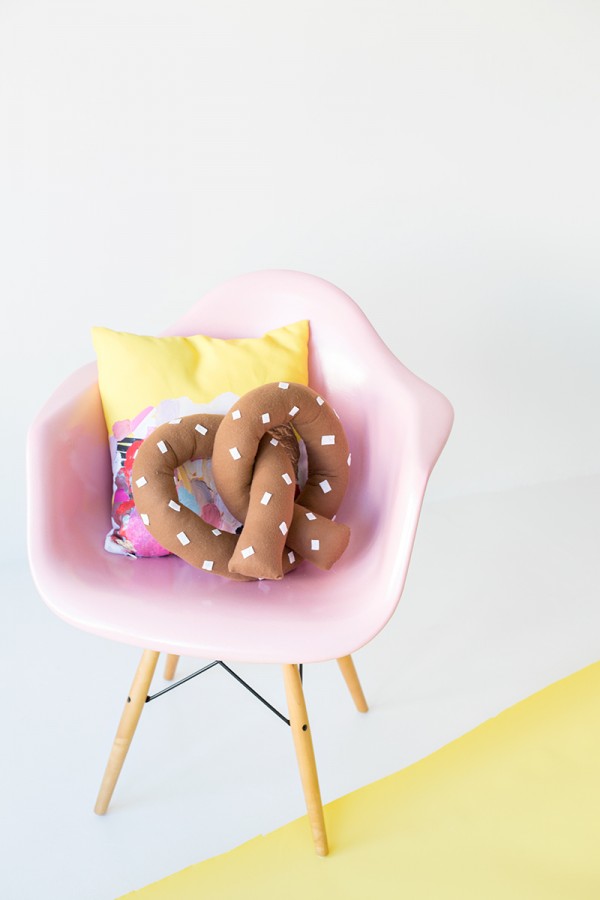
This cute pretzel pillow! From Studio DIY.

Super fun pompom key rings, free how-to from Wool and the Gang! (email sign up required to download instructions)

Also from Wool and the Gang, an adorable penguin embroidery pattern to customize your Christmas sweater! One can probably use it as a chart to knit the sweater itself. Might even work for crochet!

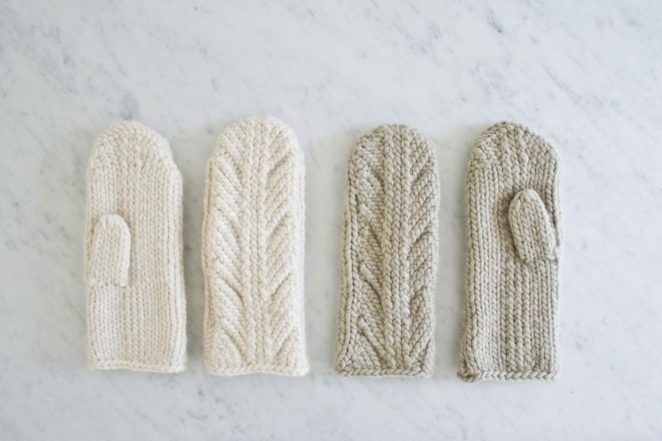
These mittens from Purl Soho are just beautiful. They’re knitted flat too (for the most part), so they’re on my to-make list :)

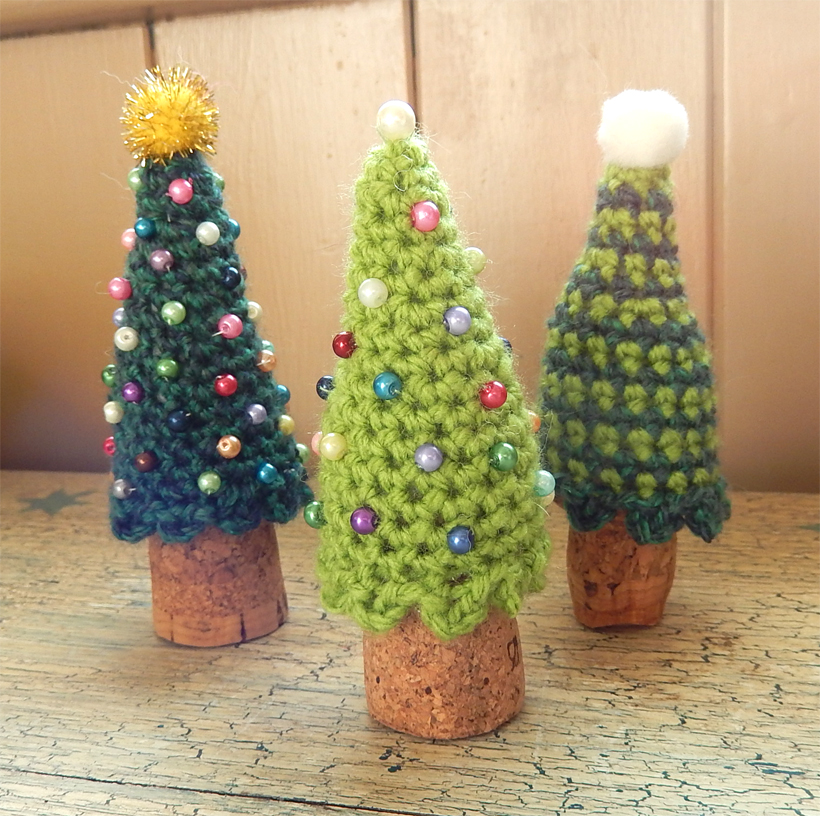
Tiny amigurumi using corks! My favourite is the Christmas tree. The elves are also ridiculously cute. Visit Moji-Moji Design to see all of them! :D

I like the contrast of the lace pattern and the dense dc stitches. From Moogly.

Need a nice gift topper or table decorations? These chrysanthemum are gorgeous and pretty easy to make. From Oh Happy Day.

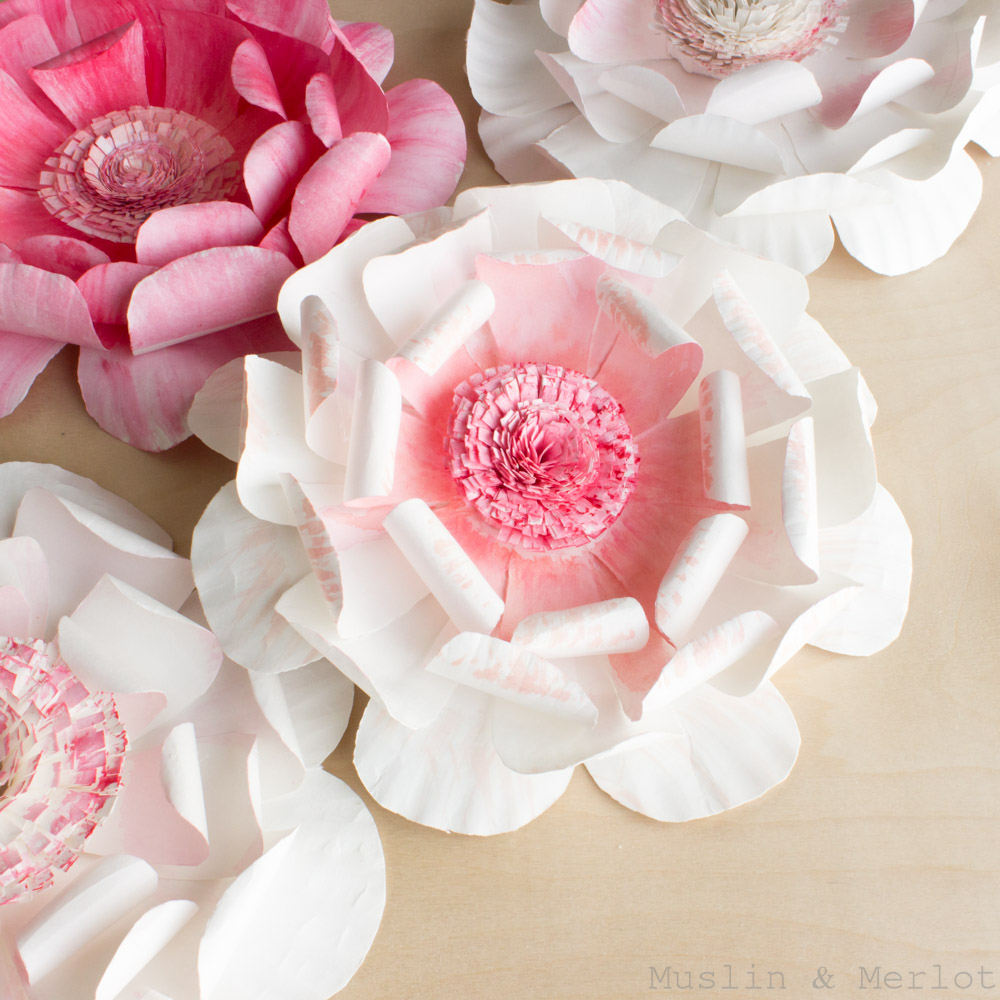
Need a bigger gift topper? These are made from paper plates! Aren’t they amazing? Can also double as wall-hanging! From Muslin & Merlot.

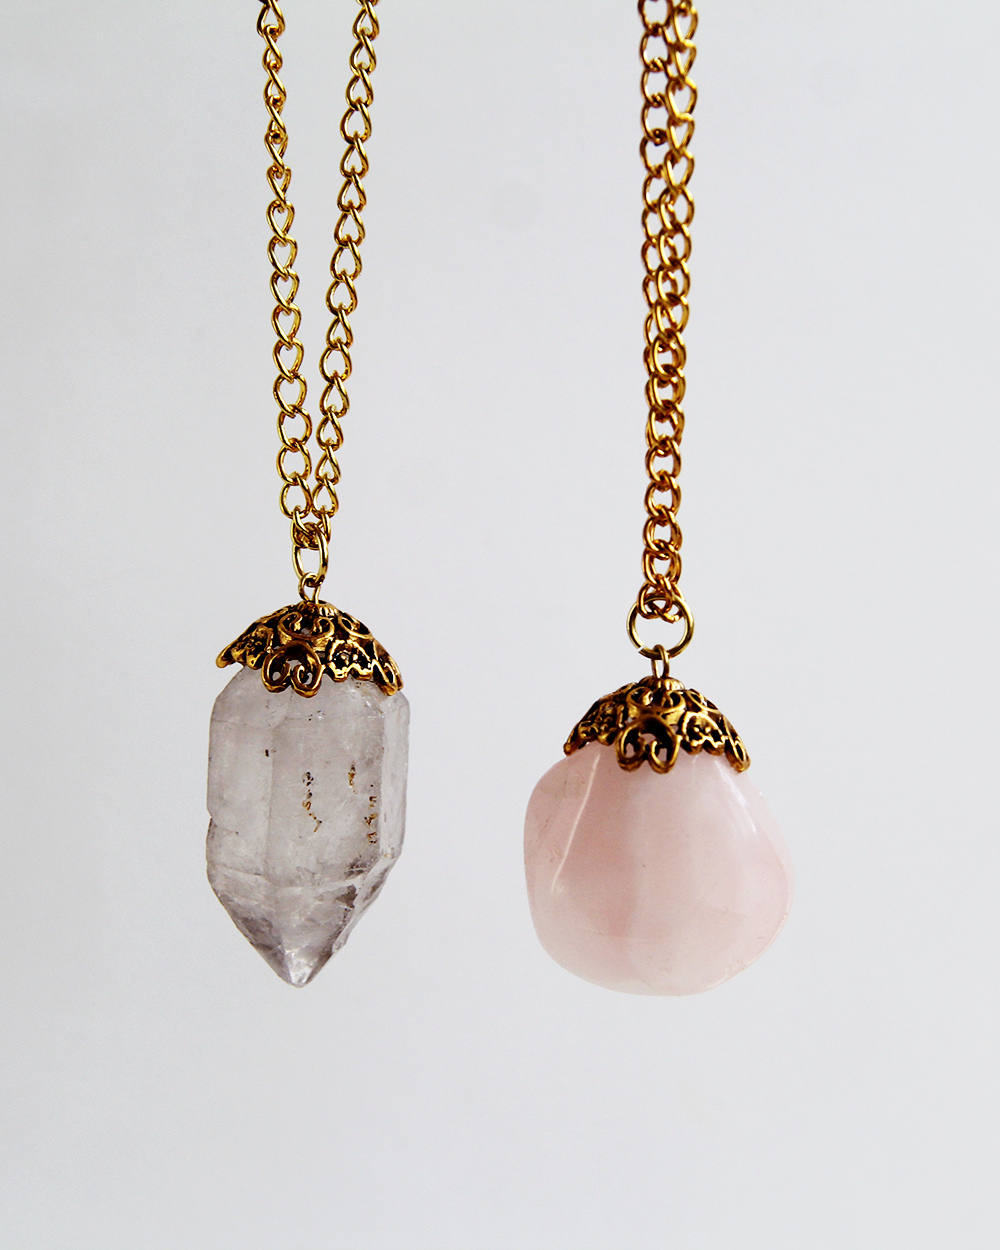
I think this is a brilliantly simple way to show off nice stones and agates, I would just be a slight bit nervous about the stones falling off the bail, as they’re just held by glue… But I’ve actually done the same with a small piece of amber, and it’s never fallen off, so I guess as long as one is using the right glue, this makes a nice quick gift! From Fall for DIY.

Can’t go wrong with a simple, cozy hat in neutral colours that will go with everything :) From Mama in a Stitch.

Can’t wait to show you all the things I’ve been making — in a few weeks, after I’ve given the gifts away :) Happy holiday crafting! :D

Tweet about this on TwitterShare on FacebookPin on PinterestShare on TumblrPrint this page

finger-knitted ear-warmer

Tomorrow is the first day of December! Thought I’d share a super cozy last minute gift to make :D
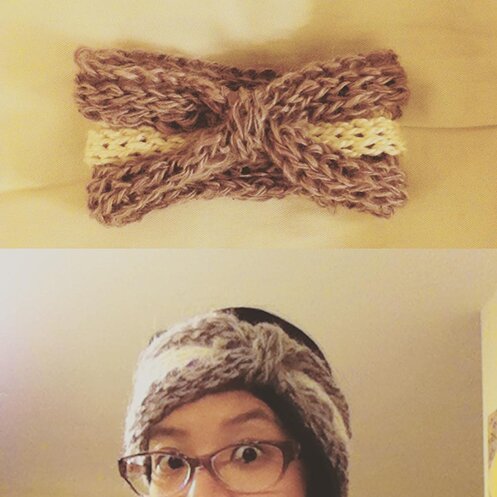
fingerknitted headband

I’ve mentioned this ear-warmer in a post before, and finally got around to taking all the pictures to make a how-to :D It works best with bulky weight yarn, to keep the fabric soft. I think super bulky would turn out too stiff. Because of the way the knitted fabric curl with finger-knitting, the ear-warmer/headband will also turn out double-thick! So it’s super warm :)

I used:

Bulky weight wool. I used the scrap yarn I have, but one ball of this will be enough to make one headband of solid colour. 2 balls if you want to make one with a contrasting colour.

No need for needles and hooks, just fingers :) but you do need a tapestry needle for sewing the headband together.

Notes:

I learned finger-knitting and joining method from Knitting Without Needles by Anne Weil. She also has a photo tutorial on how to finger-knit here. But to save everyone the trouble of going back and forth between different sites, I’m showing the basics of finger-knitting in the how-to below as well.

The bind-off method is inspired by this finger-knitted blanket video by Good Knit Kisses. The author of the video uses a different finger-knitting method than the one I’m used to, so I just took the basic idea and made up a bind-off method that works for me.

Basically, finger-knitting produces a long strip of knitting. For the headband, we’re going to make 6 strips of knitting and join them together lengthwise as we knit.

It might take longer to make the headband if you’re learning finger-knitting for the first time. But with some practice, the headband took me a couple of hours in front of the TV to finish :)

Ready? Let’s knit! :D

We first make a setup row. Take your left hand, take the yarn end and hold it between your thumb and hand, then take the yarn behind your middle finger, in front of your fourth finger, and behind your pinky.
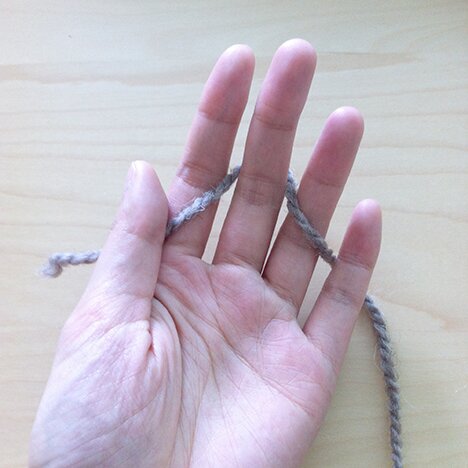
Photo 2015-11-28, 12 04 05 PM

Wrap the yarn around your pinky, take it behind your fourth finger, in front of your middle finger, and behind your index finger.
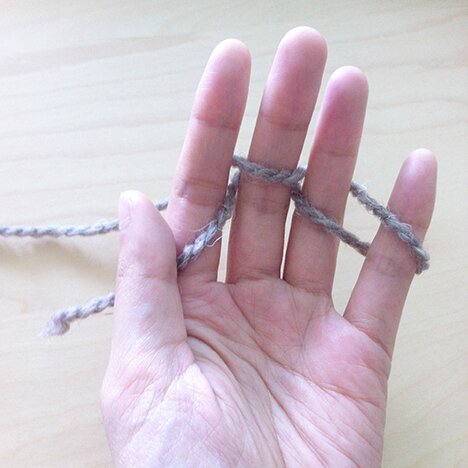
Photo 2015-11-28, 12 05 06 PM

Wrap the yarn around your index finger, then take it behind your middle finger, in front of your fourth finger, and behind your pinky again.
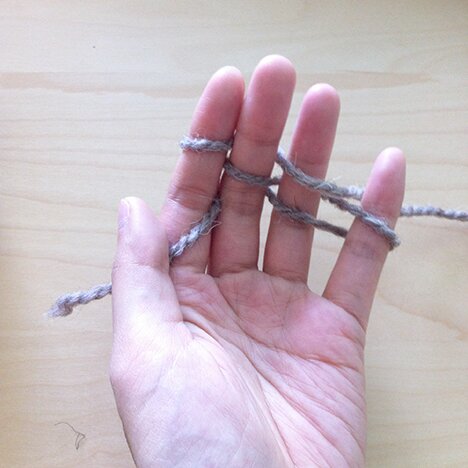
Photo 2015-11-28, 12 05 49 PM

Wrap the yarn around your pinky, take it behind your fourth finger, and in front of your middle finger, than hold the yarn between your index finger and middle finger.
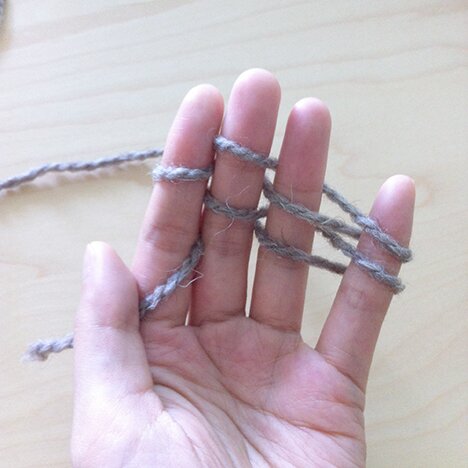
Photo 2015-11-28, 12 06 22 PM

Straighten out the wrapping a bit, it will look something like the picture below, with the yarn end still held between your thumb and your hand, and the working yarn tail between your index finger and middle finger.
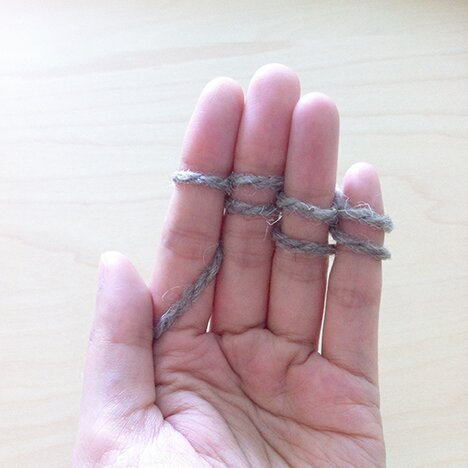
Photo 2015-11-28, 12 09 12 PM

Now, starting from your pinky, take the lower loop of yarn, and pull it over the upper loop of yarn and over your finger, so that you would have only one loop of yarn left on your finger. Repeat on your fourth finger and middle finger.

Then take the yarn end between your thumb and hand, and swing it to the back of your hand between your index finger and middle finger, like so. We’ve now completed the set up row.
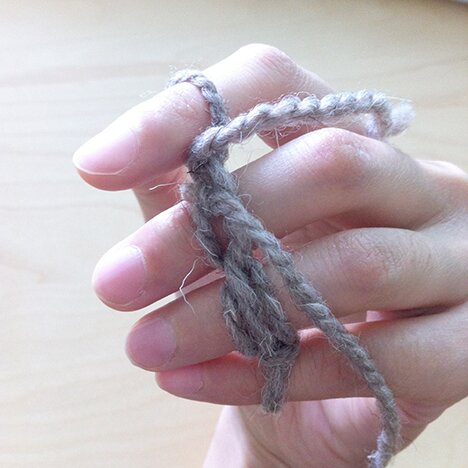
Photo 2015-11-28, 12 11 06 PM

We now begin our first row. Wrap the working yarn around your index finger, from left to right, take it behind your middle finger, in front of your fourth finger, and behind your pinky.
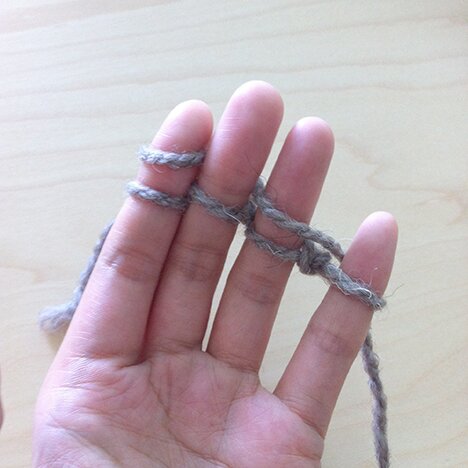
Photo 2015-11-28, 12 11 43 PM

Wrap the working yarn around your pinky, take it behind your fourth finger, in front of your middle finger, and hold it between your index finger and middle finger. The working yarn tail will always rest between your middle finger and index finger after each row.
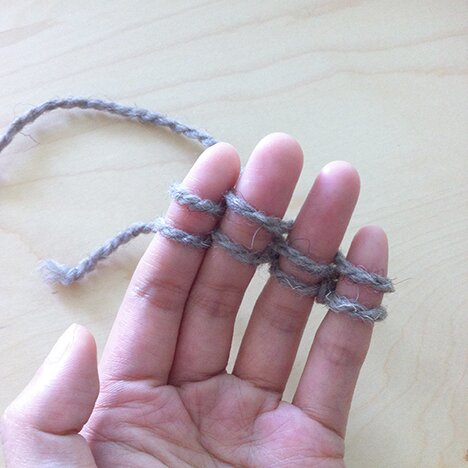
Photo 2015-11-28, 12 12 34 PM

Starting with your pinky, pull the lower loop on your finger over the upper loop and over your finger. Repeat with your fourth finger, middle finger, and index finger. We’ve completed a row!

Repeat the steps from “we now begin our first row” to “we’ve completed a row” 39 more times. So that altogether we will have 40 rows.

Note on size: 40 rows fits me fine, since headbands are supposed to be a bit snug to stay on the head, and because of the loose gauge of finger-knitting the headband will stretch. But the length of your knitted strip may also vary according to the kind of yarn you use or the tension of your knitting. You can wrap the knitted strip around your head after 40 rows, and see if the ends will meet with a bit of stretching, and if you need to add or take out a row or two. Or if you’re making it for somebody else, make the knitted strip a couple of inches shorter than the person’s estimate head circumference. I think an average adult head is 22″ around.

As you knit, the right side of the work will be facing the back of your hand, the wrong side of the work will be facing up.

After the 40th row is complete, we now begin to bind off the strip. Wrap the working yarn around your index finger from left to right. Hold the yarn between your index finger and middle finger.
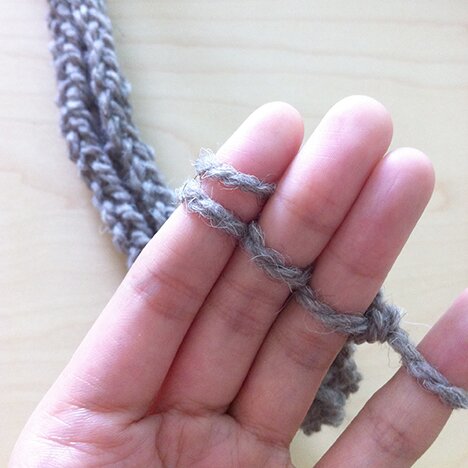
Photo 2015-11-28, 12 24 11 PM

Pull the lower loop over the upper loop and over your index finger.
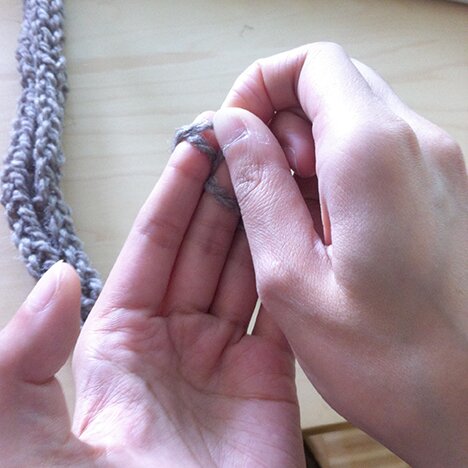
Photo 2015-11-28, 12 24 55 PM

Place the remaining loop on your index finger onto your middle finger.
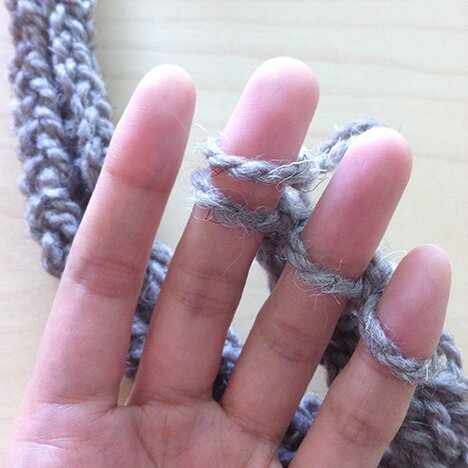
Photo 2015-11-28, 12 27 23 PM

Take the working yarn and wrap it around your middle finger, from left to right. Pull taut (but not too tight) the working yarn by holding it between your index and middle fingers. Pull the two lower loops on your middle finger over the upper loop (working yarn loop) and over your middle finger.
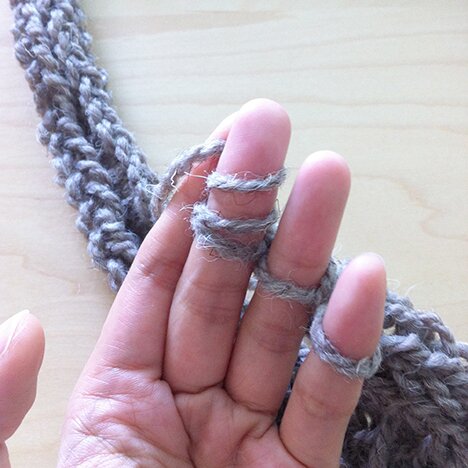
Photo 2015-11-28, 12 27 59 PM

Transfer the remaining loop on your middle finger onto your fourth finger.
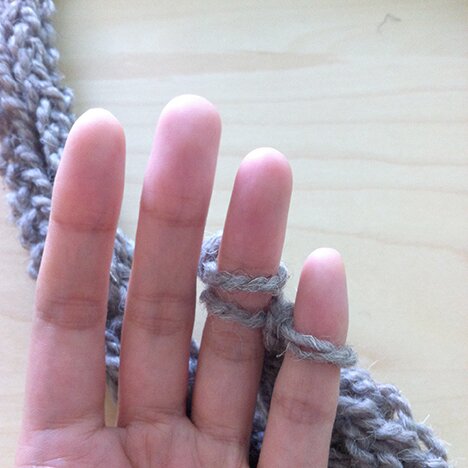
Photo 2015-11-28, 12 28 25 PM

Wrap the working yarn around your fourth finger, from left to right. Pull taut the working yarn tail by gripping it between your index and middle fingers. Pull the two lower loops on your fourth finger over the upper loop and over your fourth finger.
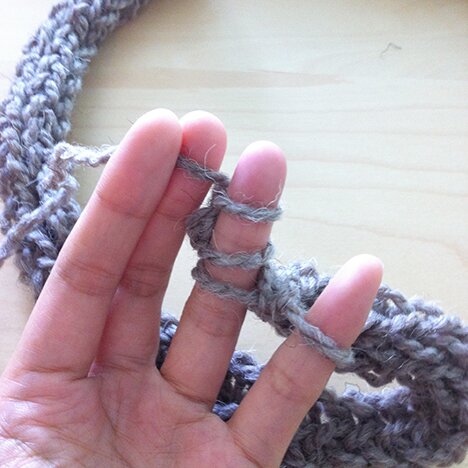
Photo 2015-11-28, 12 28 45 PM

Transfer the remaining loop on your fourth finger to your pinky. Wrap the working yarn around your pinky, from left to right. Pull taut the working yarn tail by gripping it with your index and middle fingers. Pull the two lower loops on your pinky over the upper loop and your pinky.
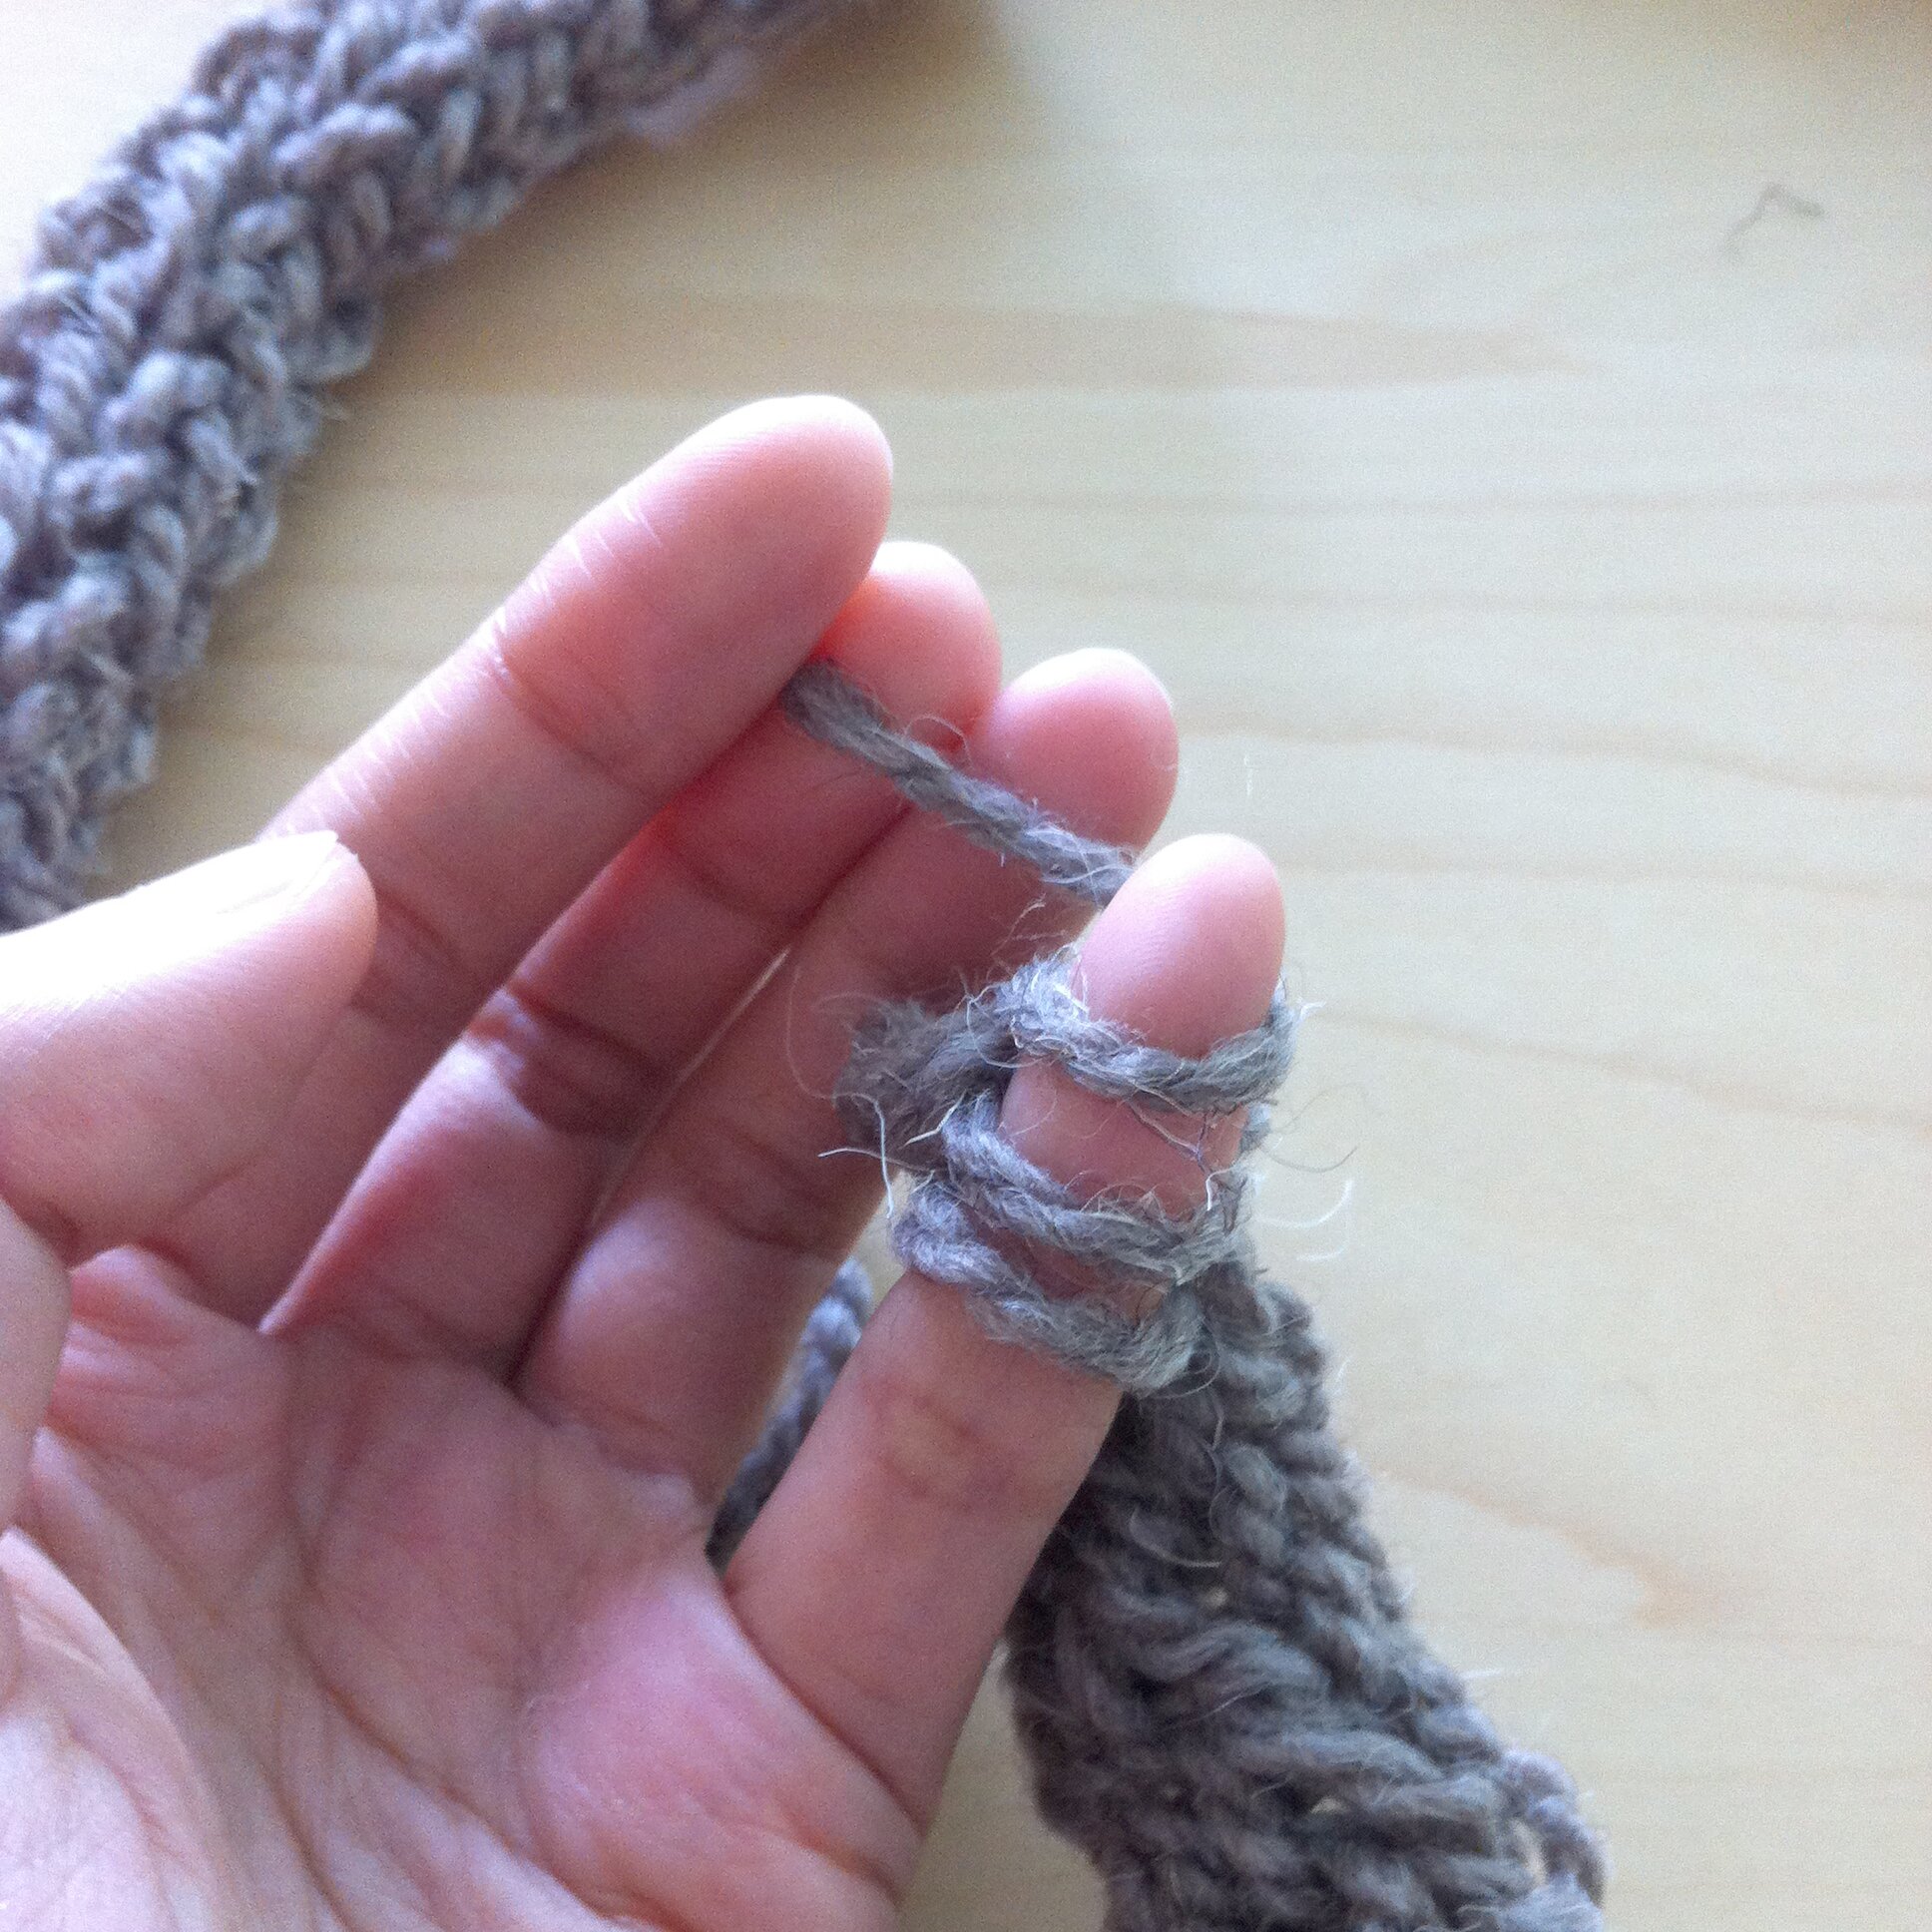
Photo 2015-11-28, 12 29 03 PM

You will have one remaining loop left on your pinky.
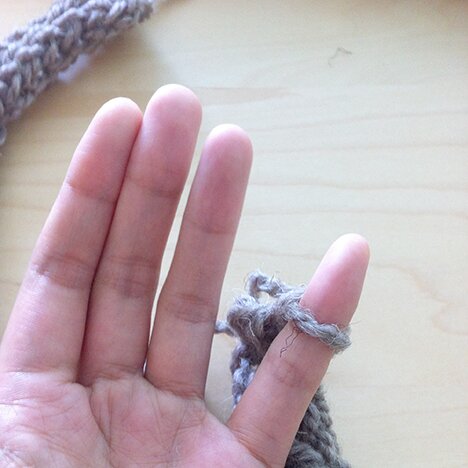
Photo 2015-11-28, 12 29 24 PM

Without turning the knitted piece, transfer the loop on your pinky to your index finger, with the right side of the work facing you, positioned like the picture below.
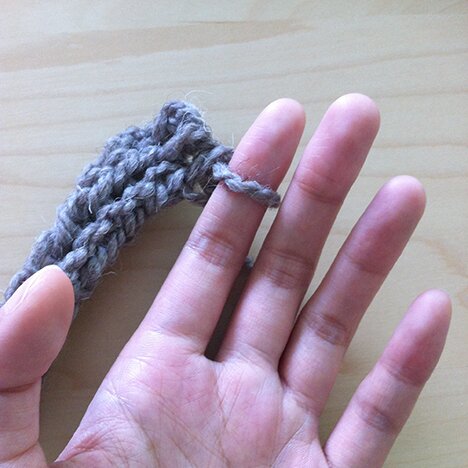
Photo 2015-11-28, 12 30 21 PM

We are now knitting the second strip, and joining it to the first strip as we knit. Wrap the working yarn around your fingers as usual to knit one row.
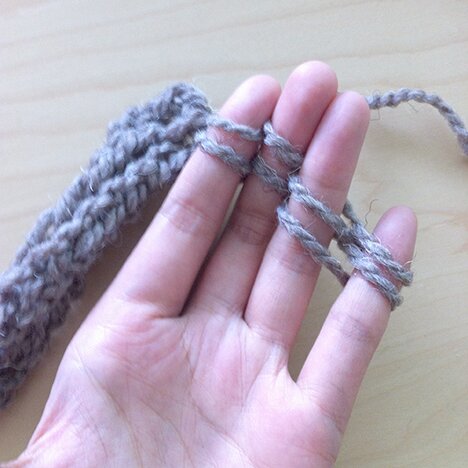
Photo 2015-11-28, 12 30 54 PM

Then, position the knitted strip and your hand like the picture below. Note that the right side of the knitted piece is still facing up.
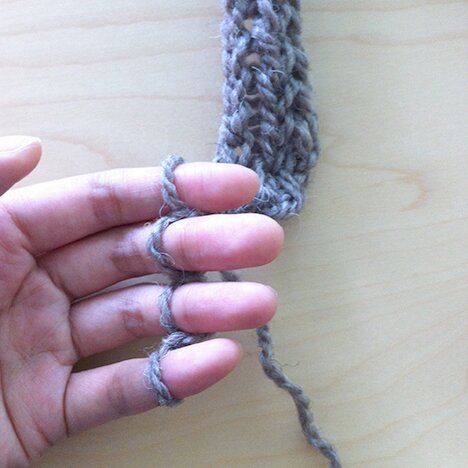
Photo 2015-11-28, 12 32 00 PM

Insert your index finger from under the loop into the outermost loop of the second row from your hand — the highlighted loop in the picture below.
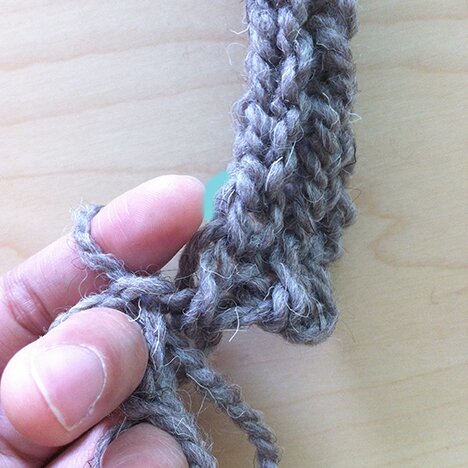
Photo 2015-11-28, 12 32 41 PM

You will now have two loops on your index finger.
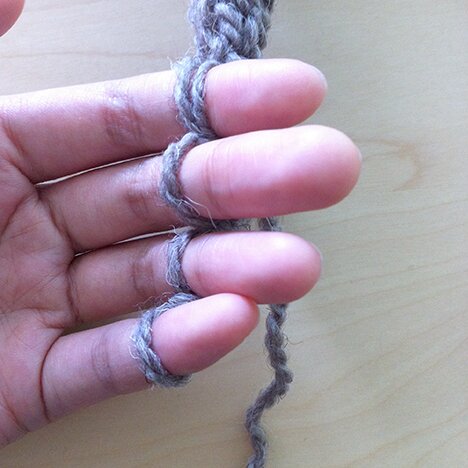
Photo 2015-11-28, 12 33 06 PM

Then wrap the working yarn around your fingers as usual to knit the row. When you get to your index finger, pull the two lower loops over the upper loop.
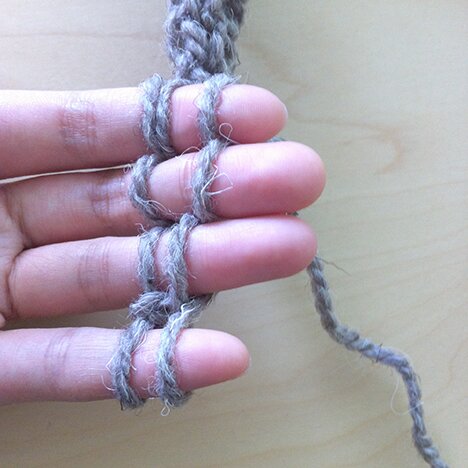
Photo 2015-11-28, 12 33 43 PM

And in every row hereafter, before wrapping the working yarn around your fingers to knit the row, insert your index finger into the outermost loop of the knitted strip — the highlighted loops in the picture below.
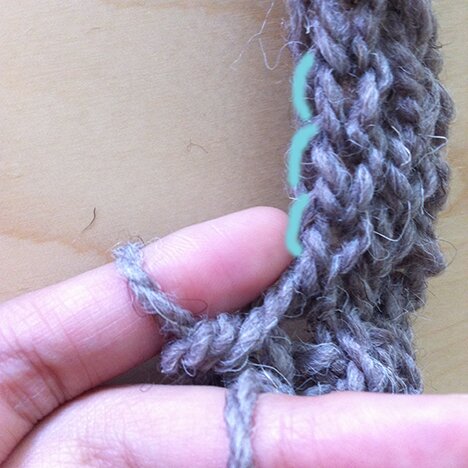
Photo 2015-11-28, 12 34 55 PM

When the second strip is complete, bind off as shown before, with one loop remaining.

If you’re making a solid colour headband, you can continue knitting until you have 6 knitted strips altogether. If you’d like a contrasting colour, change colour after knitting the first 2 strips, as follows.

Make a loop with new colour and place loop in the working loop, like so.
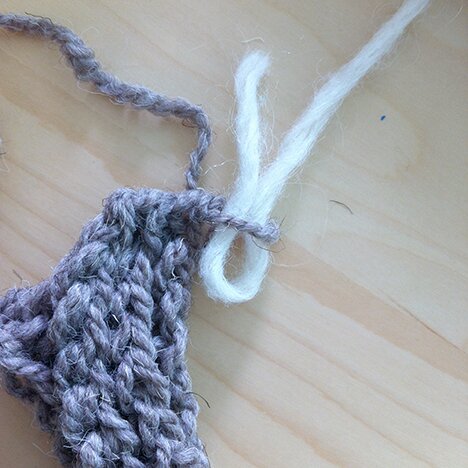
Photo 2015-11-28, 2 05 55 PM

Tie the yarn end of the new yarn to the working yarn tail of the previous colour. You might want to put a pen into the new yarn loop to stabilize it when tying. Cut off the previous colour.
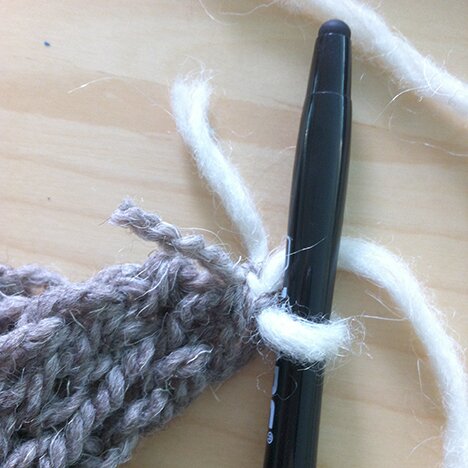
Photo 2015-11-28, 2 08 16 PM

Then knit with new yarn and join it to the previously knitted strip, as shown before. Knit two strips with the new yarn. Then change to previous colour, and knit two strips.
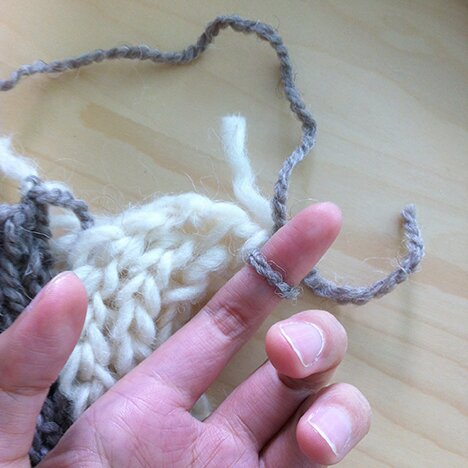
Photo 2015-11-28, 2 35 47 PM

After binding off the 6th strip, leave a long tail for sewing, and cut off yarn. Pull the yarn end through the working loop to fasten off.

Now we sew the headband together. With wrong side facing, sew the two short ends of the headband together using a loose mattress stitch. Because of the loose gauge of finger-knitting, some stitches are going to be quite loose. Ensure that your needle is passing through two strands of yarn on each side in each stitch.
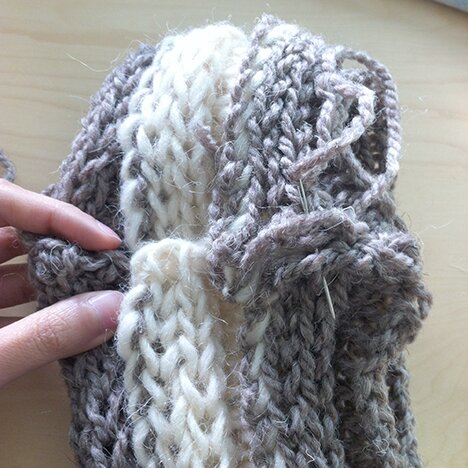
Photo 2015-11-28, 3 13 33 PM

After sewing the seam together, don’t fasten off. Pull the sewing yarn tight to cinch the seam. Turn piece right side out. Wrap the sewing yarn firmly around the middle a couple of times, with the top and bottom edges of the headband folding into the centre, like so.
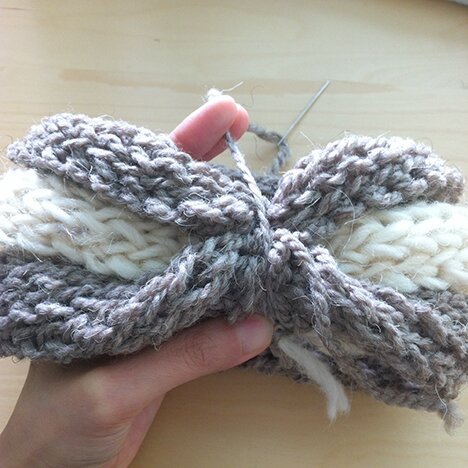
Photo 2015-11-28, 3 18 00 PM

Fasten off the sewing yarn by tying it to the beginning yarn end. Weave in ends.

Now we make the small strip in the middle of the cinch. Finger-knit a piece that is 6 rows long, and bind off, leaving a long tail for sewing.
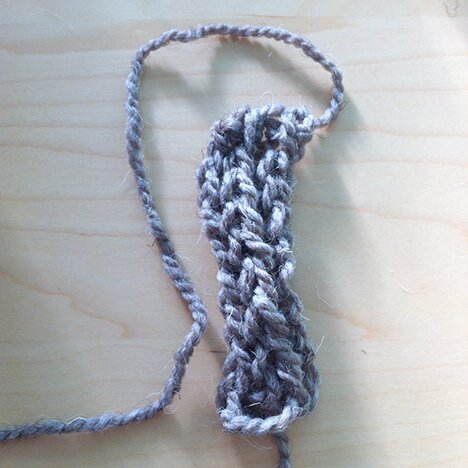
Photo 2015-11-28, 3 29 33 PM

Wrap the piece around the cinched middle of the headband, sew the ends of the small piece together, then sew through all layers of the headband a couple of times through the middle. Fasten off by tying the sewing yarn tail to the beginning yarn end of the small knitted piece in the middle.
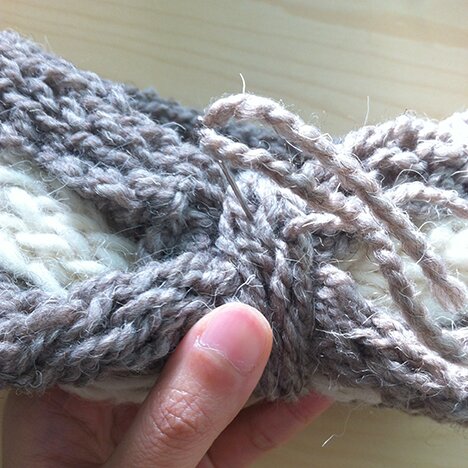
Photo 2015-11-28, 3 32 05 PM

And we’ve done it! A double-thick, super warm, (literally) handmade ear-warmer! :D
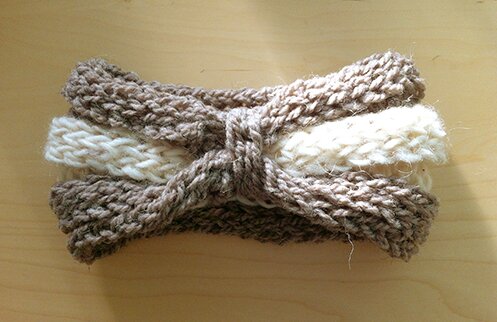
Photo 2015-11-28, 3 39 47 PM

I hope my photos are clear. But if you have any questions, please feel free to leave a comment below and I will try my best to explain, and other visitors will benefit from your questions too, so don’t be shy :)

Wishing you a happy week!


Tweet about this on TwitterShare on FacebookPin on PinterestShare on TumblrPrint this page

adventure in rock-felting

12237345_198818310454199_1066602545_n

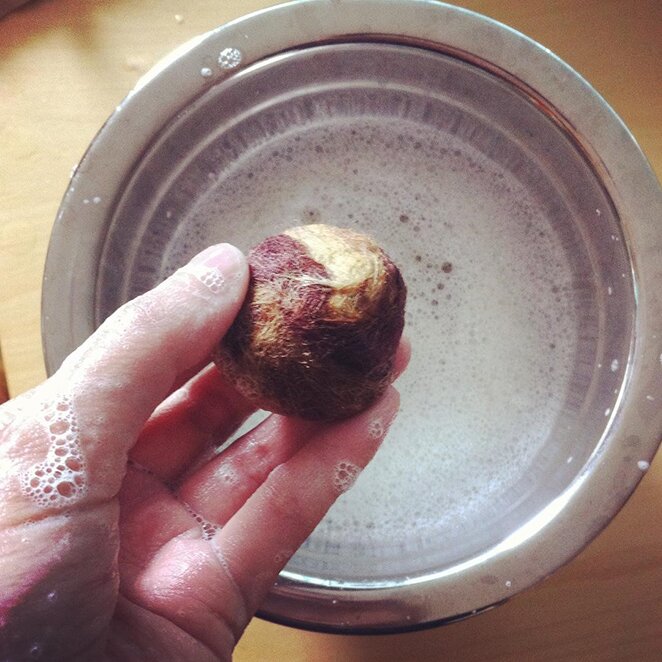
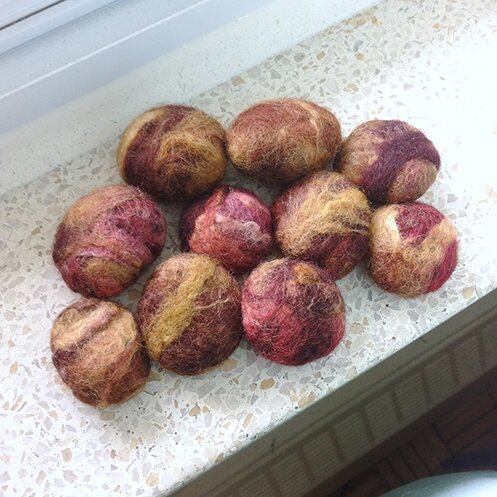
I was looking up Christmas gift ideas and stumbled upon tutorials for felted rocks. All I needed was some wool roving, some stones, hot water and soap. I had all of those things. So I thought I’d give it a try.

There are many tutorials for felted stones. I followed the one from Daily Colours. I was gifted two bags of roving some years ago. One bag was in fall colours, and the other was in beautiful shades of blue. I had really wanted the blue roving to work, but it just wouldn’t felt/bind/shrink around the rock. I thought the water wasn’t hot enough, or I wasn’t rolling the rocks in the right way… then I noticed that the tutorial had specifically noted not to use “superwash” wool, so then I read the label on my roving, and noticed that what I was using was indeed superwash wool. No wonder it didn’t work!

For some unknown reasons the fall colour roving worked much better though. It felt like the wool didn’t bind as firmly as it was supposed to around the stone, but I thought they still look great! Next time I’ll get some different wool, and maybe pick up some rocks from the beach! :D

Photo 2015-11-28, 11 09 49 AM

I think I might try stitching on them. Will keep you posted if I do!

Have a happy weekend!


Tweet about this on TwitterShare on FacebookPin on PinterestShare on TumblrPrint this page

adventures in fingerknitting


My interest in finger-knitting was sparked when I was contemplating what project to bring on my trip to the east coast. I didn’t want my needles and project to be confiscated at the airport. A few knitters I asked, and even my good friend who is a former flight attendant, assured me that they have either brought knitting needles on the plane, or seen people knit on the plane. But still, my project was on 3.5mm straight metal needles… I didn’t want to risk them being “misconstrued as weapons”.

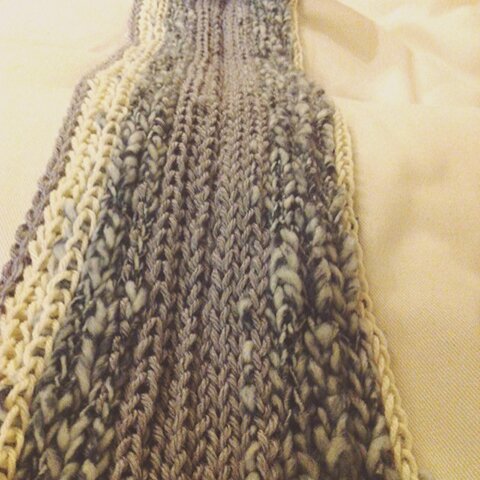
A while ago I also bought Knitting Without Needles by Anne Weil of the beautiful blog, Flax and Twine. I tried making this finger-knitted scarf in the book for a friend.

fingerknitted scarf

It uses a “join as you go” method that joins multiple knitted strips together to make a wider fabric. So then I thought I can do some finger-knitting on the trip, with some locally made yarn, and that would make some pretty special souvenirs. Taking handmade to the next level! :D

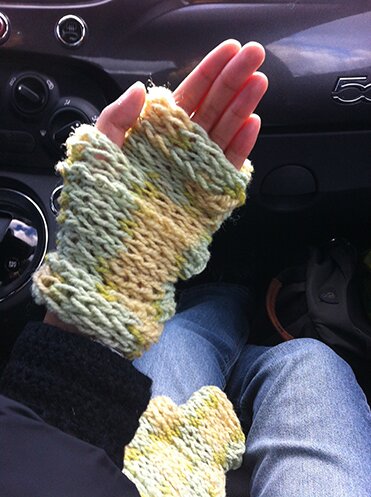
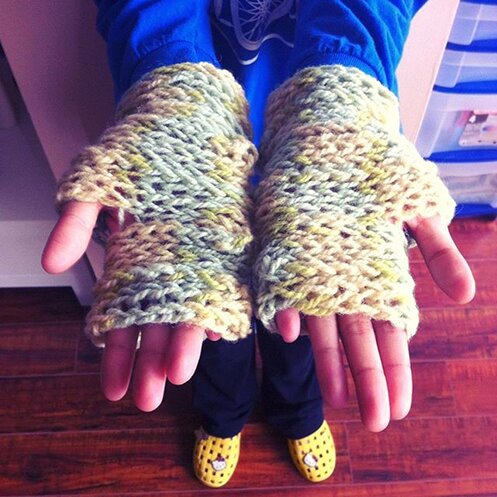
I used the “join as you go” method from the book and came up with these finger-knitted fingerless mitts :D

fingerknitted fingerless

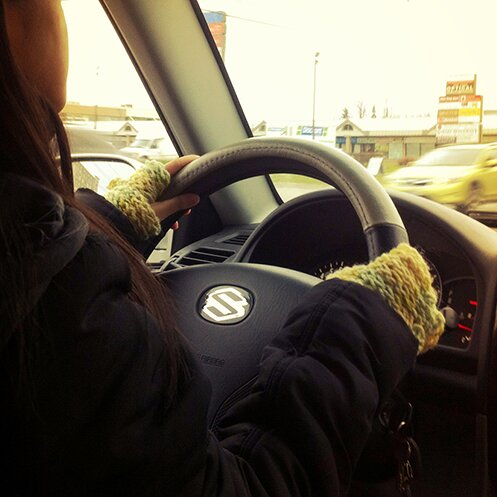
I made these while driving through Cape Breton Island. The wool is by East Anchor Yarns. I made them for my sister. I thought they’d come in handy (haha) for driving in cold weather. It would keep the hands warm enough before the car is fully heated up, and it leaves the fingers out to grip the steering wheel. They fit my sister well :D

fingerknitted fingerless mitts

And this is the fingerless mitts in action! :D

fingerknitted fingerless mitts in action

Lately I made a couple of headbands / ear-warmers for the shop, which also uses a “join as you go” method, but slightly different, and creates sort of a ribbed fabric.

fingerknitted headband

I based it on this tutorial for making a finger-knitted blanket. The instructor of the tutorial uses a different finger-knitting and casting-off method. So I just took the general idea and kind of made up some of my own steps to fit the finger-knitting method I know. This was actually a lot of fun to make, and very quick, so I’m hoping to write a tutorial for it :D

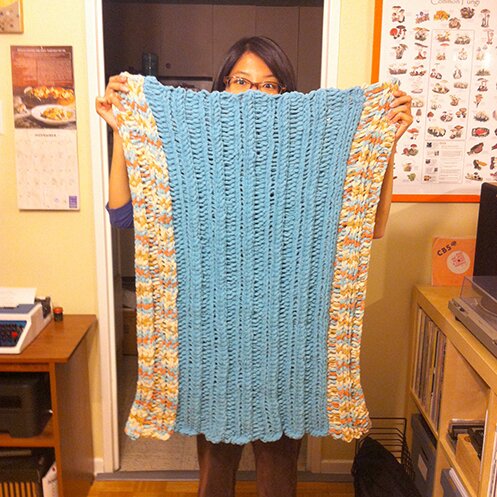
And with the same method, I made a baby blanket! :D (for a family member, I don’t think she reads my blog :S) It’s very thick and warm. I used 1.5 balls of Bernat Blanket.

fingerknitted blanket

I like this method because the fabric doesn’t curl relentlessly inward, like the resulting fabric from “join as you go” method from the book.

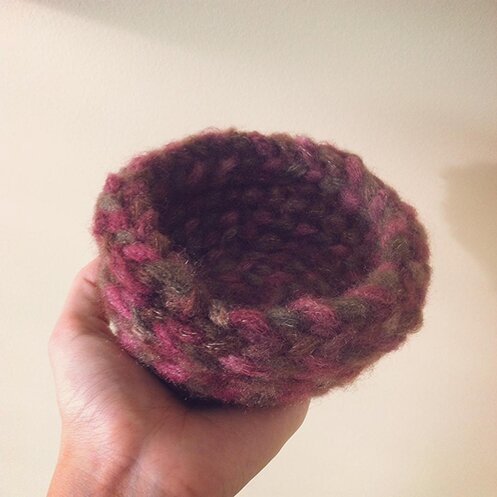
Using the book I’ve also made a couple of bowls. They’re like soft nests. I’m hoping to use them at work to hold stones.

fingerknitted bowl

In some ways I actually like the very tactile process of finger-knitting more than knitting with needles or crocheting with hooks. Especially when making something for another person. There’s something very heartfelt about literally making every single stitch by hand. I look forward to sharing more about the headband / ear-warmers! They’re very thick and warm as well.

Wishing everyone a great start to the week!


Tweet about this on TwitterShare on FacebookPin on PinterestShare on TumblrPrint this page

buttermilk mary

Trip to the sea continues! :D

IMG_4332

We were so fortunate! We were told by the locals that the leaves in Cape Breton were 2 weeks behind their regular schedule this year, so we got to drive through the mountains when they were the most vibrant! <3

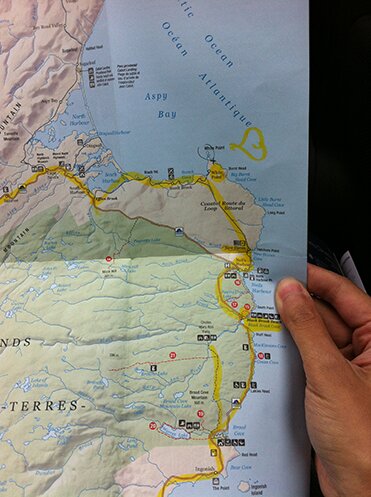
Like many people who visit Cape Breton Island, we drove around the Cabot Trail, which is the upper part of the island, as shown in this map here.

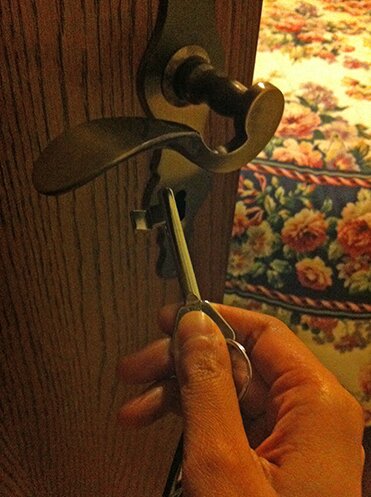
We stayed at the Auld Farm Inn in Baddeck, I think the largest village on the Cabot Trail. (We highly recommend the B&B, the rates are very reasonable, and the hosts are so very friendly and thoughtful. I loved that they took the time to explain the history of the farm house and referred to themselves as custodians rather than owners of the property. AND they use old keys for the rooms!)

IMG_4329

We aimed for an early start in the morning, as fellow inn guests let us know that they took 6 hours to complete the trail the day before. It was a sunny and crisp fall morning when we set out on our road trip around the trail :)

If I remember correctly, we spotted this church near St. Anne’s Bay, not far from Baddeck.

36050035

Then we stopped at the look-out point at Lakie’s Head, with its rugged coastline of pink rocks.

36050026

We stopped here for the washroom I think. And I really like the building against the bright blue sky, and the name of the place. So honest.

36050034

This is also where we found an album named “Buttermilk Mary”. I thought Buttermilk Mary was the artist or the band, and I thought that’s a great stage name (or blog post title, or name for a cat, haha). It wasn’t until after we came back and Googled it that we realized Buttermilk Mary is a set of jigs by the Baroque N’ Fiddle String Quartet, and we totally regretted not buying the album at the general store! We ended up buying it on iTunes :P It’s really lovely, you can watch it played here.

Can’t remember the last time we navigated by paper rather than GPS or Google Maps. This map was given to us by a friendly staff when we got to the Highlands National Park office. We were asking for directions to waterfalls on the trail. She marked her favourite spot on the trail with a heart :)

IMG_4342

White Point Beach was her favourite spot and she highly recommended it. Just a bit north of Neil’s Harbour, which is a very picturesque fishing community.

36050022

This lighthouse doubles as an ice cream parlour in warmer months!

36050021

Obviously October is not one of the warmer months in the east coast. It actually got really windy when we got to White Point.

IMG_4345

And we snapped a few more photos…

IMG_4347

But we never made the trek to the White Point Beach, because it was just too cold and windy. So we got back into our warm rental car and continued on the trail.

There were many look-out points along the way. Pictures really can’t capture fully the vastness of land and the majestic mountains. Can you see the river weaving between the mountains?

IMG_4362

We started following one of the shorter trail to find the Black Brook Falls, but then Mike spotted the Coyote warning sign and told me about it. I started to panic, remembering stories from our east coast friends about how east coast coyotes hunt like wolves, in packs. So I convinced Mike to turn back. But we did venture into the woods for a few minutes. I love how moss seems to cover everything in these woods.

IMG_4354

And we came across a river. Mike took a brilliant photo of it, which I don’t think he minds me showing it off :D

12187986_10156226408085228_4375532701555381345_o

I also took far too many of these behind-the-dashboard pictures with Mike’s DSLR while he was driving. The view is different behind every bend! And as you can see, the weather was also different minute by minute. It was now hailing. But look at the sea!!

12186785_10156226410415228_4411821386201275189_o

One of the last look-out points we stopped at was the most exhilarating. I believe this is at or near Margaree. The gusty wind, the sea mist, the salt in the air, the roaring sea — it simply commands us to be fully present in that moment of being there. I usually have a huge fear of deep water and height (because I can’t swim). But in that moment, looking down into the sea and the jagged rocks from a cliff, I felt strangely safe, like I’ve found my place in all the created beings and things. Like I belong. The experience of that moment was one of the best gifts that I brought back with me.

IMG_4366

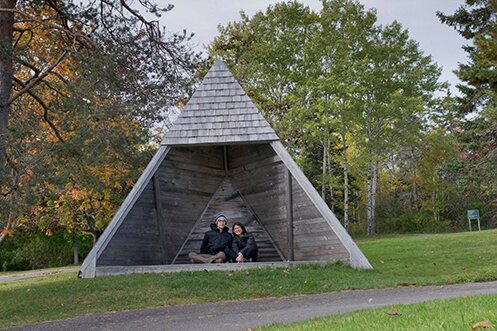
After going around the trail we explored village of Baddeck the next day. Aside from Baddeck Yarns (see previous post :D), we visited the Alexander Graham Bell Historic Site and museum. I never knew that the inventor lived in Cape Breton! (he and his wife are also buried in Baddeck) And that aside from inventing the telephone, he also contributed to many innovations in aviation and shipbuilding. The tetrahedron was a structure that he frequently incorporated into his inventions, from kites to towers to aircrafts, because of its strength. This is a tetrahedron shelter that he would have stayed in to observe flying experiments.

12195093_10156226412880228_6701276815009916783_o

Alexander Graham Bell fell in love with this view and stayed. I wish we could stay too.

36050009

Doing a bit of beach-combing here before heading to Sydney.

36050005

And here we are in Sydney, capital of Cape Breton, home of the big fiddle and beautiful purple rocks!

IMG_4387

Here we spent the day visiting a couple of historic house museums. At Jost House the upper floor displayed an apothecary exhibit and a marine exhibit. The house was occupied by families of merchants from the 1700s until the 70s.

Apothecary

Then we visited the Cossit House, which is believed to be the oldest house in Sydney, built in 1787. It was the home of a minister, who lived there with his wife and 13 children. It has a lovely back garden maintained by the museum docents, with handwritten signs explaining the names and uses of the herbs in all the garden boxes. It really was a cozy place. But when I took the picture with Diana Mini it turned out sort of dark, and then it has this glow at the doorway, which makes it look like those pictures of haunted places… or a house with a glowing heart…?

36050003

Not sure where the glow comes from, it is also in a picture at the Joggins cliffs (picture of my feet), so I’m sure it has to do with the developing process or some kind of lens flare, and not the house itself :P

We then drove back to Halifax to catch our flight home, trying to squeeze in a few more strolls in the lovely city before we had to leave.

Argyle Street, naturally.

IMG_4455

If you ever find yourself visiting Halifax, and you’re looking for souvenirs that are not in the shape of a lobster or lighthouse, be sure to visit the World Tea House and Biscuit General Store on Argyle St.!

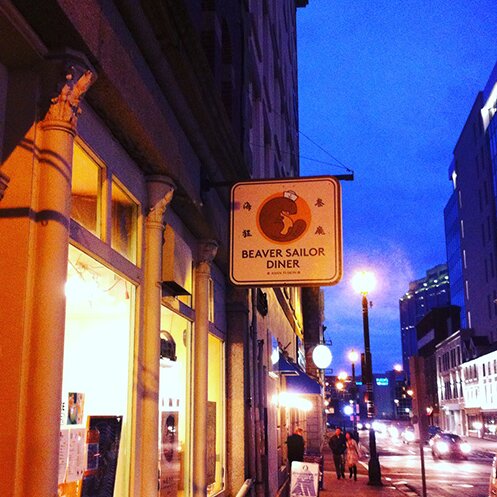
Also, if you like East Asian food, I highly recommend the Beaver Sailor Diner up the street from the harbour! I think it’s pretty new, the staff was really friendly, the noodles are handmade, the prices reasonable, and the logo is cute! (I think they should make buttons/pins of the logo.)

IMG_4436

Another great place where we found awesome souvenirs was the farmers’ markets. We visited the Seaport Farmers’ Market for breakfast one day at one of the bakers’ stalls, and bought quite a few bags of seaweed products from Mermaid Fare :D (the owner is very knowledgeable about the seaweed and how to cook them!) Here’s Mike’s picture of a friendly fish monger. We didn’t bring back any fish though.

12191116_10156226390475228_3406406335586526008_o

And then we ventured into the Historic Farmers’ Market in the Alexander Keith’s Brewery building (still haven’t done the brewery tour, must do that one day!). We find that it’s a smaller (but equally vibrant) market with more local residents visiting, whereas the Seaport Market can be very crowded when there’s a cruise ship docking at the harbour :S At both markets there are produce, spices, soaps, coffee stalls, bakeries, crafts, artwork, and everyone is happy to explain their products even if we weren’t buying anything.

IMG_4441

This is from one of our early morning strolls at the Old Burying Ground in Halifax. I like how the gentle sunlight of early morning is filtered through the trees and illuminating the old graves. It was founded in 1749, and closed in 1844. We spent some time there marveling at the old lettering and cravings on the headstones.

IMG_4196

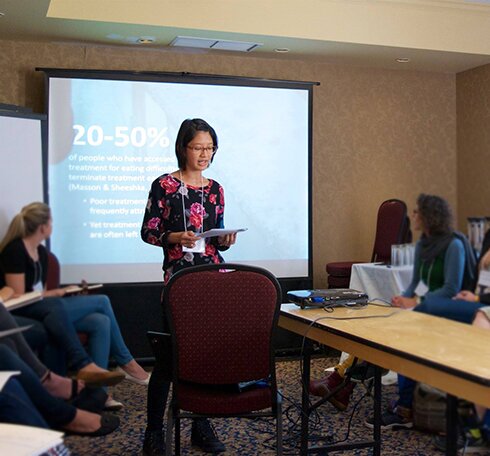
And finally, part of why we were in the east coast in the first place was because I was presenting a paper at an art therapy conference in Halifax. That happened before we went on the road trip to Cape Breton. And this was me, basically reading out my script because I so dread public speaking. But I hope whatever it was that the participants took from what I shared would make a difference one day, no matter how small, how indirect.

12186283_10156229059235228_3046187235751870491_o

And that was my journey! I have a feeling that I will journey back one day. Just feel strangely at home in the east coast. Until then, I will miss the warm hospitality and the sea.

I hope you enjoy the photos and stories and travel tips! Thank you for journeying with me! :D


Tweet about this on TwitterShare on FacebookPin on PinterestShare on TumblrPrint this page

trip of the dreams!

IMG_4280

I’ve been looking forward to visiting the Joggins Fossil Cliffs for months. I had so wanted to become a paleontologist when I was a child, so going to a fossil site was a trip of the dreams! I studied tide time charts and planned our drive so we would arrive at low tide; I looked at other travellers’ photos and comments; I checked and re-checked weather forecast and prayed for rain to hold off on the day we planned to visit…

– and suddenly we were here!

The cliffs are situated along the Bay of Fundy, which has the highest tides in the world. It holds rocks and fossils from the “Coal Age”, about 300 million years ago.

This, where I was standing, is the OCEAN FLOOR (could hardly contain my excitement!!) and will be submerged in up to 13 metres of water in a matter of hours.

36040011

(as you might notice, some pictures were taken with film with the Diana, and some where taken on my phone).

We joined a walking tour, in which the friendly tour guide pointed out different fossils that could be found at the cliffs. Like this fossil of a tree trunk.

IMG_4267

These were trackways of Arty the arthropleura — a giant insect about 1–8 feet long. The tour guide showed a scaled down replica of Arty.

IMG_4270

Fossil of a trilobite.

IMG_4278

Fossil of tree roots.

IMG_4273

Look at the beautiful layers of rocks on the cliffs!

36040010

IMG_4271

The tides coming in…

36040007

It was majestic.

12142206_1067811469919034_1766796886_n

We were hoping to visit the Fundy Geological Museum in Parrsboro afterwards, but we spent a bit too much time at the cliffs, and by the time we got to Parrsboro the museum was closed. So instead we spent some time at the wharf looking at the sunset sparkles on the water.

36040002

More on Nova Scotia tomorrow! :D

Hope everyone is having a good start to the week!


Tweet about this on TwitterShare on FacebookPin on PinterestShare on TumblrPrint this page

east coast yarn adventures!

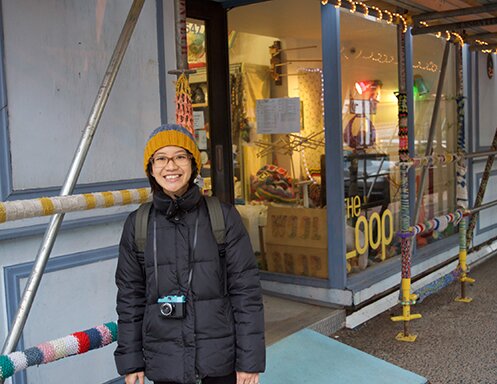
Mike and I were travelling in Nova Scotia over the past week :D We had a magical time driving through the mountains, marveling at the sea and chatting with very friendly locals. I will share more pictures about our trip in other posts. But first, yarn! We first stopped in Halifax (where I was actually attending a conference before we rode off to the sunset and the sea and fun times), and not far from where we were staying is The Loop!

DSC_0446

There’s been some construction going on in front of the shop, so guess what? The scaffolding gets some new sweaters! :D

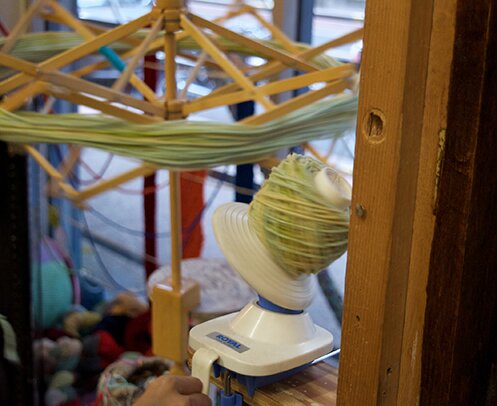
I bought a skein of locally made wool there, by East Anchor Yarns, in lovely shades of blue/green and pale yellow. (The friendly shopkeeper let me know that the other skeins with shades of pink were dyed with newspaper! Who knew black ink will turn yarn pink? She also helped me with winding the skein into a ball so I can start using it right away :D)

DSC_0443

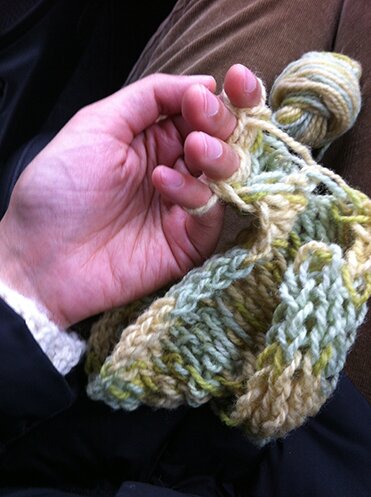
And so during lunch time at the conference and on the way to Cape Breton Island I was finger-knitting :)

IMG_4317

Can’t show you what I was making yet, because it’s a gift. I thought it would make a pretty special souvenir to buy some local yarn and make something during the trip! I might even write a pattern for this project, it’s super fun for travelling :D

I could have brought the project I was working on at home, but because I mostly knit with straight, long (and metal!) needles, I was doubtful about bringing them on the plane. So I figure I’d finger-knit!

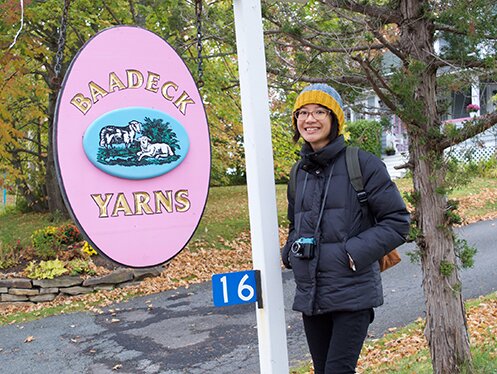
We were staying in Baddeck while visiting Cape Breton. I didn’t know that the village has a yarn store until we spotted the bright pink sign on the way there. Baadeck Yarns! This is the best surprise ever! :D

DSC_0892

It has soooo much yarn… (sorry about the blurry picture, my hands were obviously shaking with excitement)

IMG_4380

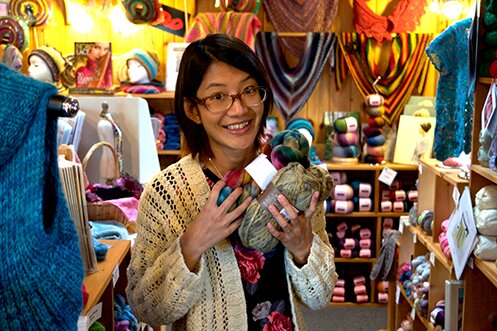
The shopkeeper is so very friendly! She showed me the beautiful crocheted cardigan she just finished, we exchanged experiences with various knitting stitches, then she chatted with Mike while I went around the store to touch everything. This is me being ridiculously happy being in this store.

DSC_0895

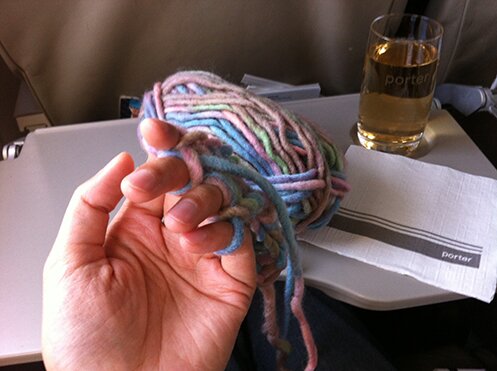
I seriously had a super hard time walking out the door, with the kind shopkeeper and all the yarns… but eventually I did. And hope to return one day. On the plane home I was knitting with a ball of yarn that I bought there.

IMG_4463

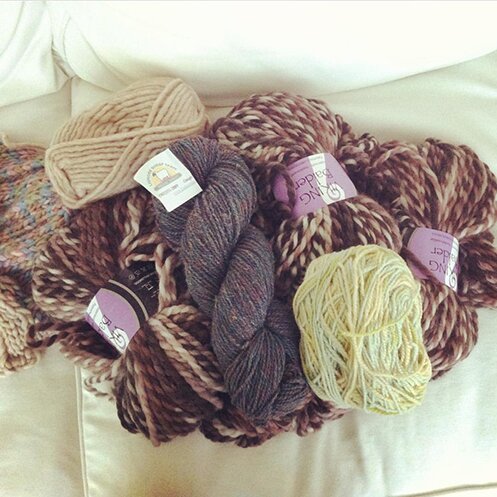
This is all the yarn I gathered from the trip :D (the Sirdar Kiko has already been knitted up)

yarnsfromns

I bought the skein with green/purple/brown shades at the Seaport Farmers’ Market from Lismore Sheep Farm, when we drove back from Cape Breton to Halifax to catch our flight. After going to Baadeck Yarns I wasn’t going to buy more yarn, because we tried to travel light and only brought one suitcase and a couple of carry-on bags. But it was really affordable and it has beautiful shades of colours I like, so I couldn’t resist! I wasn’t going to get so much of the brown/tan yarn neither, but the shopkeeper at Baadeck gave me a really good deal because she was cleaning out the shelf… Anyway, good thing yarn can squeeze into small spaces, everything fit in our suitcase in the end :D

Stay tuned for more photos and stories from our trip! :D Hope everyone has a good start to the week!


Tweet about this on TwitterShare on FacebookPin on PinterestShare on TumblrPrint this page

needle testing fun

The friendly folks at Yarn Canada sent me a Denise2Go knitting set to review :D

DSC_0341

So very generous of them! Clearly I was very excited, and started a couple of projects to try it out :D

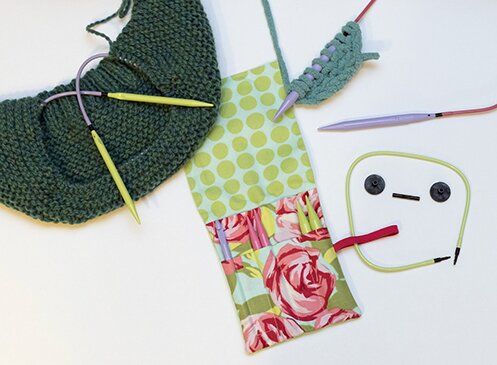
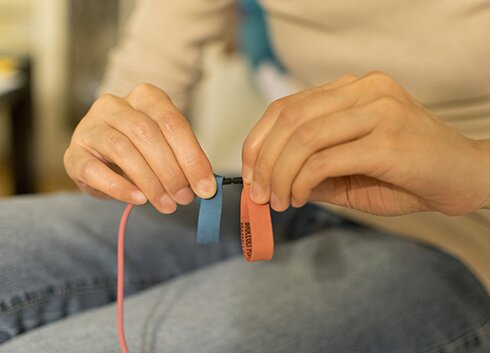
The knitting kit that I chose comes with 4 pairs of needles (6.5mm-10mm) and 3 cords of different lengths (14″, 16″, 19″), and they’re interchangeable! It also comes with a 6.5mm crochet hook (handy to have in a knitting kit for weaving in ends, picking up stitches, adding crochet details, or taking up crocheting if one doesn’t already crochet…), 2 end buttons and a connector (I’ll show you what they do in a bit).

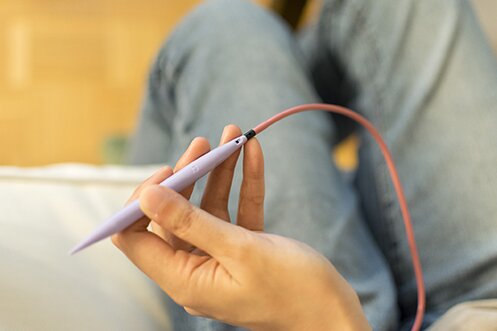
The cord locks into the end of the needle with a half turn and a click. And we’re ready to knit!

DSC_0310

DSC_0311

DSC_0312

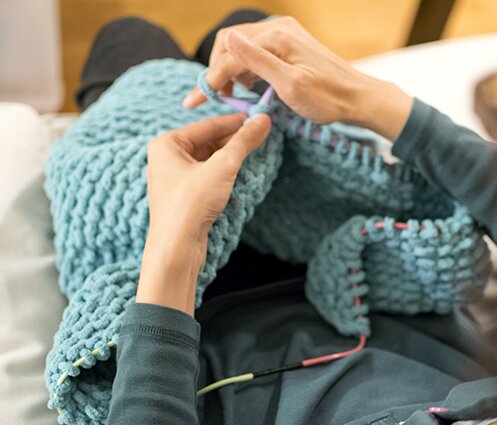
I’m super excited about the cords. Since I usually avoid projects that work in the round, I don’t have a lot of circular needles, but I do need them for knitting collars (even though I try to avoid knitting those in the round as well), and for large projects. This is where the connector is very useful.

DSC_0320

I could link two cords together to make a super long cord! Initially I had just connected the cords for a photo, but as my knitting grew I realized that without the cord connector I wouldn’t have been able to continue :S (I’ve never knitted anything this large before).

DSC_0349

The plastic is kind of stiff when it’s new, and it’s a tiny piece, so I found it a bit hard to to grip and turn some pieces in place, but wide elastic bands (from buying broccoli :D) saved the day.

DSC_0335

I also wondered about the cords becoming disconnected in the middle of knitting. So far it’s been fine, everything seemed secure. The cord only came off the connector once when I accidentally turned it while pushing the stitches forward.

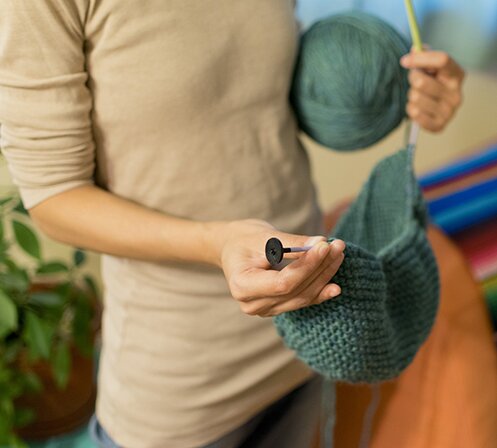
And the end buttons! They can turn circular needles into “straight” needles.

DSC_0314

All in all I do prefer actual straight needles, because I can rest them on my forearms as I knit, and I find that easier on my wrists. But have you seen my bin of needles? I will spare you the headache and won’t show you, but it’s a giant mess! The good thing about this kit is that it wraps up in a neat bundle, and it’s organized and small and easy to store. And the case is handmade! Maybe I should look into making cases for all my other needles…

DSC_0355

Yarn Canada also carries a crochet kit and a knitting kit with smaller needles, you can find them here :) They also carry a wide variety of yarn, with free shipping options. I’ve never bought yarn online before, but might give this a try if I already know the look and feel of the yarn I want.

And now I’m off to the yarn shop! :D Happy Wednesday, everyone!


Tweet about this on TwitterShare on FacebookPin on PinterestShare on TumblrPrint this page