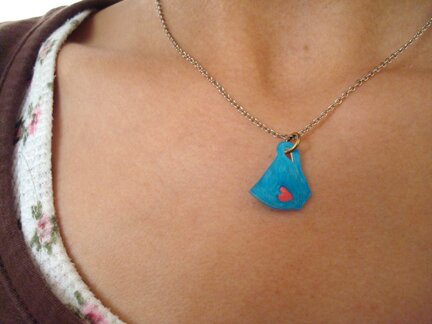
So, I was trying to make shrink plastic necklace charms with the teacup templates I made for the teacup bookmark project, but it proved to be quite a process! The trickiest part, I think, was to make it hang on a bit of an angle, rather than sideway, like my earlier attempt here…
When it hangs sideway like that I’m afraid it doesn’t really look like a teacup any more…
So, after several attempts and numerous sheets of #6 plastic, I finally figured it out! It just involves some “Frankensteining” of two of the teacups.
1. Print out the teacup templates at 50%. (My finished — baked and shrunk — teacup is about 3/4 inch wide, one could vary the finished size by increasing/decreasing the scaling of the templates when printing)
2. Cut around the tall teacup and stick it on the blank area of the paper with a tape loop or glue stick. Then draw a line from the top of the teacup ear (aka handle), like so…
3. Cut out the short teacup, but without the handle. Note that I also smoothed out the area where the foot of the cup meets the bottom of the cup shape. Just thought it would look better that way, with the new handle, which is what we’re making next!
4. Trace the sides and bottom of the round teacup (it helps to draw it in colours other than black, like the red pencil crayon I used here) onto the tall teacup, lining up the bottom, shifting slightly to the left, so that if the right side of the round teacup is extended it would touch the farthest right point of the line drawn in step 1. Like so…
5. Complete the shape, like so…
6. Trace the new teacup shape onto the plastic to be shrunk. (I used recycled #6 plastic, so I sanded it with fine sand paper before tracing. But sanding would not be necessary if using store-bought shrink plastic, i.e. Shrinky-Dinks.)
7. Decorate to your heart’s content! I used pencil crayons.
8. Bake and shrink! I placed the plastic on a piece of tin foil in a baking pan, and baked it at 325°F. I watched it closely as it shrank, until it was as flat as it could be, for about 30 seconds to 1 min. I find that with #6 plastic it never lies completely flat when it’s done shrinking. So I press the plastic with the bottom of a glass as soon as it comes out of the oven.
TA-DA!
I also sealed the coloured side with an acrylic varnish, so the colour doesn’t rub off.
I’d like it to hang on more of an angle, but I think that’s the best one so far. Or perhaps a teacup shape like that would just never be able to hang much more upright than that when it’s hung by the ear, I mean handle.
These are the previous attempts I made. They shrank really well so I don’t want to just throw them out. I’ll find a use for them one day…
One thing about the recycled #6 plastic though, is that it’s unpredictable. I’m convinced that it has some kind of “grain”, that it tends to stretch a certain way. I cut this piece diagonal to the edge of the box that the plastic came from and it stretched completely out of shape when baked.
So I think it’s best to first test-bake a small piece before cutting out the project piece to see how it shrinks.
Anyway, I had a good time experimenting. Do let me know if you decide to give this a go!
Happy first day of June! :D


