Finally getting around to post the pattern for Piña Colada :D They’re about 3 inches tall, and I’ve attached magnets on the back for mine.
This is not a complicated pattern, but it has many parts to it, and I apologize in advance if there’s any mistake — please let me know if you see any! Your feedback is greatly appreciated :)
To make Piña Colada, you’ll need:
- Small amount of worsted weight yellow, green, brown and white yarn
- Small amount of DK weight white yarn
- 3.5mm and 3mm crochet hooks
- Embroidery floss in pink, brown, and black
- black round beads for eyes (I used 4mm)
- sewing needles
- Stuffing
Pineapple: with yellow and 3.5mm hook
Row 1: ch 3, 4 sc in 3rd ch from hook, sl st in top of beginning ch.
Row 2: ch 2, hdc in same st, 2 hdc in each of next 5 st, sl st in top of beginning ch.
Row 3–6: 1 sc in each sc around. Fill with stuffing.
(You may also want to sew on eyes and mouth before stuffing it, but I usually like to decide on the placements of eyes and mouth after the amigurumi has been stuffed and filled, and then I hide the loose ends of the threads under the magnet or pin that I’m going to attach on the back.)
Row 7: 2 sc tog five times, sl st into next st, leaving a long tail, fasten off.
Weave tail through each of the 5 st at the opening, pull tight and tie off. Weave in ends.
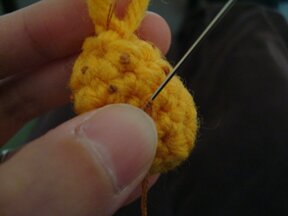
At this point, I also added the “eyes” of the pineapple by stitching french knots all around, like so:
Pineapple top: with green and 3.5mm hook
Row 1: Leaving a long tail, ch 6, sl st into 2nd ch from hook, 1 sc in each of remaining ch’s, ch 1, turn.
Row 2: sc in 1st sc, sc in next sc, ch 4, sl st in 2nd st from hook, (crocheting back towards the beginning of row 1 at this point) sc in each of remaining ch’s and sc’s, ch 1, turn.
Row 3: repeat row 2.
Row 4: sc in 1st sc, sc in next sc, ch 5, sl st in 2nd st from hook, 1 sc in each of remaining ch’s and sc’s, ch 1, turn.
Row 5: repeat row 4, except omit ch 1 at the end. Fasten off.
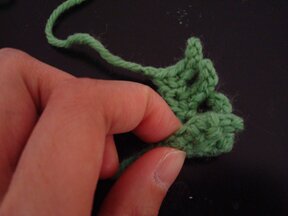
Then, starting from the end that has just been fastened off, I rolled it up, like so:
Then I stitched it together, through all the layers in the stitches below the “spikes”, using the tail I left in the beginning.
Sew pineapple top to pineapple. I had enough yarn left after sewing the pineapple top together, so I didn’t tie off and just continued using the same yarn tail to do the attaching of the two parts.
Then I attached the eyes with black embroidery floss and embroidered the mouth (I used brown embroidery floss). I like to use straight pins with black bead pin heads to try out positions for eyes.
Now it’s time to make arms and legs, but they’re optional. I made them for this pair because they’re wedding gifts and I like that they’re able to hold hands :)
Arm/hand (make 2): with DK weight white and 3mm hook
ch 8, sl st in 2nd ch from hook, sl st in next ch, ch 3, sl st in 2nd ch from hook, sl st in next ch, ch 3, sl st in 2nd ch from hook, sl st in next ch, sl st in 5th ch from the beginning ch, sl st in each of remaining ch’s. Leaving a long tail, fasten off.
Leg/foot (make 2): with DK weight white and 3mm hook
ch 8, sl st in 2nd ch from hook, sl st in next ch, ch 3, sl st in 2nd ch from hook, sl st in next ch, sl st in 5th ch from the beginning ch, sl st in each of remaining ch’s. Leaving a long tail, fasten off.
Then I stitched the arms and legs to the pineapple using the long tails I left, and weaved in all ends.
Now, on to the coconut!
Coconut — shell: with brown and 3.5mm hook
Row 1: ch 3, 4 sc in 3rd st from hook, sl st into the top of beginning ch.
Row 2: ch 2, sc in same st, 2 sc in each sc around, sl st into top of beginning ch.
Row 3: ch 2, sc in next sc, * 2 sc in next sc, 1 sc into each of next 2 sc*, repeat from * to * around, sl st in top of beginning ch.
Row 4: ch 2, 1 sc in each sc around.
Row 5: repeat row 4. Fasten off, weave in ends.
I sewed on the eyes and embroidered the mouth (I used pink embroidery floss) at this point.
Coconut — flesh: with worsted weight white and 3mm hook
Row 1: ch 3, 4 sc in 3rd st from hook, sl st into the top of beginning ch.
Row 2: ch 2, sc in same st, 2 sc in each sc around, sl st into top of beginning ch.
Row 3: ch 2, 1 sc in each sc around. Leaving a long tail, fasten off.
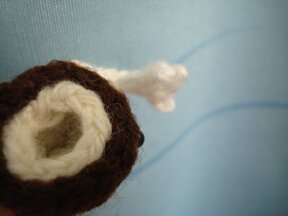
Put coconut flesh into coconut shell, so it looks like this:
Using the tail left from the white part, I sewed the shell and flesh together by making a few stitches around, being careful that the white yarn is not showing through the brown shell, i.e. sewing through the stitches that are on the inside of the shell. I suppose one could also attach the shell and flesh together with a blob hot glue at the bottom, that might be more straightforward.
Lastly, make arms and legs and attach to coconut.
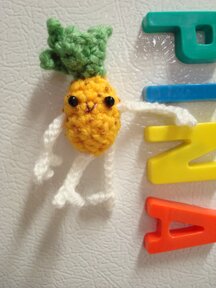
So here we have it -
“Piña!”
“Coladaaah!”
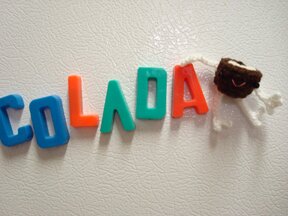
I realized that coconut in Spanish isn’t “colada”, like I’ve always thought. I found out that “Colada” actually means “strained”. But coconut needed some magnetic alphabets to pose with. Hence the picture.
Again, I hope the pattern is clear. If you come across any problem or need clarification please drop me a note!

klasse gemacht