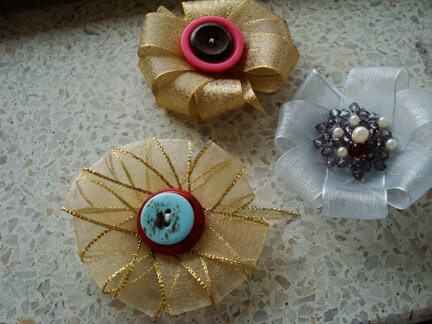
Whoa! It’s December already! Friends are saying that their holiday decorating / baking / shopping are well underway, but since I’ve spent the past month travelling I’m barely feeling the Christmas excitement at this point. A festive craft might help fix that!
Actually, I needed to find simple yet festive craft ideas for an upcoming project. I spent last night searching on different blogs and craft sites for projects that involved the least amount of sewing and use of hot glue. This idea came about as I was twiddling around with some ribbons. I thought they’d make nice last-minute gifts so I made a bit of a tutorial to share :D
Apologies for the horrid discoloured pictures and the funky backgrounds — I was in a bit of a rush and didn’t get around to setting up a nice photo-shoot. But I hope you get the idea. As always if there’s any question/comment feel free to drop me a note! :D
To make one festive brooch, I used:
30 — 40 inches of 3/4‑inch ribbon
assortment of buttons
a push pin
some kind of thick padding, like a sponge, or thick piece of Styrofoam
sewing needle, threaded
a pin back
a hot glue gun
felt (optional)
Step 1: Wrap ribbon around 4 fingers securely but not so tight that it can’t be slipped off the hand after, and ensure that the loops are stacked neatly on top of one another, like so…
Step 2: Slip loops of ribbon off the hand, holding it in the center, like so…
Step 3: With the push pin, pin the stack of ribbon to the piece of padding (I used a new kitchen sponge) in the center-ish point of the ribbon (doesn’t need to be perfect, just make sure that the pin goes through all the layers), like so…
Step 4: Fan out the ribbon loops by gently tugging on the loops, like so… (it helps to begin by tugging the top half and bottom half toward opposite directions a bit at a time. And yes, it’s much more efficient to do this with two hands. I only photographed one hand because one hand needed to hold the camera.)
Step 5: When satisfied with the shape, hold it together in the center and take it out of the sponge/foam with the pin still in it, like so…
Step 6: Remove pin, still holding it together in the center, take the threaded sewing needle and make a small cross stitch through all the layers in the centre, like so…
Step 7: With same thread, sew button in the center. I like to top it with another smaller button in contrasting colour.
Step 8: Sew through buttons twice and tie off at the back (it helps to line up the button holes).
Step 9: Attach pin back to the back with a big glob of hot glue (apply glue to the ribbon, NOT to the pin. Hot glue + metal pin = burnt fingers!)
And there you have it, a brooch to put any outfit into festive mode! :D Here’s one made with a sheer kind of ribbon, which I prefer.
Now, if one has more time beads can be sewn in the center instead of buttons.
I initially made the beaded pin as a sample for photos and thought I would put it in the shop after, but after taking pictures of it this morning with this particular sweater I’ve decided that I’m keeping it :P The shop will have to wait.
For beaded brooches I would recommend sewing the pin back to a piece of felt and then hot-gluing the felt to the ribbon flower, so it’s more sturdy, like so…
With the multi-steps I think I made it look more complicated than it actually is. It’s actually quite straightforward, and took me an hour to make the two buttoned brooches, and that’s with me being indecisive about the colour combination of the buttons. Â It would be fun to play around with different textures and length of ribbons.
Hope you enjoy this and thank you for visiting!


Very cute! I like the one you’re keeping for yourself! :)