loom-knit-along: join-as-you-go mitered square blanket – part 3

Hel­lo friends! We’re back again with our mitered square blan­ket! Today we’re going to join the first square on the sec­ond row, and the method for join­ing is the same for the first square in every row. 

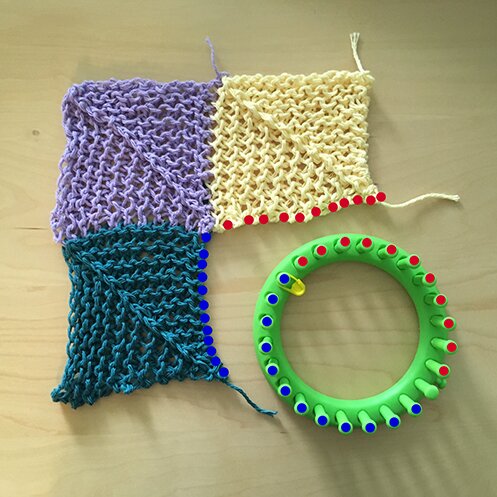
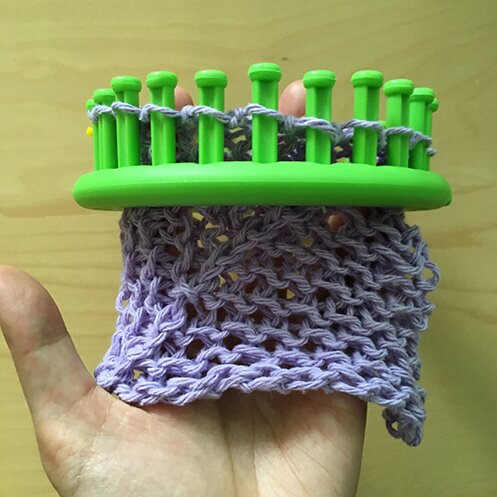
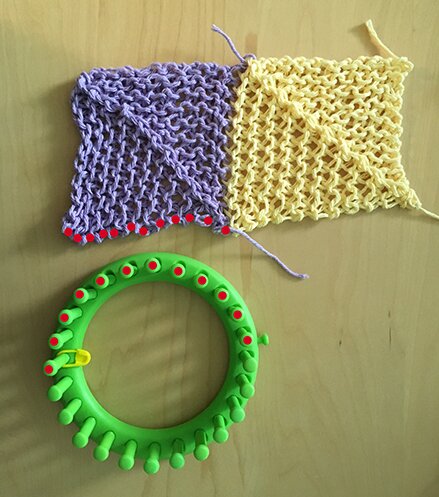
Let’s first ori­ent our­selves. For the first square in every row, we will always be join­ing under the first square in the pre­vi­ous row. In our case, it’s the pur­ple square (in the last post we joined the yel­low square). 

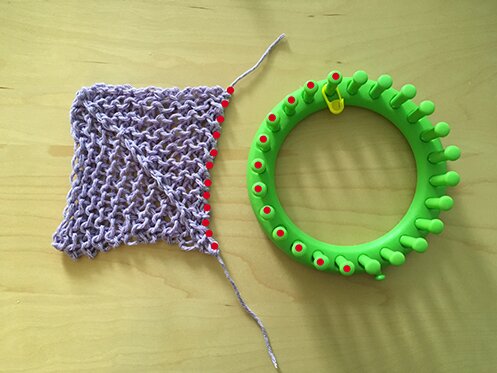
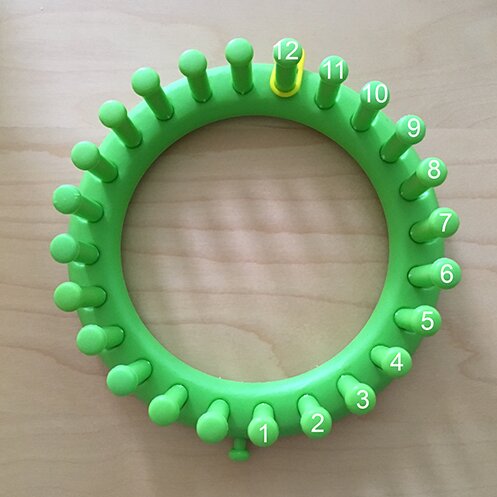
We will place the loops on the bot­tom edge of the pur­ple square (as indi­cat­ed by the red dots) onto the pegs on the loom that are marked by the red dot, start­ing at the first peg (the one that’s beside the side knob) and end­ing at the peg marked with a stitch mark­er, or the one just before it. So you will put on 11 or 12 loops, it does­n’t make a difference.

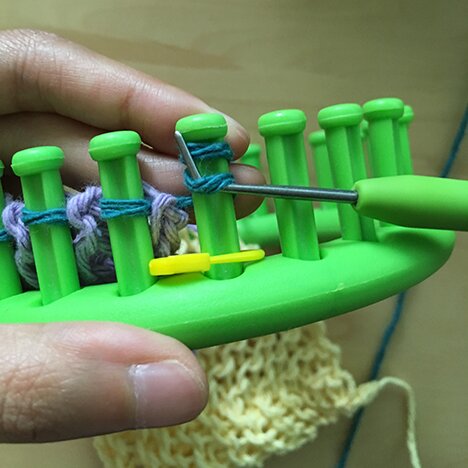
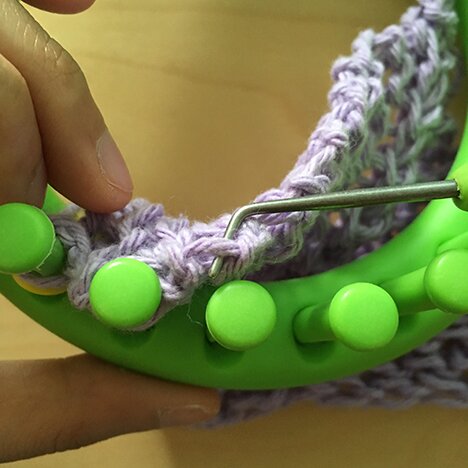
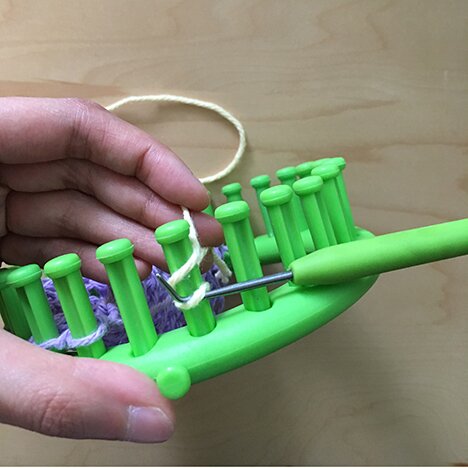
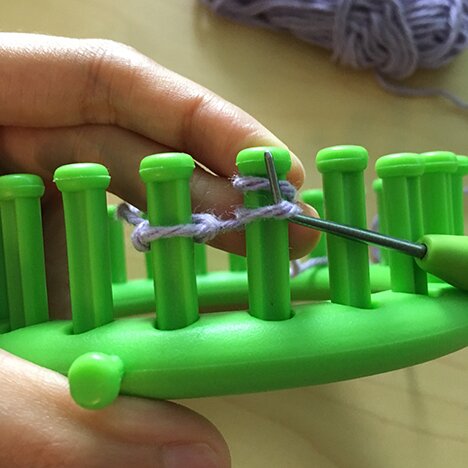
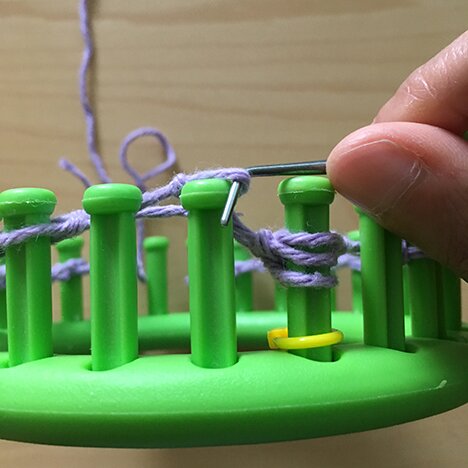
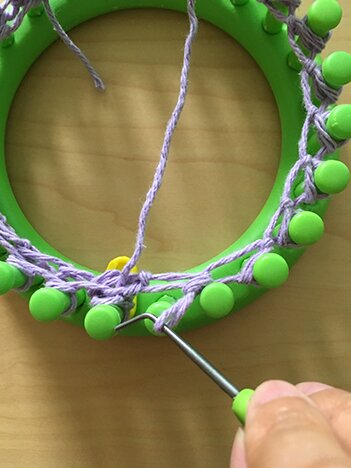
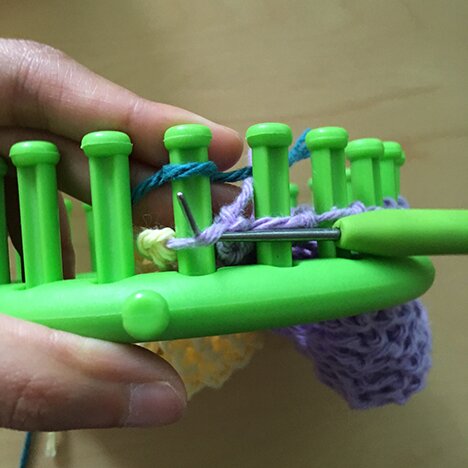
To place the loops on the square onto the pegs, find the hor­i­zon­tal strands between the purl bumps, and place the strands onto the pegs.

When actu­al­ly joining/knitting the square, you would posi­tion it like this, with the right side of the square you’re join­ing to fac­ing the inside of the loop, and pick­ing up the loops on the side this way. (And yes that was a won­der­ful day knit­ting in the sun sit­ting on the grass in a park! :D)

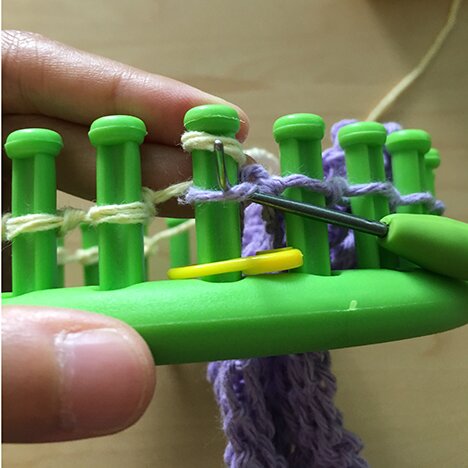
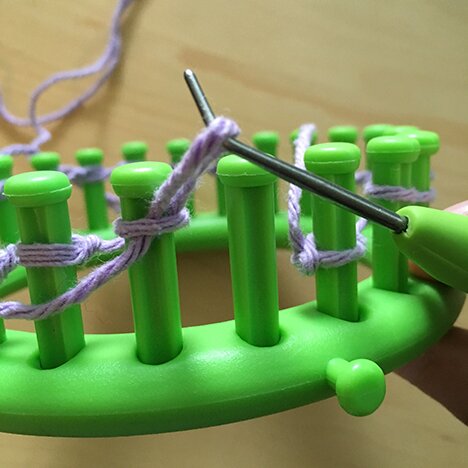
Once the loops are placed onto the peg, make a slip knot with the new yarn (in this demon­stra­tion it’s the blue yarn), place it on the first peg, and knit over with the loop on the peg.

E‑wrap the next peg, then knit over. Repeat until there are no loops on the next pegs. Then, e‑wrap the next loop twice and knit off the bot­tom loop (in this demon­stra­tion it is the marked peg, but it can also be the peg after the marked peg if you have placed a loop from the pre­vi­ous square on the marked peg, it does­n’t real­ly make a dif­fer­ence), there­by cast­ing on a stitch.

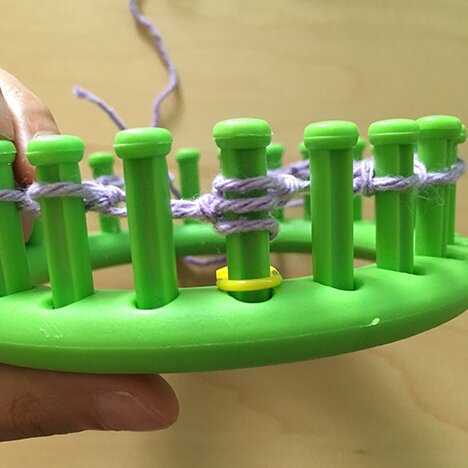
Con­tin­ue cast­ing on until the sec­ond last peg on the loom — that will be the last stitch, 23 stitch­es altogether.

You’re now ready to con­tin­ue mak­ing the square as usu­al. Instruc­tions are past­ed below for con­ve­nience’s sake but if you need more help there are pho­tos in the first post.

Row 1: Purl (here’s a video of purl­ing) to the marked peg, e‑wrap knit the marked peg, purl to end. (Note in the pic­ture that the last peg of the loom is emp­ty — we only use 23 pegs of the loom.) Beware not to make the stitch­es too tight.

Row 2: Move the loop on the peg to the left of the marked peg onto the marked peg. Move the loop on the peg to the right of the marked peg onto the marked peg. Now the marked peg has 3 loops on it. (Always move the loop on the left first, then the one on the right, so it looks consistent.) 

Move the loop on the peg to the left of the now emp­ty peg onto the emp­ty peg. Keep mov­ing each loop to the emp­ty peg to the right until you reach the begin­ning of the row.

E‑wrap and knit off each peg until you reach the marked peg. E‑wrap the marked peg, knit off all three bot­tom loops on the peg (I pre­fer knit­ting them off one at a time, it’s easier).

You will now have an emp­ty peg to the right of the marked peg. Move the loop on the peg to the right of the emp­ty peg onto the emp­ty peg, e‑wrap the peg and knit off. Then keep mov­ing each loop to the emp­ty peg to the left and e‑wrap and knit off until you reach the end of row. I find it eas­i­er to do this with the loom sit­ting flat on a surface.

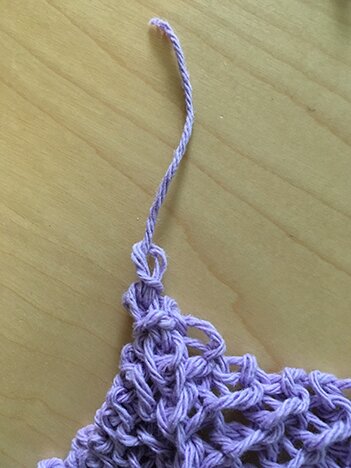
Repeat rows 1 and 2 until you have 3 stitch­es left. Purl the 3 stitch­es. Place the stitch on the left and stitch on the right onto the mid­dle peg, e‑wrap, then knit off all 3 bot­tom loops. Fas­ten off.

Now we have the first square of the row joined! Next time we’ll join the next square, which is how we make the major­i­ty of the squares in the blanket.

Be sure to leave a com­ment on the post if you have any ques­tion! You can send me an email too but oth­er read­ers may also find your ques­tions help­ful so don’t be shy :)

Hap­py weekend!


Posts in this series:

How to make the first square

How to join the sub­se­quent squares in the first row

How to join the first square in every row
How to join all the oth­er squares

How to make striped squares

loom-knit-along: join-as-you-go mitered square blanket – part 2

Wel­come back to the loom-knit-along mitered square blan­ket project! :D

In this post we knit a sec­ond square while join­ing it to the pre­vi­ous one. Every square on the very first row of the blan­ket will be made this way. You can make the row as long as you want. My blan­ket is 10 squares wide, and it’s 39″. 

First, let’s ori­ent our­selves. We will put the loops on one side of the first square onto 12 pegs of the loom, as illus­trat­ed in the pic­ture below. The red-dot­ted stitch­es will go on the red-dot­ted pegs.

With the right side of the square fac­ing the inside of the loom, start by putting the first stitch at the top of the square onto the marked peg. For the fol­low­ing stitch­es, use the loom pick to pick up the hor­i­zon­tal strand of yarn between the purl bumps and place it onto the peg, like so…

Con­tin­ue putting a loop on each peg until you reach the oth­er cor­ner of the square and each of the 12 pegs have a loop on it. It will look like this.

Then, go to the first peg of the loom, and cast on the 11 pegs that don’t have loops on them with a new colour for your new square (my sec­ond square is yellow).

When you get to the first peg with a loop of the pre­vi­ous square on it (the marked peg), e‑wrap, then knit off the loop from the pre­vi­ous square.

Con­tin­ue until the end of row. And that’s it! You’ve cast on a con­join­ing square! :D

Knit the rest of the square the same way as the first square. For con­ve­nience, I’ll paste the pat­tern below but there are pho­tos in the blog post that might help if you’re hav­ing trouble.

Row 1: Purl (here’s a video of purl­ing) to the marked peg, e‑wrap knit the marked peg, purl to end. (Note in the pic­ture that the last peg of the loom is emp­ty — we only use 23 pegs of the loom.) Beware not to make the stitch­es too tight.

Row 2: Move the loop on the peg to the left of the marked peg onto the marked peg. Move the loop on the peg to the right of the marked peg onto the marked peg. Now the marked peg has 3 loops on it. (Always move the loop on the left first, then the one on the right, so it looks consistent.) 

Move the loop on the peg to the left of the now emp­ty peg onto the emp­ty peg. Keep mov­ing each loop to the emp­ty peg to the right until you reach the begin­ning of the row.

E‑wrap and knit off each peg until you reach the marked peg. E‑wrap the marked peg, knit off all three bot­tom loops on the peg (I pre­fer knit­ting them off one at a time, it’s easier).

You will now have an emp­ty peg to the right of the marked peg. Move the loop on the peg to the right of the emp­ty peg onto the emp­ty peg, e‑wrap the peg and knit off. Then keep mov­ing each loop to the emp­ty peg to the left and e‑wrap and knit off until you reach the end of row. I find it eas­i­er to do this with the loom sit­ting flat on a surface.

Repeat rows 1 and 2 until you have 3 stitch­es left. Purl the 3 stitch­es. Place the stitch on the left and stitch on the right onto the mid­dle peg, e‑wrap, then knit off all 3 bot­tom loops. Fas­ten off.

Now we have two squares joined togeth­er! Next time we’ll join a square to the row below. Here’s a first look at how we’ll do that.

In the mean­while, join as many square as you’d like for the first row, by plac­ing the loops from the pre­vi­ous square on the loom (i.e. if I were to join a third square to the first row, I’d place loops from the yel­low square on the loom). Then come back and join us for the sec­ond row!

Hap­py knit­ting! :D Feel free to leave a com­ment if you have any questions!

Posts in this series:

How to make the first square

How to join the sub­se­quent squares in the first row

How to join the first square in every row
How to join all the oth­er squares

How to make striped squares

loom-knit-along: join-as-you-go mitered square blanket — part 1

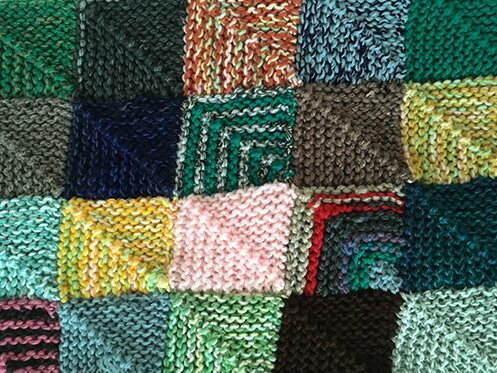
I’ve been look­ing for a good yarn scrap project because I love the patch­work look and my yarn col­lec­tion is grow­ing at an uncon­trol­lable rate.

I came across a mitered square baby jack­et one day so I fol­lowed the link to the free pat­tern, but it involves sewing all the squares togeth­er… doable maybe for a baby jack­et but I was­n’t into sewing hun­dreds of squares togeth­er to make up a blan­ket. So I tried look­ing for visu­al tuto­ri­als for a join-as-you-go ver­sion but did­n’t come across any. After mak­ing the Ten-Stitch Blan­ket I was pret­ty sure it’s pos­si­ble to join as you go, so I tin­kered around a bit and fig­ured out a system!

Inter­est­ed in knit­ting along? :D I fig­ure if we start now, and knit one or two squares a day, we’ll have a blan­ket by Christ­mas to give away as gift! (or keep for your­self!) You can also use the idea of tem­per­a­ture blan­ket, mood blan­ket, or sky blan­ket. They’re real­ly great ideas to be mind­ful of our sur­round­ings or our feel­ings so we don’t take them for grant­ed or be unaware of how things affect us. 

Each square does­n’t take very long to make, only 23 stitch­es at its widest part, and it keeps decreas­ing as you go so it feels like it’s knit­ting up even faster. There WILL be a mil­lion ends to weave in, but I weave them in as I com­plete each square so I don’t leave them all till the end.

So! In this post we’ll show you the mate­ri­als I used, and how I made the first square. In the next few posts I will share:

How to make the first square

How to join the sub­se­quent squares in the first row

How to join the first square in every row

How to join all the oth­er squares

How to make stripes!

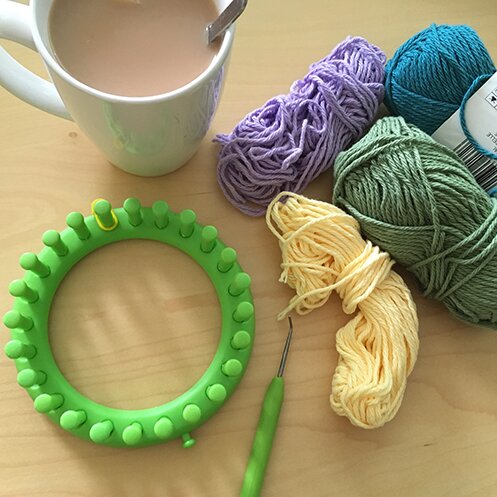
First, we need:

24-peg loom (I got mine from this kit, it’s the small­est in the kit)

Loom pick

Bulky weight yarn or two strands of worsted held together

Stitch mark­er

Tea! (option­al but high­ly recommended)

(For the demon­stra­tion I’m going to make a hand tow­el with some worsted weight cot­ton, and for clar­i­ty pur­pose, I’m just going to use a sin­gle strand. But for the blan­ket, if you’re using worsted weight, it’s best to use 2 strands held togeth­er for the gauge of this loom.)

Before knit­ting we need to mark the mid­dle stitch. Count­ing from the first peg, which is the first peg to the right of the side knob, put the stitch mark­er on the 12th peg on the loom, like so…

Then we’re ready to cast on!

Cast on row: Make a slip knot with the yarn, adjust it to the first peg. E wrap (wrap the work­ing yarn around the peg from right to left) the first peg and knit off. Cast on the next 22 pegs by e‑wrapping each peg twice and knit the bot­tom loop over the top loop. Beware not to cast on too tightly.

Row 1: Purl (here’s a video of purl­ing) to the marked peg, e‑wrap knit the marked peg, purl to end. (Note in the pic­ture that the last peg of the loom is emp­ty — we only use 23 pegs of the loom.) Beware not to make the stitch­es too tight.

Row 2: Move the loop on the peg to the left of the marked peg onto the marked peg. Move the loop on the peg to the right of the marked peg onto the marked peg. Now the marked peg has 3 loops on it. 

(Always move the loop on the left first, then the one on the right, so it looks consistent.)

Move the loop on the peg to the left of the now emp­ty peg onto the emp­ty peg. Keep mov­ing each loop to the emp­ty peg to the right until you reach the begin­ning of the row.

E‑wrap and knit off each peg until you reach the marked peg. E‑wrap the marked peg, knit off all three bot­tom loops on the peg (I pre­fer knit­ting them off one at a time, it’s easier).

You will now have an emp­ty peg to the right of the marked peg. Move the loop on the peg to the right of the emp­ty peg onto the emp­ty peg, e‑wrap the peg and knit off. Then keep mov­ing each loop to the emp­ty peg to the left and e‑wrap and knit off until you reach the end of row. I find it eas­i­er to do this with the loom sit­ting flat on a surface.

And that’s it! Just repeat rows 1 and 2 until you have 3 pegs left with loops on them. (mov­ing the stitch­es is kind of tedious, appar­ent­ly there are looms with mov­ing inserts to help with this…? But I don’t have one of those looms, so this is why we only make one or two squares a day! It’s not so bad.)

Purl the last 3 loops, then move the loops to the left and right of the marked peg to the marked peg. E‑wrap and knit off the bot­tom 3 loops. Take the last loop off the peg, cut yarn, and tie off by bring­ing the yarn tail around the loop to the front, then through the loop from back to front, as pictured.

And here we have our first square! Now by always e‑wrap knit­ting the marked/middle peg, you’ll get a raised line of knit stitch­es or braid run­ning diag­o­nal­ly through the square. For my blan­ket I just purl all the pegs on the purl rows, because I can’t trust my atten­tion to always knit that one stitch on purl row and not make mis­takes. But it’s up to you!

Here’s a sneak peek of how we will join the next square, so you can see the fin­ished square. (and see? I already make a mis­take by purl­ing the marked stitch on a purl row!)

Hap­py knit­ting! I’ll be back in a few days with the next episode of join-as-you-go mitered square blan­ket! :D


Posts in this series:

How to make the first square

How to join the sub­se­quent squares in the first row

How to join the first square in every row
How to join all the oth­er squares

How to make striped squares


this week’s awesome finds… and YARN HOP!

Adorable lla­mas to hold your yarn/embroidery scraps and it’s a free print­able! :D From Picot Pals.


These would make cheer­ful buntings and adorable blan­ket squares. Lla­ma granny squares from Mari­a’s Blue Cray­on.


Look at these par­ty lla­mas made of par­ty plates! From Hand­made Char­lotte.


For the more adven­tur­ous, this no-dra­ma-lla­ma is very cud­dly. Free pat­tern from Red Heart <3

Why so many lla­mas, you ask?

Well, this year I’m going to be team cap­tain again for The Great Toron­to Yarn Hop on Sat­ur­day July 14, and I’m with Team Alpaca! (for­mer­ly TTC Knit-Along — but we want to expand the name to include all forms of yarn-craft­ing and we actu­al­ly have no offi­cial affil­i­a­tion with the Toron­to Tran­sit Com­mis­sion, hence the name change)

Alpacas are kind of cousins of lla­mas (I think), hence all the lla­ma crafts :)

What’s so great about The Great Toron­to Yarn Hop? It is an event where yarn-crafters get into teams and vis­it var­i­ous local yarn shops in Toron­to, shop for high qual­i­ty yarn and enjoy spe­cial dis­counts, knit/cro­chet/­yarn-craft in pub­lic on buses/streetcars/trains, meet oth­er yarn enthu­si­asts and share projects/tips/jokes, sup­port inde­pen­dent LYS’s, AND raise funds for Sis­ter­ing, a local, 24/7 drop-in and sup­port cen­tre for women that offers ser­vices like coun­selling, hous­ing help, meal pro­gram, pri­ma­ry health­care, and a safe place to be. At the end of the day we all gath­er at a pub for food and drinks and raf­fle draws! I’ve only been involved for the past cou­ple of years but this event is in its 12th year! What can be more great? 

If you’re in Toron­to or close to it, we would love for you to join us! Tick­ets can be bought here for just $20. Each team fol­lows a dif­fer­ent route that vis­its dif­fer­ent stores, and you can check out all the dif­fer­ent avail­able teams/routes and how the whole thing works here. And be quick because quite a few teams have sold out already! 

Need ideas for what projects to shop for or what to make dur­ing the Yarn Hop?

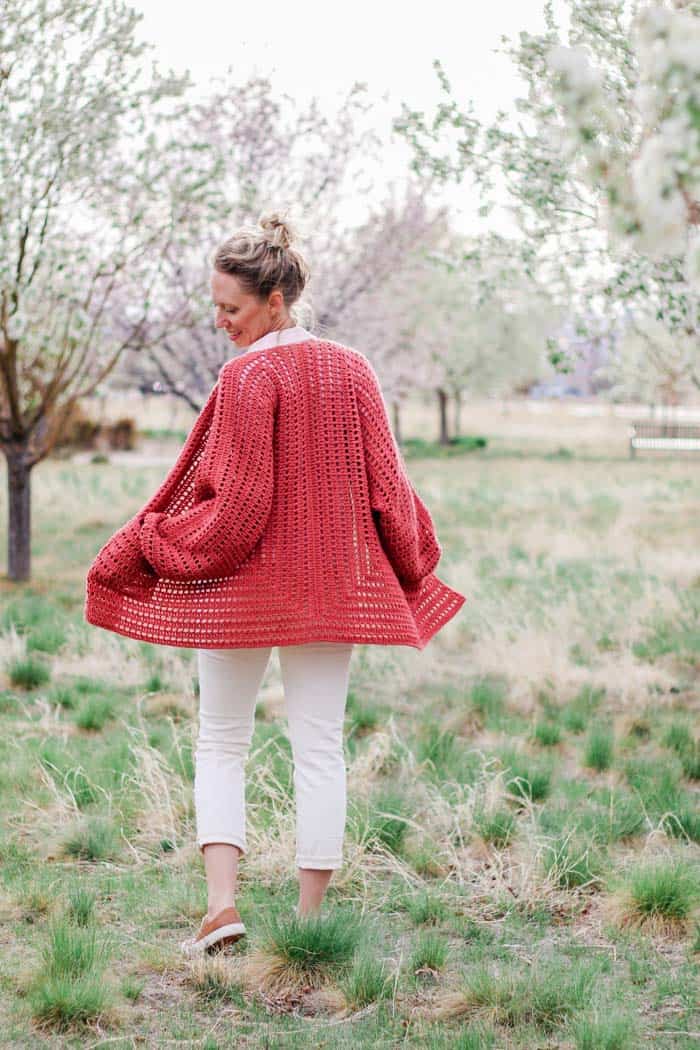
This cardi­gan is made with two hexa­gons sewn togeth­er! Very clever. Make it with a breeze cotton/linen for sum­mer or wool for cozy fall/winter lay­er­ing! Imag­ine using yarn with long tran­si­tion colour changes! From Make & Do Crew.


What about a portable project per­fect for knit­ting on the pub­lic tran­sit, like these fluffy clouds? From Bernat Yarn.


Mak­ing granny squares is anoth­er excel­lent portable idea. This com­fy sum­mer sweater pat­tern is free this week only on Love Cro­chet!


Hap­py mak­ing, every­one! :D


adventures in paper marbling

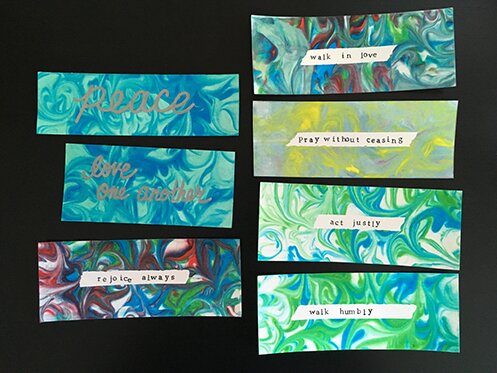
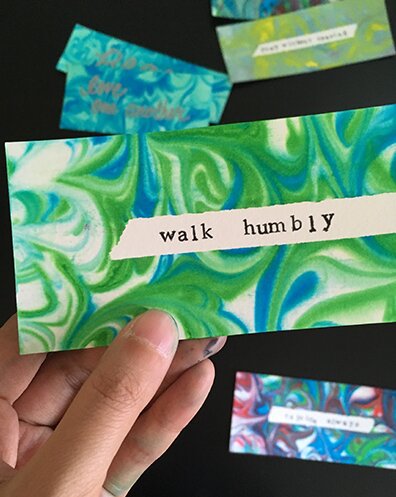
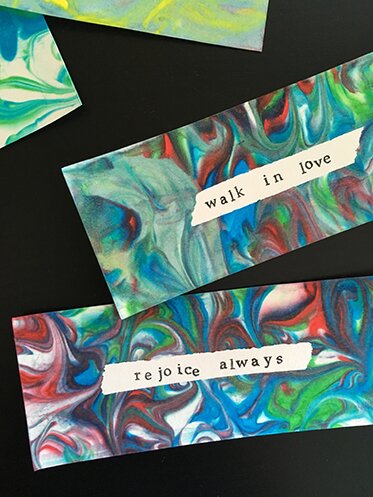
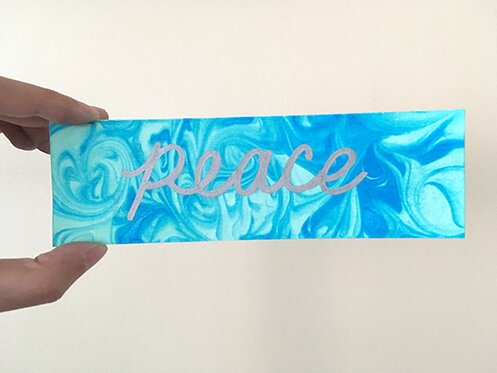
I vol­un­teered to make some book­marks for my sis­ter’s church fundrais­er. And as I was look­ing for ideas to cre­ate cool effects on paper, a friend asked me to sign a birth­day card she’s made for anoth­er friend, using a piece of paper that she mar­bled with shav­ing cream. I’ve seen this before but nev­er thought of try­ing it. Until now! 

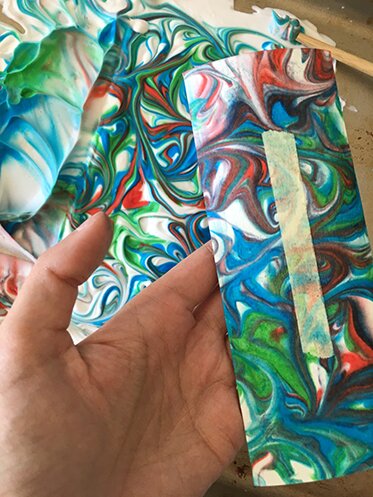
So I dashed to the dol­lar store for the shav­ing cream and the gro­cery store for food colour­ing, and pulled out the largest bak­ing pan I had. I used a 140 lb. water­colour paper that I had on hand (cold press/smooth, as I read that toothy/textured paper does­n’t work well), and cut them into book­mark-size. I want­ed to stamps some words on it, so I used mask­ing tape as a resist, to tape off a sec­tion in the cen­tre. I had no idea whether the dye will bleed through. We’ll see.

The first dip was MAGICAL!

When I saw this on oth­er tuto­ri­als I used to think, how does the mar­bling not smear when you peel it off the shav­ing cream? But it does­n’t! I used a spat­u­la to scrape off the excess cream.

Here’s a bunch of them I made! :D


This was so much fun, and clean up was a breeze. Also, it smells refresh­ing. Per­fect for kids. Or adults who don’t like clean­ing up. Who likes clean­ing up any­way? So per­fect for every­one, most like­ly :D I fore­see mak­ing many more of these for oth­er projects!

Hap­py weekend!