adventures in flameworking

I’ve always been fas­ci­nat­ed by glass, espe­cial­ly the kind of small glass sculp­tures or beads where a form or swirls of colours are enclosed in clear glass. It’s like a world unto itself. I’ve been want­i­ng to take flame­work­ing class­es for a long time, but did­n’t quite have the mon­ey or the time. In the begin­ning of the year I decid­ed to make time to do some­thing I want­ed, and remem­bered that years ago I bought this small pen­dant of a jel­ly fish encased in a drop of clear glass from a local artist. So I looked her up, and found that she offers class­es at a stu­dio not too far from me, at quite a rea­son­able rate! Excit­ed, I signed up right away.

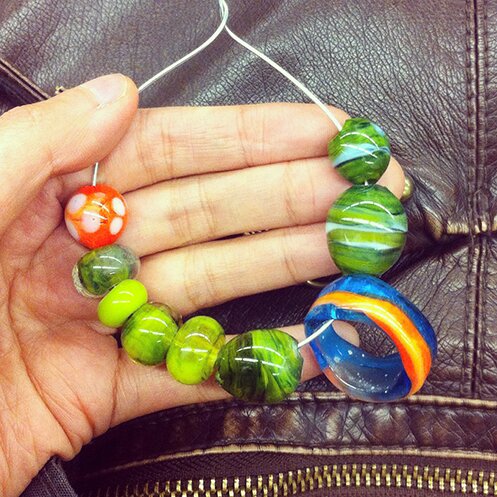
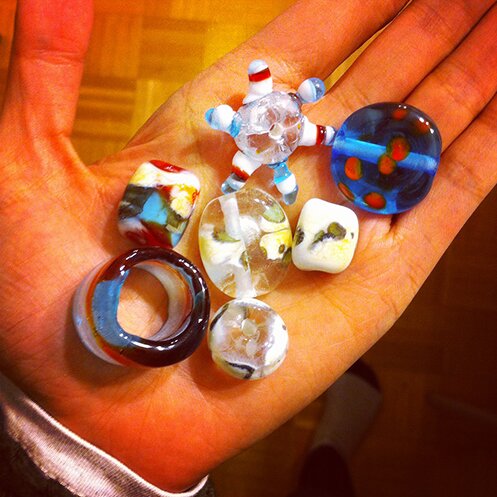
And these are my very first batch of beads!

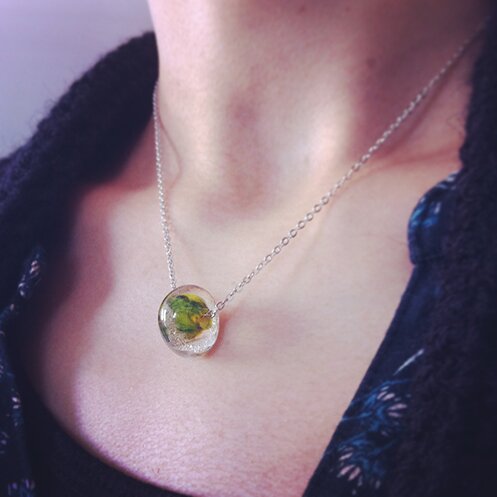
To be com­plete­ly hon­est, half way through the first class I had the thought that it was a bad idea after all and I should just leave, because I was so uncom­fort­able with open flames, and the glass was­n’t melt­ing the way it should because I was­n’t hold­ing it in the right spot in the flame, I was ter­ri­fied of the glass or the torch explod­ing or me doing some­thing stu­pid and catch­ing on fire (vivid imag­i­na­tion some­times is a hin­der­ance to learn­ing), and I could­n’t see prop­er­ly because I was wear­ing these gog­gles on top of my glass­es… but towards the end of the class I seemed to have got­ten the hang of mak­ing round beads. I made three prop­er ones (the 3 green/clear donut-shaped ones on the left — the teacher made the small opaque green one as demo, she just let me keep it :D), and one of them I made into a neck­lace right away when I got home :D

The next class we tried mak­ing dif­fer­ent shapes and adding sculp­tur­al com­po­nents. That snowflake is a bit sad-look­ing but it was fun to try.

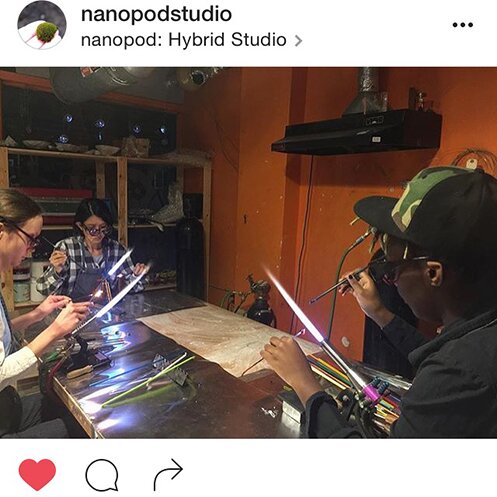
If you’re in the city and would like to give flame­work­ing a try, check out the nano­pod stu­dio! (that’s me con­cen­trat­ing very hard in the plaid shirt)

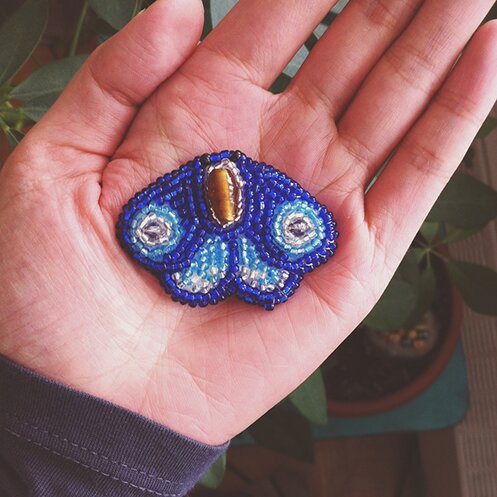
On a relat­ed note, I saw an image of a bead­ed death’s head hawk moth one day, and decid­ed that I want­ed to make a bead­ed moth. So I looked up bead embroi­dery, found this very help­ful tuto­r­i­al, and tried just mak­ing a test one on felt, with the beads I have on hand.

I found it a bit dif­fi­cult to keep to the exact shape I drew on the felt, the wings are more round­ed than I intend­ed, but it may get bet­ter with prac­tice. Next time I’ll get more moth-like colour beads and try anoth­er design.

Hope every­one have a good week!


spring forward

Win­ter seems to be drag­ging on in my cor­ner of the world, but that does­n’t stop us from get­ting ready for san­dal weath­er and look­ing for­ward to bloom­ing trees :)

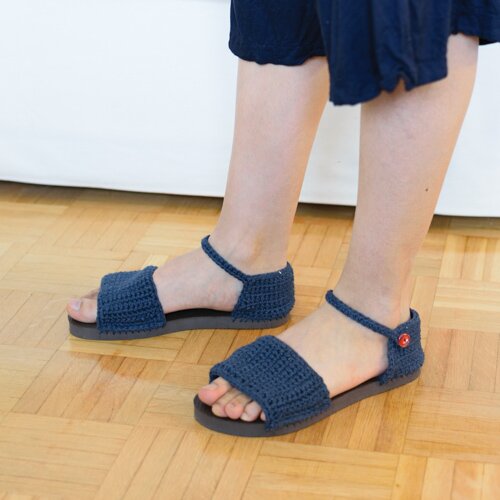
Last year I tried cro­chet­ing shoes because I hate shoe shop­ping. I made some shoes and san­dals with jute soles, I was quite hap­py with how the pat­tern turned out, but the jute sole turned out to be a bit bumpy and uncom­fort­able after walk­ing in them for a while. Sev­er­al friends have sent me this cro­cheted shoes pat­tern by Make & Do Crew, so I thought I’d try using flip flop soles this time.

And I think they turned out not so bad! :D
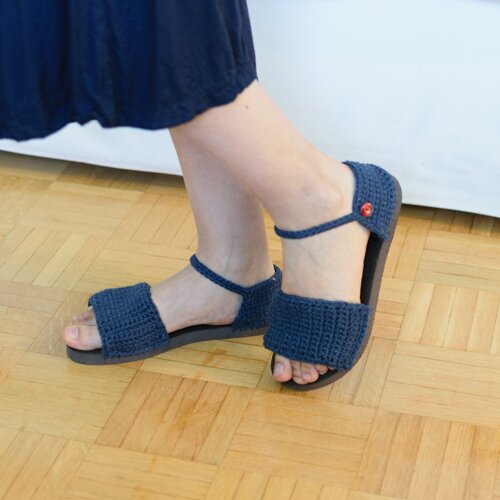
I thought I’d share how I made them here. As much as I’m shar­ing it with you, I’m also record­ing it so I can remem­ber what to do when these wear out, because they’re real­ly quite com­fort­able! If you try to make them I hope you’d like them too :) It took me just two evenings to make them and I was tak­ing process pho­tos and such, so it’s a fair­ly quick project. And apolo­gies in advance about the poor­ly lit process pho­tos! The weath­er has been so drab late­ly and the light­ing in our apart­ment is bad :S but hope­ful­ly the what the pho­tos are try­ing to show is clear! If not, drop me a note!

I used:

One pair of flip flops (I bought mine from Old Navy for about $5 CAD, in size 5)

One skein of Bernat Hand­i­crafter Cot­ton (80 yrds, mine in Indigo)

3.5 mm hook, and a small­er hook (i.e. 2.5 mm) to weave in ends

Sewing nee­dle

Sewing thread that match­es the colour of yarn

2 half-inch buttons

A long sharp tool (I used an awl for book­bind­ing, but I know that’s not real­ly an every­day handy tool, so I did a quick search for awl alter­na­tives, and the results that came up were met­al skew­ers and long crewel needles)

Mask­ing tape or painter’s tape

Sharpie mark­er

Tape mea­sure

Kitchen scis­sors

What I did:

First, I cut off the straps on the san­dals with kitchen scis­sors. I left the bits of plas­tic in the holes where the straps were attached though, because I plan on wear­ing these out­door and I don’t want holes in the soles of my shoes.

I then put painter’s across the soles and wrapped around the sides, the top piece of tape posi­tioned just a bit above where the straps were attached at the top of the sole. On mine it’s about 1.5″ from the very top of the sole, but that would prob­a­bly be dif­fer­ent if you have a dif­fer­ent size shoe. It does­n’t real­ly mat­ter, as long as the tapes on both shoes are posi­tioned the same way. I put a cou­ple more pieces of tape across so that the taped area is 2.5″ in length. Again you can make it longer or short­er, as long as both shoes are the same.
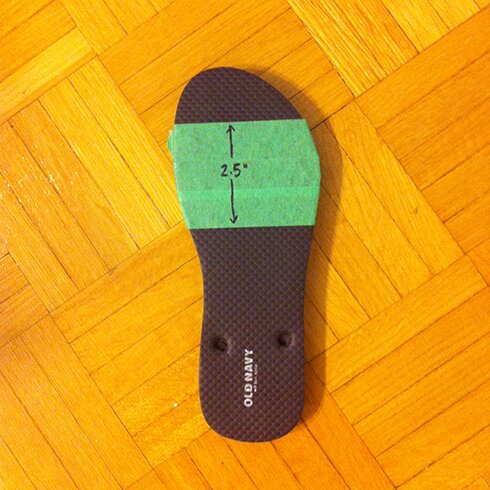
I then marked one side of the sole on the painter’s tape with a tape mea­sure and mark­er, with a mark­ing every quar­ter-inch apart, at about the mid­point of the thick­ness of the sole, start­ing at one edge of the taped area and end­ing at the oth­er edge of the tape. 

I then poked holes at the mark­ings and going through diag­o­nal­ly from the side to the top of the sole, com­ing out about quar­ter-inch away from the edge at the top of the sole, like so…
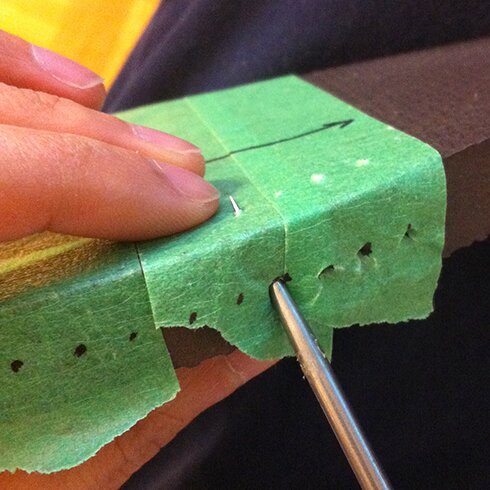
Repeat mark­ing and pok­ing holes on the oth­er side of the sole. Remove all the tapes.

I put painter’s tape around the heel, start­ing and end­ing where the orig­i­nal san­dal straps were attached at the bot­tom of the sole, and marked and poked holes in the same way I did one the sides of the sole. Remove the tapes when done.
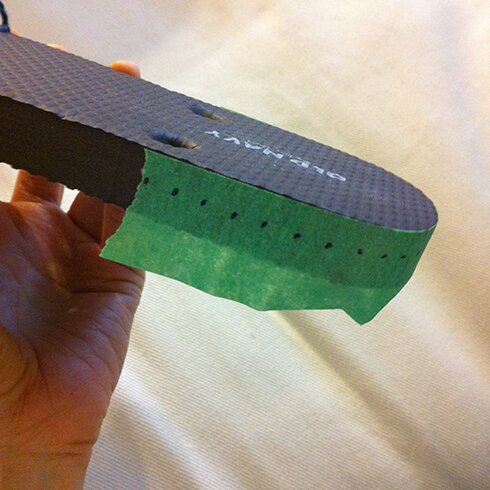
Repeat for the oth­er shoe. Make sure both shoes have the same num­ber of holes!

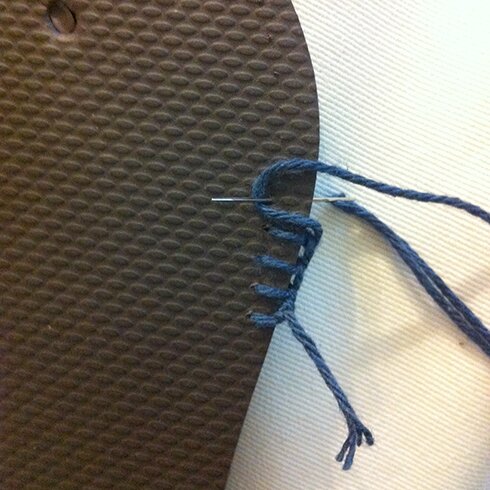
With top of the sole fac­ing, and a length of yarn and sewing nee­dle, attach yarn to the first hole at the top on one side of the sole, like so…
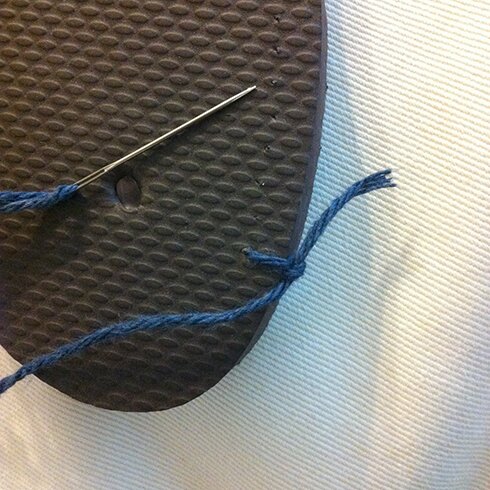
Sew through the holes made with blan­ket stitch.

When you get to the last hole, rein­sert the nee­dle down from the top of the sole to the side of the sole, then tie off securely.
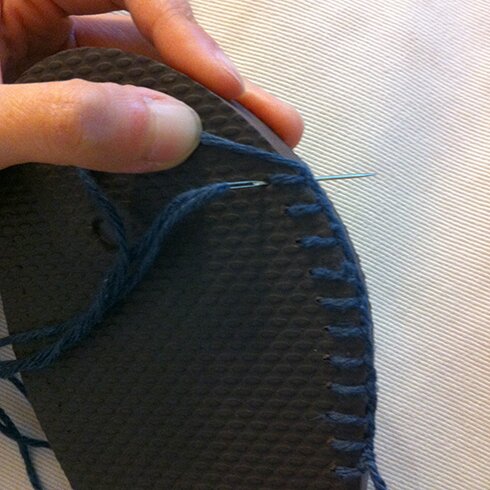
Don’t wor­ry about all the loose ends, you can weave them in when you cro­chet the top and heel :)

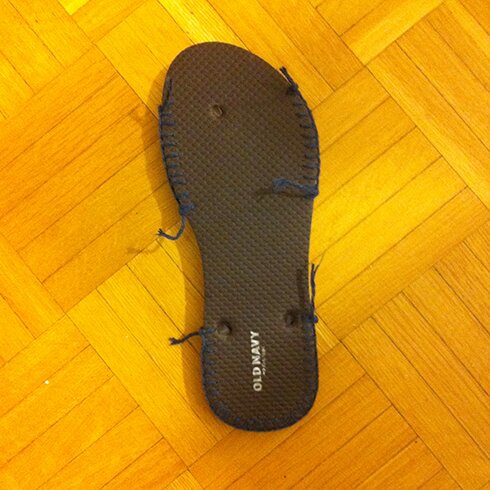
Repeat the blan­ket stitch on the oth­er side of the sole and the heel, then repeat on the oth­er sole. It will look like this.

Now we’re ready to cro­chet! :D

Left San­dal Top:

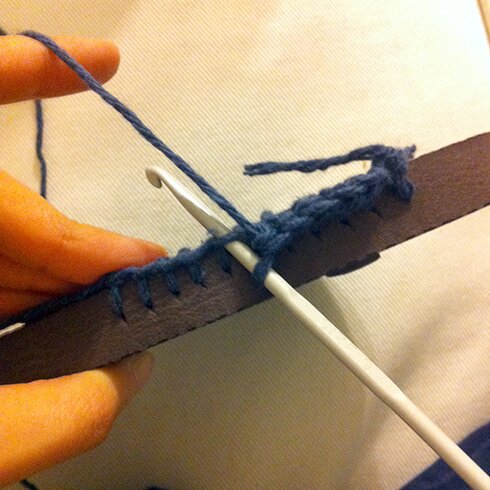
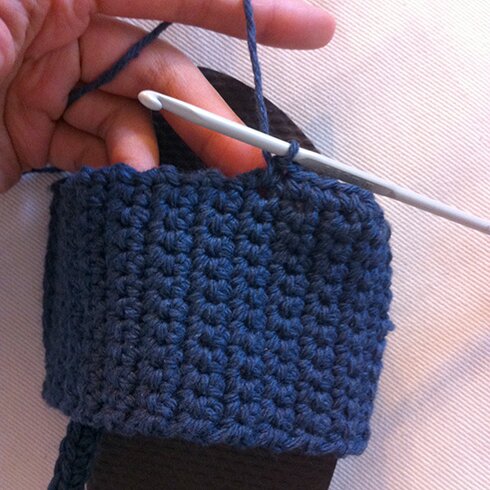
With a blan­ket stitch, you would have a ver­ti­cal thread and hor­i­zon­tal thread in each stitch. Attach yarn to the ver­ti­cal thread on the top right of the sole, work 1 sc around this thread, then work 1 sc around the hor­i­zon­tal thread right next to it, then work 1 sc in every hor­i­zon­tal thread to the end of the row, and plac­ing last sc around the last ver­ti­cal thread of the row.

Sec­ond row and every row there­after: ch 1 (does not count as a stitch), sc in each sc, turn. 

You can put your foot on the sole and see how wide you need to make the top as you go. It’s good to make it a bit snug, I imag­ine it will stretch a bit as you wear it. There were 26 rows in mine. End with a wrong side row. 

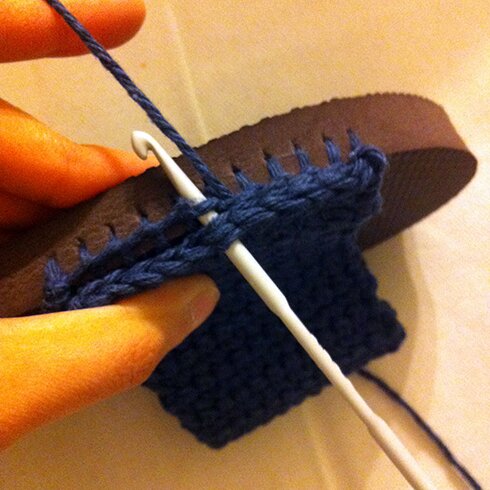
Attach row: sl st in top left ver­ti­cal thread of the blan­ket stitch on the sole, then sl st togeth­er next sc on the san­dal top and next hor­i­zon­tal thread of blan­ket stitch on the sole, con­tin­ue with sl st in next sc and next hor­i­zon­tal thread till end, end with sl st in ver­ti­cal thread of last blan­ket stitch on the sole, fas­ten off.

Edg­ing: Attach yarn to the ver­ti­cal thread of the blan­ket stitch on the top right side of the sole, ch 1, sc even­ly across top edge of san­dal top. I find that repeat­ing [1 sc in each of the next 3 end of sc row, skip 1 end of row] seems to work well. End­ing with sl st in ver­ti­cal thread of blan­ket stitch on the top left side sole, fas­ten off.
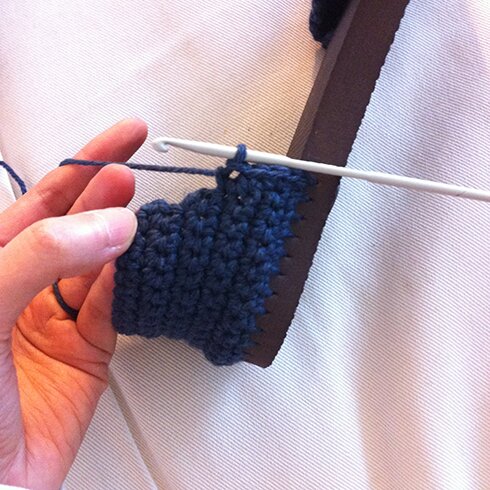
Repeat edg­ing on the bot­tom edge of the san­dal top. Weave in ends.

Left San­dal Heel:

Attach yarn to first ver­ti­cal thread on the right side of the sole, work 1 sc around this thread, then work 1 sc in the hor­i­zon­tal thread right next to it, then work 1 sc in every hor­i­zon­tal thread to the end of the row, and plac­ing last sc around the last ver­ti­cal thread of the row.

Row 2–3: ch 1 (does not count as a stitch), sc in each sc, turn.

Row 4 (decrease row): ch 1, skip first sc, sc in next sc and each sc till there are 2 sc left, 2 sc tog, turn.

Repeat rows 2–4 twice more. Fas­ten off.

Edg­ing: Attach yarn to the first ver­ti­cal thread on the right side of the sole (same stitch where the heel start­ed). ch 1, sc even­ly up the side of the heel. I find that repeat­ing [1 sc in each of the next 3 end of row, skip 1 end of row] seems to work well.

When you reach the top of the right side of the heel piece, ch 30, sc in the 6th ch from hook, sc in every ch (strap made), then sc in each sc across the top of the heel, then sc even­ly down the oth­er side of the heel, end with sl st in last ver­ti­cal thread of the last blan­ket stitch on the heel, fas­ten off. Weave in ends.

Attach but­ton with match­ing thread to the top left cor­ner of the heel piece.

Right San­dal Top:

Make as left san­dal top, except start by attach­ing yarn to the bot­tom left ver­ti­cal thread on the sole. 

Right San­dal Heel:

Make as left san­dal heel, except when cro­chet­ing edg­ing, work sc even­ly up the right side of the heel piece, then sc in each sc across the top of the heel piece, then ch 30, sc in 6th ch from hook, sc in each ch, then work sc even­ly down the left side of the heel piece.

Fin­ish­ing:

Sew but­ton on each heel piece oppo­site of the strap.

Ready to roll :D

These are fair­ly plain-look­ing, but they’re my first try, and I do like sim­ple designs. But maybe one day I’ll try to incor­po­rate fanci­er stitch pat­tern or a closed toe ver­sion! As always if you have any ques­tions please feel free to leave a com­ment below :)

Hope every­one is hav­ing a good weekend!
this week’s awesome finds

It’s March and win­ter has returned for its (hope­ful­ly) last hur­rah with much snowi­ness and bit­ter winds. So, wel­come to a very cozy episode of awe­some finds! :D

This phone case is inge­nious — you open the case by tak­ing off the hel­met, which is latched onto the but­ton nose when closed! (I don’t think Darth Vad­er would like me using the words “but­ton nose” on him. But there it is, his nose is a but­ton.) Paid pat­tern by Anna Vozi­ka on Rav­el­ry. There’s a Yoda ver­sion too!
 

I love kimono slip­pers, I think they’re very styl­ish. And these are very easy to knit, I just won­der where one could buy thick wool felt for the soles, if not buy­ing the felt soles from the online store. Maybe an alter­na­tive would be flip flop soles, but that’s less cozy. From Joe’s Toes


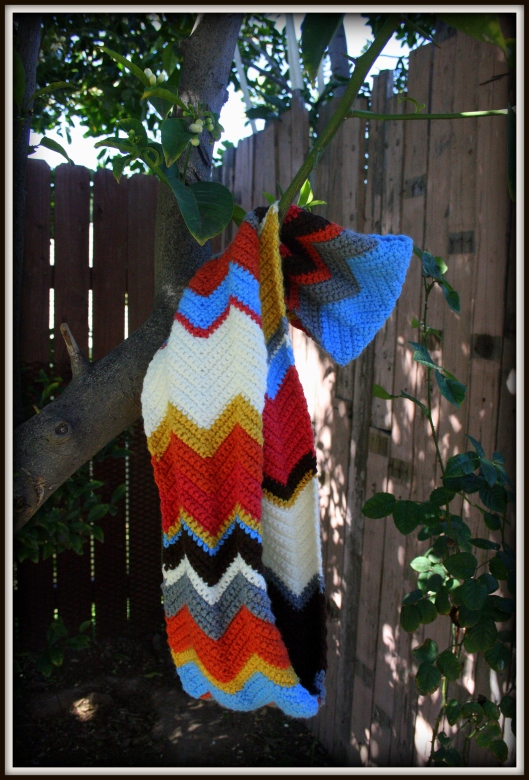
A per­fect stash-buster project with styl­ish chevrons. From Dan­de­lion Daze.


A love­ly, squishy stitch that I think would make a nice seat cov­er or a bath mat. Or a clutch with that funky neon yel­low! From Notey / Behooked Cro­chet.


Real­ly like the asym­met­ri­cal stripes on this cardi­gan. It uses thick wool and large nee­dles so it should be a quick make… Can one have too many cardi­gans? From Of Two Wands.


Did you know that sprouts could grow in a jar? Mag­i­cal! This means that win­ter does­n’t stop us from doing some kind of gar­den­ing. Not that I do any kind of gar­den­ing in the spring/summer… But this is prob­a­bly the eas­i­est, low­est main­te­nance, most kid-friend­ly kind of gar­den­ing ever. We bought a sprout­ing jar from Young Urban Farm­ers at a com­mu­ni­ty fair recent­ly, and have already har­vest­ed and enjoyed the adzu­ki sprouts! Unfor­tu­nate­ly they don’t seem to sell the sprout­ing jars online, but here’s a tuto­r­i­al on how to make your own from Pass the Pis­til. The friend­ly urban farmer at the fair did say to buy sprouts from here rather than bulk barn to get bet­ter ger­mi­na­tion rates. I also post about our sprout­ing progress on Insta­gram if you’d like to check it out! :D


Final­ly, you can cheer any­one up and chase the win­ter blahs away with this uni­corn pup­pet made with an origa­mi heart! From Wil­low Day.

Wish­ing every­one a good week filled with sim­ple joys :)


cumulus

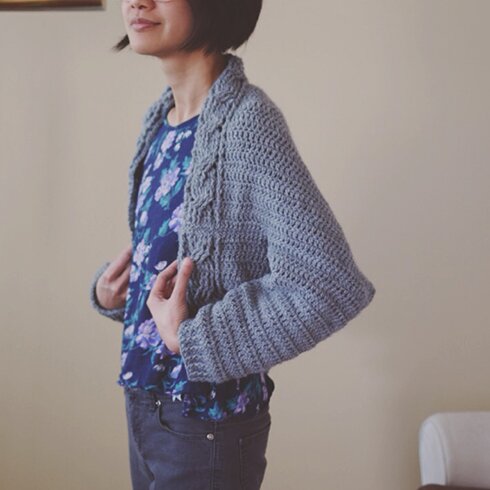
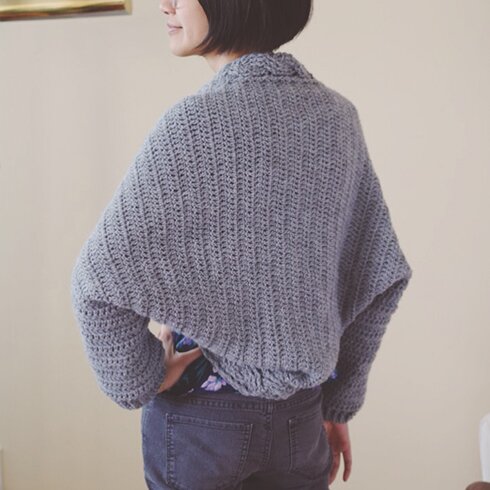
Or, an exer­cise in cro­chet cables!

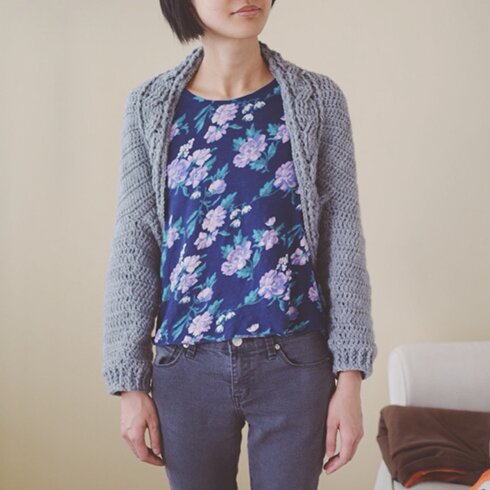
Cumu­lus is a shrug/cardigan with a ring of cables around the neck/front/back. 


The con­struc­tion is quite sim­ple. Basi­cal­ly, it’s mak­ing a 25″ x 26″ rec­tan­gle, fold­ing it in half, sewing the side seams, then attach­ing yarn to cro­chet the sleeves in the round. Sleeves mea­sure 11″ from where it joins the arm hole to cuff.

I used 5.5 mm and 5 mm hooks, and one ball of Lion Brand Pound of Love

Below are the stitch­es used, you can click on the link for instruc­tions on how to make the stitches.

fdc = foun­da­tion dou­ble crochet

bpdc = back post dou­ble crochet

fpdc = front post dou­ble crochet

bptr = back post tre­ble cro­chet (made the same way as bpdc, but make a tre­ble cro­chet stitch instead of a dou­ble cro­chet stitch)

fptr = front post tre­ble cro­chet (same as above)

Note: you might want to make the front/back post stitch­es a bit more loose­ly than you would when mak­ing a typ­i­cal dou­ble cro­chet stitch, so that the post stitch­es are a bit taller to match the height of the reg­u­lar dc’s. 

Pat­tern:

(RS) With larg­er hook, begin with 96 fdc. (you can add to the length of the shrug by adding more fdc stitch­es at this point. 4 dc = 1″)

Row 1 (WS): ch 3 (counts as a dc through­out), [bpdc in next dc, dc in next dc, skip 3 dc, bptr in next 3 dc, turn, make 3 fptr in the skipped stitch­es, turn, dc in next dc after the 3 bptr, bpdc in next dc], dc in every dc till there are 11 stitch­es left, repeat from [ to ], dc in last dc, turn.

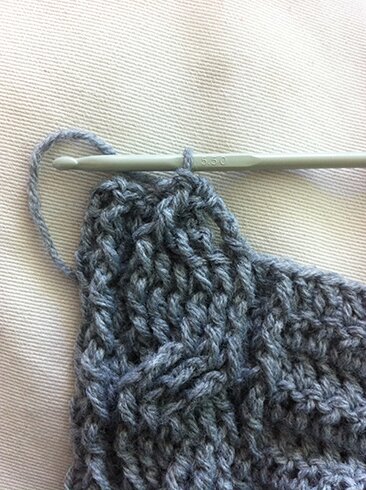
Here is a pho­to re-cap of how the cable was made. At the point where you’ve skipped 3 dc, bptr in next 3 dc from right to left as usual.

Now turn the piece. You’re only turn­ing the piece tem­porar­i­ly because it’s eas­i­er to work from the oth­er side to form the cable. fptr in the 3 skipped stitch­es from left to right. I’ve made the first of the 3 fptr in this picture.

Then turn the work back and con­tin­ue on pattern.

Row 2: ch 3, [fpdc in next dc, dc in next dc, fpdc in next 6 stitch­es, dc in next dc, fpdc in next dc], dc in each dc till there are 11 stitch­es left, repeat from [ to ], dc in turn­ing ch, turn.

Row 3: ch 3, [bpdc in next dc, dc in next dc, bpdc in next 6 stitch­es, dc in next dc, bpdc in next dc], dc in each dc till there are 11 stitch­es left, repeat from [ to ], dc in turn­ing ch, turn. 

Row 4: repeat row 2

Repeat rows 1 to 4 until piece is 26″ from begin­ning, end­ing with Row 3. Fas­ten off.

Side seams:

Posi­tion piece so that the cables are hor­i­zon­tal. With wrong side fac­ing out, fold piece in half (the hold is par­al­lel to the cables). Start­ing from the bot­tom of each side, cro­chet the side seams togeth­er by match­ing the stitch­es on both lay­ers and using slip stitch, cro­chet 22 sl st up each side.

Sleeves:

Turn piece right side out.

Attach yarn to a stitch near the side seam in the arm hole, ch 3, make 49 dc around the arm hole, turn.

Row 1: ch 3, dc in each dc around, sl st in top of turn­ing ch, turn.

Row 2 (decrease row): ch 3, 2 dc tog, dc in each dc until the last 2 dc, 2 dc tog, sl st in top of turn­ing ch, turn.

Row 3–4: repeat row 1.

Row 5: repeat row 2.

Repeat rows 3–5 sev­en more times. Work row 1 one more time. Don’t turn piece on the last row. 19 rows alto­geth­er on sleeve. 

Row 20 (RS): with small­er hook, ch 3, [fpdc in next st, dc in next st] repeat from [ to ] around, don’t turn.

Repeat row 20 twice. Fas­ten off. Repeat for the oth­er sleeve.

Fin­ish­ing:

Attach yarn any­where on col­lar, with larg­er hook, work 2 sc around each dc or turn­ing ch post around collar/front/back, sl st in first sc to com­plete round. Fas­ten off, weave in all ends.

Fin­ished :)

Feel free to leave me a mes­sage in the com­ments if you have any ques­tions! Hap­py crocheting!


full heart


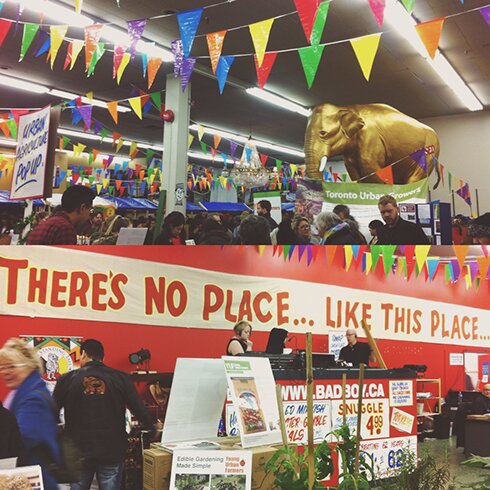
Last week­end was a very full one! We went to a farewell par­ty for icon­ic Hon­est Ed’s, orga­nized by Toron­to for Every­one

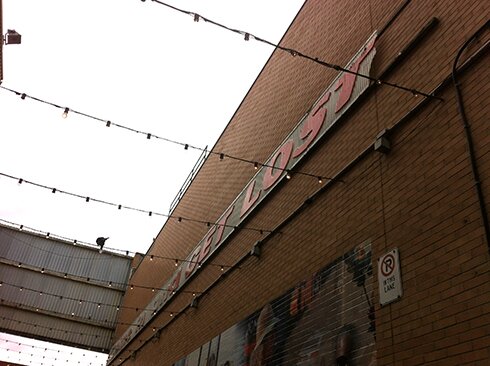
If you’ve ever vis­it­ed Toron­to, you might have been to Hon­est Ed’s. That was where I like to take out-of-town friends to impress them any­way. It is an enor­mous department/bargain store that lit­er­al­ly invites you to get lost in it. Lit­er­al­ly because there is a sign on the build­ing that says:

“COME IN AND GET LOST”

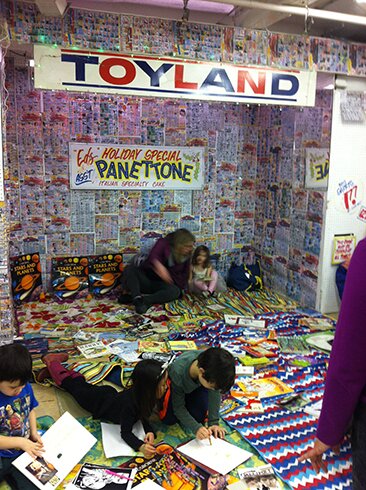
Lost part­ly because there was SO much stuff! And so much real­ly dif­fer­ent stuff, all kind of orga­nized in a maze-like for­ma­tion. If you were there for the first time and look­ing for some­thing spe­cif­ic, you’d prob­a­bly get kind of frus­trat­ed, but then quick­ly dis­tract­ed by the cheesy slo­gans hand let­tered in cheer­ful colours everywhere. 

But if you were like me, who lived right across the street from Ed’s for a while and then con­tin­ued to shop or meet peo­ple in the neigh­bour­hood, you’d know exact­ly where to get the 99 cents loaf of bread and tinned fish for lunch, or ban­dan­nas for a sewing exper­i­ment (and this!), or those 2 dol­lar waf­fle shirts for days that turned cold sud­den­ly, or large quan­ti­ty of t‑shirts for sum­mer camp, or socks, or just to get anoth­er pic­ture of that giant plush moose head on top of a grand­fa­ther clock with its eyes pop­ping out, or to kill time, or escape from real­i­ty for a cou­ple of hours in the evening. 

Hon­est Ed’s was named after it’s own­er Ed Mirvish and opened in 1948. As not­ed on Toron­to for Every­one:

“Beyond his bar­gain prices and pun­ny ways, Ed was known for his abil­i­ty to bring peo­ple togeth­er and build com­mu­ni­ty in wacky ways: roller der­bies, 72-hour dance marathons, free turkey give­aways, to name a few. Per­haps most impor­tant of all, Hon­est Ed’s was a mod­el for inclu­siv­i­ty. Every­one, no mat­ter how you looked, what you did, or how much you made — was wel­come at Ed’s. Whether you made a pur­chase or sim­ply enjoyed walk­ing around and brows­ing every­thing from kitchen­wares, cloth­ing, toys, fab­rics, to knick-knacks (SO MANY knick-knacks!), Ed’s had a way of instill­ing won­der and mak­ing you feel at home.”

And from the Jane’s Walk that we par­tic­i­pat­ed in (more on that lat­er), we also learned that he offered very afford­able rental spaces — and they remained afford­able despite the rapid increas­es in rental costs every­where else in the city — to artists and arti­sans in the sur­round­ing Mirvish Village.

There was no place like this place. 

And so a group of good peo­ple brought more good peo­ple togeth­er and orga­nized one last very vibrant mar­ket­place in hon­our of Hon­est Ed’s. 

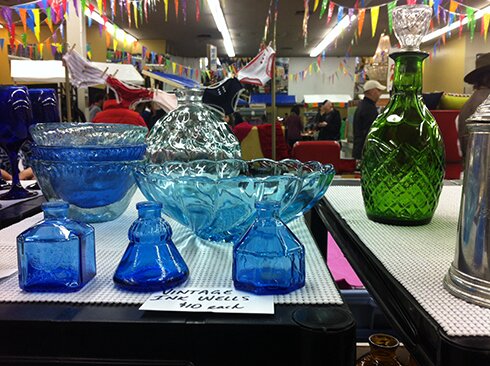
The jux­ta­po­si­tion of vin­tage glass­ware and under­pants very much cap­tured the spir­it of what this place was.

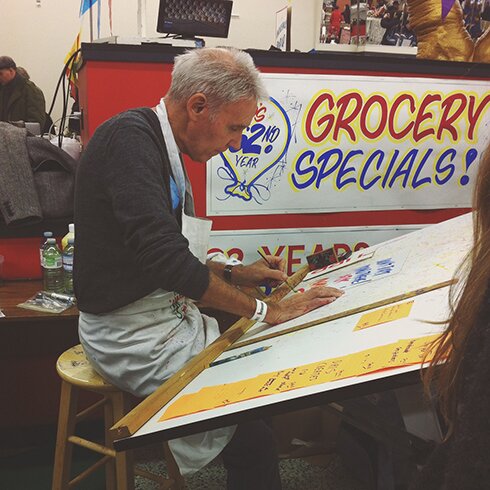
The artist who hand let­tered all the signs for the store over the past years was there paint­ing cus­tom signs for visitors. 

In 2014 when the news first came out that Hon­est Ed’s will be clos­ing, there was a sale for all the hand let­tered signs used in the stores. So my friend and I went there and lined up for over 5 hours and each got our­selves a few signs. One sits in front of my desk at home, it says “hol­i­day coat­ed marsh­mal­low bis­cuits * 99 cents”. Very spe­cial because it’s got stars on it and they don’t make pen­nies anymore! 

In a dif­fer­ent part of the build­ing there was a com­mu­ni­ty hub, where one could sprawl out and read all the Sun­day flyers…

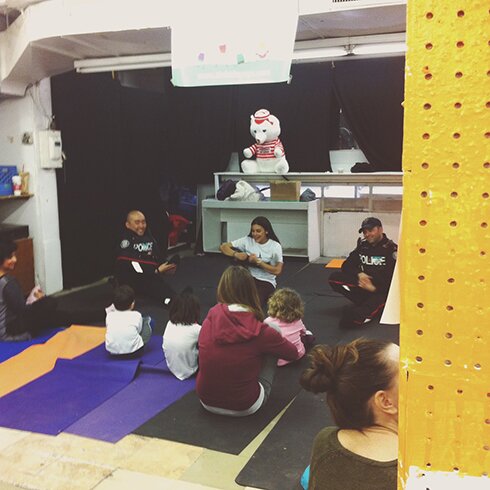
… and very smi­ley police­men do yoga with the kids.

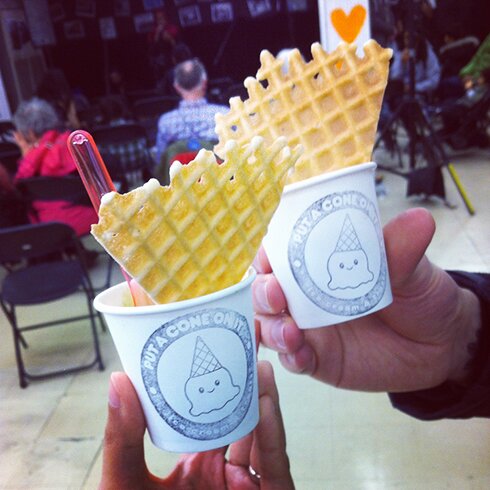
Mike and I were most look­ing for­ward to the retro ice cream social. (and you can see there is a set­up for music or spo­ken word per­for­mance in the back)

And intu­itive paint­ing! :D

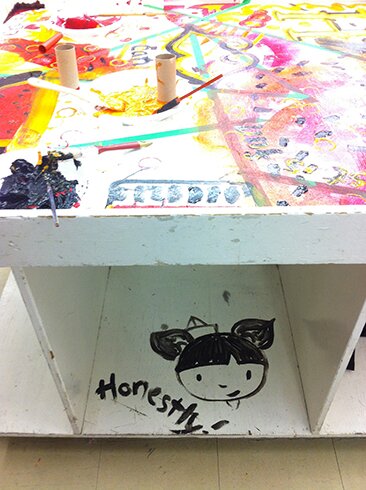
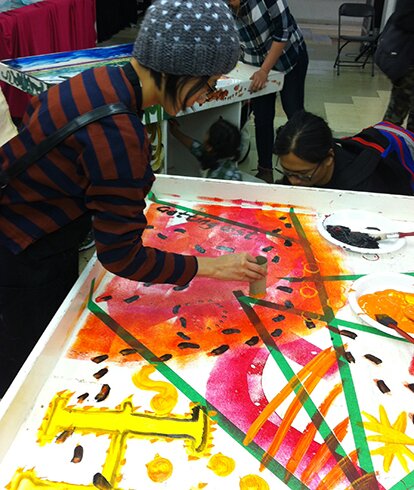
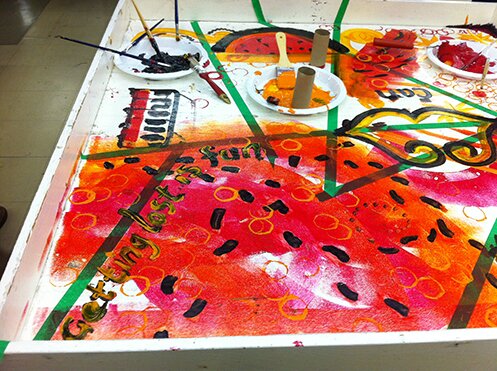
Peo­ple were invit­ed to paint on mer­chan­dise tables. The theme of our table was Hon­est Ed’s.

This was our work! The black dash­es were meant to be foot steps but it’s all get­ting a bit lost there… that was the point I guess :) And Mike paint­ed the streetcar. 

This was under our work by some­one else very talented.

Then we par­tic­i­pat­ed in the Jane’s Walk in Mirvish Vil­lage, where a num­ber of pre­vi­ous ten­ants spoke about the changes they expe­ri­enced after the city block was bought out. At the end peo­ple who went on the walk also shared their sto­ries of Hon­est Ed’s and Ed Mirvish. There were def­i­nite­ly expres­sions of sad­ness about see­ing such impor­tant part of the city go, but there was no anger, or bit­ter­ness, just the acknowl­edge­ment that every­thing good will inevitably come to an end, and there is hope that what is com­ing will car­ry on the lega­cy of embrac­ing diver­si­ty and inclu­sive­ness, and the space will con­tin­ue to bring peo­ple together.

In fact, you can see the vision for the new Mirvish Vil­lage here.

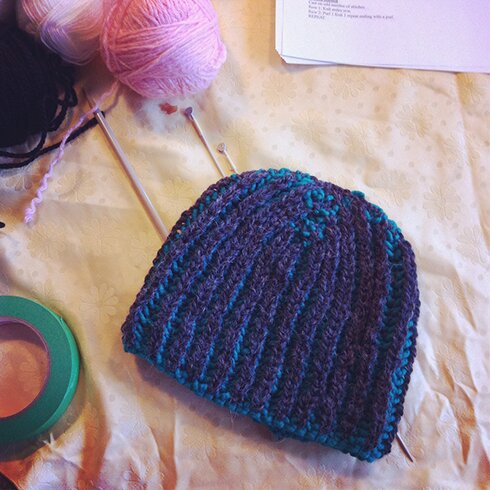
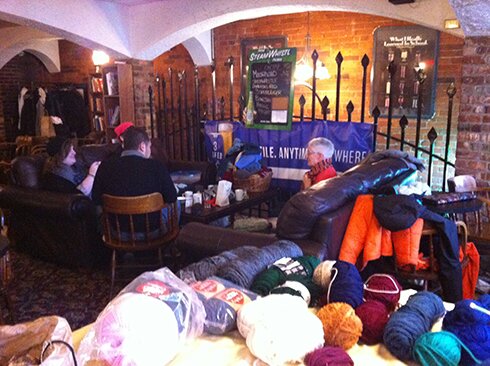
After say­ing good­bye to Hon­est Ed’s, the next day we went to the Warm­ing Toron­to knit­ting day. Here’s the hat I fin­ished :D

It’s a two-colour fish­er­man’s rib hat that was knit­ted flat and seamed togeth­er. I learned the 2‑colour rib pat­tern from this Craft­ster post. The decreas­es are not very neat at all, I’ll learn how to do prop­er decreas­es with this kind of pat­tern next time.

It was a very relax­ing after­noon of knit­ting and hang­ing out with peo­ple who knit :D If you live in the city, the project is still col­lect­ing hats and scarves till March 26! The orga­niz­er can arrange for pick­ups along the sub­way lines. Check out the Face­book event page for details.

Have a love­ly week, every­one! :D