Welcome to genuine mudpie’s new home! :D
If you haven’t already, please update your bookmark to www.genuinemudpie.ca.
If you have previously subscribed to genuine mudpie on WordPress (thank you so much for your support!), please re-subscribe by entering your email address on the right side bar.
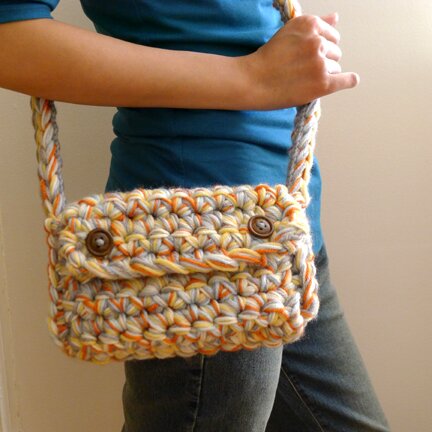
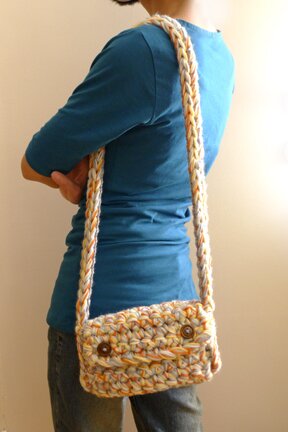
I decided to begin this new chapter of the blog with a celebratory project to share :D The idea of a plush clutch came from a comment that a visitor, Jenna, made on the comical neckwarmer pattern, which involves a 16mm hook and crocheting with multiple strands of yarn held together. She suggested that the same hook/yarn combination would look cute for a purse too! I thought it was a brilliant idea — I could totally picture a fun, plushy purse bursting with colours. So I did some testing, and the plush clutch was born! Thank you, Jenna! :D
It isn’t technically a clutch, because it has a strap. Clutches are for clutching and therefore don’t have shoulder straps. But I’m calling it such because it kind of rhymes… or at least it kind of has a ring to it…Â Um. Anyway. It’s real plushy though!
The construction is pretty simple, just one rectangle and one really long rectangle (aka a strap) put together.
It measures 9″ wide, 5″ tall, and 3″ deep, with a 47″ strap.
So, without further ado, here’s how it’s made.
Yarn: I used 6 strands of worsted weight yarn held together. If you’d like to substitute yarn of other weights, I’d suggest doing a swatch with sc rows to see if the stitches are too loose, and add strands if they are. Because it’s a purse the fabric needs to be on the stiff side to hold its shape.
Hook: 16mm
Other stuff: fabric for lining, sewing needle, two 1″ — 1.5″ buttons.
Note: To avoid extra, unneeded bulk I did not do a turning ch in the beginning of each row. Instead I just pull the loop on the hook slightly higher and sc directly into the first stitch of each row.
Bag
Row 1: ch 11, sc in second ch from hook, sc in each ch across. (10 sc)
Row 2: turn, pull loop on hook slightly higher, sc in first sc, sc in each sc across. (10 sc)
Row 3 — 24: repeat row 2.
Fasten off. When fastening off, I found that it’s helpful to leave a 4–5″ tail for weaving in. If tail is too short it can easily come out, because the stitches are so large.
Strap
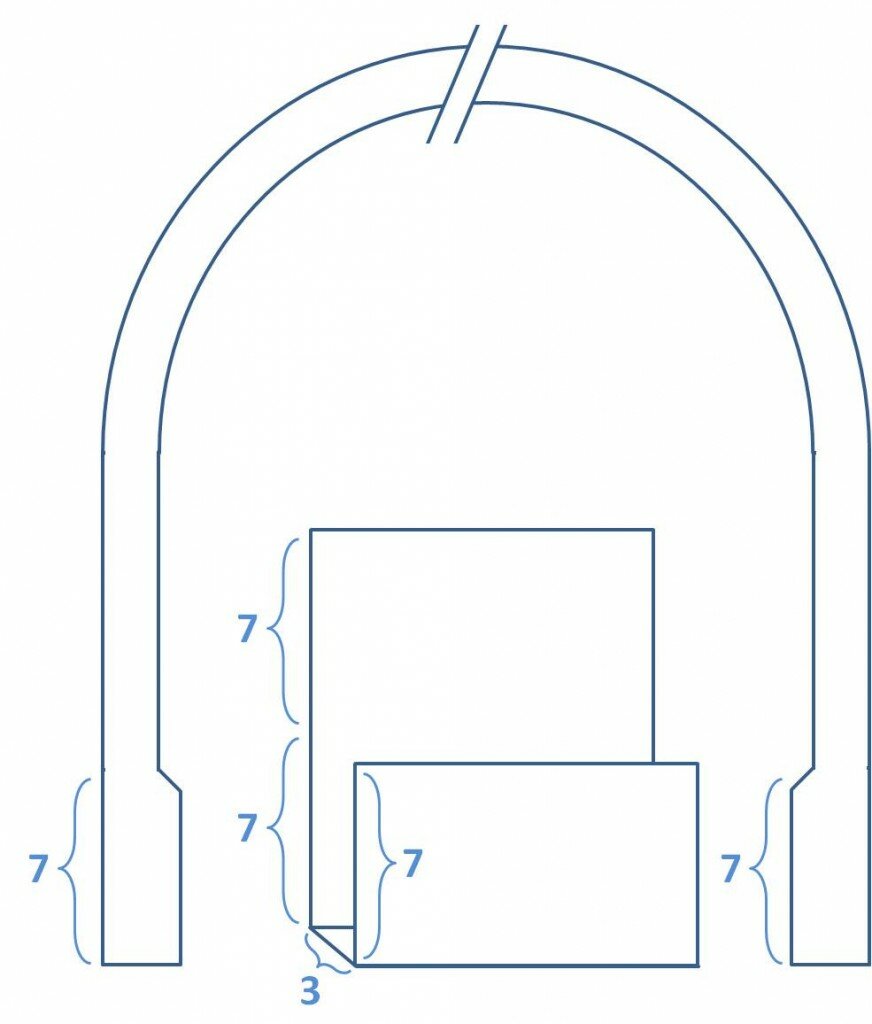
I measured the strap of another purse (47″, that’s the length of the strap plus the sides of the bag — see diagram below) and made the beginning ch 4″ shorter (43″), because the stitches will stretch quite a bit after the sc row. You can adjust the length of the strap and the number of stitches in the beginning ch accordingly.
Row 1: ch 72, sc in second ch from hook, sc in each ch across.
Row 2: turn, pull loop on hook slightly higher, sc in each of next 6 sc, sl st in next sc, fasten off, weave in ends.
Join yarn at the top of first sc of row 1, ch 1, sc in first sc, sc in each of next 5 sc, sl st. in next sc, fasten off, weave in ends.
Putting it all together…
This diagram shows how the strap and bag piece are attached and the row counts of the front, the bottom, the back, and the flap.
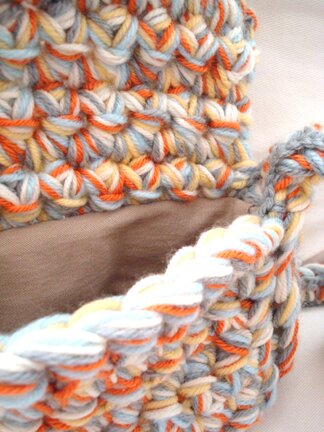
Row 2 of the strap is attached to the front of the bag on each side. Seam with wrong sides facing out, and turn the bag inside out when finished.
I crocheted the seams together using sc’s with 1 strand of yarn and a 5mm hook, and I decided to do 2 rows of sc on the back of the strap to minimize stretching.
I did the seaming and the crocheting on the strap in one continuous round: starting from the top corner of right front, around to the bottom right, up 7 rows of the back, then crocheted across the strap until I got to the back of the other side of the back, 7 rows away from the bottom. Then I started seaming again, down the back, around the bottom, up the left front, then at the top edge of left front I crocheted across the strap the other way until I reached the top of right front, where I started.
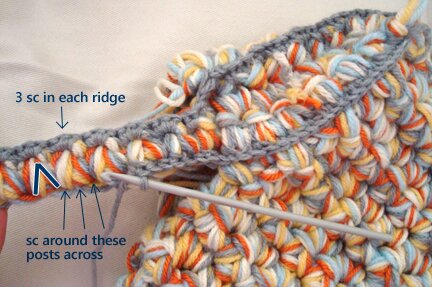
Here’s how I crocheted the 2 rows of sc across the strap.
On the back of the strap there are “ridges” near one edge and upside-down‑V shapes across. I did 3 sc’s in each “ridge” down one way, and then when I came around the strap the second time I did 1 sc around one leg of the upside-down‑V, 1 sc around the strands of yarn between the legs of the upside-down‑V, and 1 sc around the other leg of the upside-down‑V.
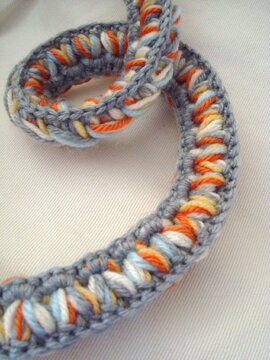
So, after it’s all said and done the back of the strap looked like this:
OK, I understand that all these can be a bit confusing… I wish I could demonstrate this to you in person, but I can’t. And I know that I’m not terribly good at explaining things sometimes. So while I want to let you know what I did, I’d encourage you to put the pieces together in ways that work best for you. Here are some suggestions:
- sc along the strap before attaching to bag, then sew strap to bag with yarn and needle.
- Line the strap with fabric, then sew strap to bag with yarn and needle.
Either way, I would highly recommend doing something to stabilize the stitches of the strap. I once crocheted a purse and didn’t line the strap and it got stretched to nearly twice the length after being used for just a month :S
Alright! Now that it’s all put together, it’s time to line the bag itself. Here are some awesome tutorials on how to make a bag lining, and to sew lining to bag on Futuregirl’s Blog. I made the lining from a pant leg of some old khakis.
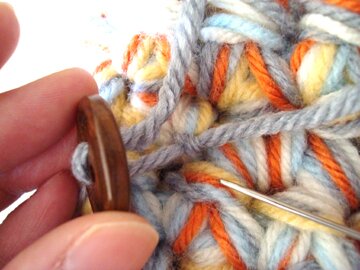
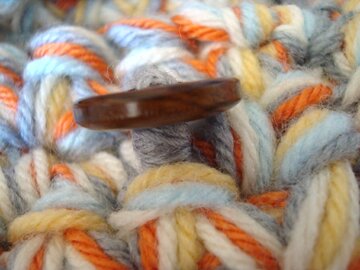
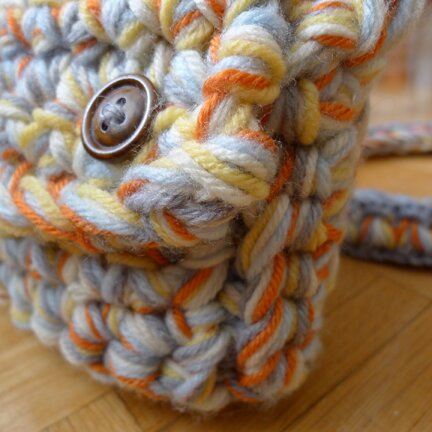
Then I sewed on some buttons. No need for button holes, the gaps between stitches would do. Note that I attached the yarn on the front of the bag, so that I don’t have to sew through the lining, and if the buttons ever fall off and I have to do some repairing I can easily untie the yarn. I hid the tails by hooking it behind the stitches.
To accommodate the thickness of the fabric I used the method that I mentioned in the wrist cuff / cup sleeve pattern to sew on the buttons.
AAAAND we’re done! :D
I love the soft spring colours in it :D But I imagine it would create a nice tweed look with some brown and gray yarn. Or similar shades of one colour would be lovely too! Might also be great with t‑shirt yarn, or plarn! I hope you enjoy the pattern; if you have any question or comment please feel free to drop me a note! :)
Thank you for visiting me at my new place! I will be back with another celebratory plush pattern later this week! Until then, take care and happy crafting! :D
trish you’re simply awesome!!!! =)
i love your new site (and the old site!!)
xo
kityan
Happy blogday! I will be trying this pattern soon. Love it!
thank you! :D
thanks kitty! you’re the awesomest! :D
Do you have any idea how much yarn I will need? Will it take an entire skein of each color? I was thinking of making it with my scrap yarn, but need to know approx how much I will need to form 6 balls. Any idea? Believe me, I have a lot of left over yarns of all types and colors. I can’t wait to start this project. I have been looking for something like this for a long time. Thank You!!!
Thank you for visiting, Tina! :D I should have mentioned how much yarn is needed! Definitely less than half a skein of each colour, and each skein I used was about 100g. Hope that helps! Let me know how it goes!
Trish
This is really great — I love it! Can’t wait to make one for myself :-)
Glad you like it! Thanks for stopping by, Melissa! :D
This clutch purse thingy is too cute lol!
Do you remember which brand of yard you used? I would like to use the same colors too.
TFS this free pattern!
Thank you! Glad you like the pattern. Unfortunately some of the yarn I use don’t have labels on them, they were half-skeins that people have given to me, so I don’t know what brand they are. I think the orange was Bernat Satin… and the rest are just some random acrylic. But they are all worsted weight. So any combination of worsted weight yarn would work.
Instructions are easy to follow. I would like to recommend that you do not use that nice, comfy, or soft expensive yarn. The stiff and sturdy kind are the way to go. Also, lining the bag with a liner will be difficult depending on how much experience you have in sewing. I had to hand-sew my liner in because the yarn made it so bulky. However, it came out great regardless and I am thrilled with the way it turned out. More information is available on the tumblr.
Loved making it and I’m sure my friend will love it as well :D Thanks for sharing!
thank you for sharing tips sarah! glad you like the pattern :D
What kind of stich did you use? Are there any video tutorials that you recommend?
it’s mainly made of single crochet stitches. i like the lion brand yarn crochet tutorials (you can find the link to it on my “tutorials” page. happy crafting!
Hi! My friend ordered one of these purses (it is super cute!) and I am working on my own purse now, but I really liked the lining inside the purse and I was wondering where did you get the supplies, how did you get it in, and how did you get the buttons on it? Thanks!!!
thank you, Hailey! for the lining i just use scarp fabric from my pile of scraps :D but if you’re buying fabric, a quarter yard of cotton will be more than enough (craft stores often sell quarter yard of fabric as “fat quarters” for quilting — i’ve even seen them at walmart). in my tutorial i linked to Futuregirl’s instruction for lining a crocheted purse. her instructions are very detailed and excellent, and i pretty much followed it :D for the button, attach the sewing yarn on the outside of the bag on the spot where the button will be, sew on the button (i’ve linked to instructions on how to sew on a button with a shank in the tutorial), then fasten off and weave in the yarn tails. i hope the photos in the tutorial will help to further clarify things.
but then how does the button keep it closed if its on the outside of the purse?
oh! sorry about the confusion. i meant to attach the sewing yarn on the outside of the body of the purse, not on the flap of the purse. hope that makes sense…
I love it! Thanks so much for sharing your pattern! I included a link to it on my blog this morning. :) http://www.mooglyblog.com/quick-crochet-with-a-q-hook/
Hi! I really like this pattern and you’ve done such a great job on it. :D I was wondering if there was an easy and not quite visible way to change colors in the middle of the piece, since I’m about to run out of one of my colors (before I buy a new skein). Thanks so much and keep up the great patterns! :)
thanks for trying out the pattern Taryn! i think that happened to me to when i was crocheting with multiple strands of yarn together and one of them ran out. i just tie the new yarn to the end of the piece that’s running out, leaving tails of both pieces that are about 3″, and then weave them in after. hope this helps! happy crocheting!